
MatterControl Touch - Getting Started Guide
MatterControl Touch is the ultimate upgrade for your 3D printer. Learn how to use some of the unique features with this 'Getting Started' guide.
In this guide we'll be going over the ins and outs of using MatterControl Touch to guide your 3D printer. If you have experience using the Desktop version of MatterControl (for Mac, PC and Linux), many of the concepts will be familiar, but some of the specifics may be different. We'll also cover new exclusive features like picture notifications and how to transfer files to your MatterControl Touch.

So, you’re the proud new owner of MatterControl Touch. Well what are you waiting for? Let’s get started!
By now, I’m sure that you have opened your MatterControl Touch box and discovered all the goodies inside, including the:
- MatterControl Touch Tablet
- Power Adapter
- USB Host Cable
- MatterControl Touch Quick Start Guide
If you haven’t already, go ahead and follow the steps in your MatterControl Touch Quick Start Guide. Have you misplaced the guide already? Don’t worry - you can find the steps right here, too:
Initial Setup
- Plug Power Adapter into a wall outlet.
- Plug Power Adapter into MatterControl Touch. After a few seconds, MatterControl Touch will automatically power on.
- Press, hold, and slide the lock icon to the right to open MatterControl Touch.
- Insert USB Host Cable into MatterControl Touch.
- Insert your 3D Printer’s USB Cable into USB Host cable.
- Power on your 3D printer.
- Follow the Setup Wizard to connect your 3D printer to MatterControl Touch.
MatterControl can be launched automatically by connecting a 3D printer, or by selecting
the big icon on the home screen.
Connecting to Printer
- The prompt "Open MatterControl when this USB device is connected?" will appear; select “Use by default for this USB device” then press “OK”.
- Follow the Setup Wizard.
- Select Make/Model.
- Press ‘Connect’.
Congratulations! You have connected MatterControl Touch to your 3D Printer. The next step is printing, so first, we need an object to print. To get a printable file to MatterControl Touch, you have a few options - you can send files wirelessly, download directly from free model databases, or use a micro SD card.
MatterControl Touch is wifi enabled, but not required. If you are connected to the Internet, you can take advantage of Cloud features, like sending files wirelessly, downloading files directly from free model databases, receiving SMS/Email notifications as to when your print is ready, remote print monitoring, and most importantly, you can receive free updates.
MatterControl is a continuously improving platform, and staying up to date with the latest developments is just a simple click away - we’ll get into that in just a bit.
For now, let’s continue on the path to starting a print by getting a file!
Sending files wirelessly is one of the features that makes MatterControl Touch special and easy to use.
- Sign into your desktop MatterControl and MatterControl Touch.
- On MatterControl Touch, navigate to LIBRARY -> Cloud Library.
- On your desktop, in the Queue, select a model and click More... -> Add to Library -> Cloud Library.
- Choose a folder in the Cloud Library to save the file in and click 'Save'.
- On MatterControl Touch, you can now find your file in the Cloud Library section under the LIBRARY tab.
Download Files Directly to MatterControl Touch from multiple free model databases.
- From the MatterControl Touch home screen, click WEB to open a browser window, venture to your favorite free model database, and download a file.
- Go to the QUEUE and press 'Add'.
- Navigate to 'sdcard' -> 'Downloads' to find your file and press 'Open'.
- Your file will now be in the QUEUE ready for you to view and print.
Using an existing 3rd party file storage service like Google Drive (or Dropbox) to transfer files is also an option. To get this setup you'll need to install the app onto the Touch. Example setup for Google Drive:
- Swipe down from the top right of the screen twice, which will bring up a menu. Select 'Settings'.
- Navigate to 'Home' and change from 'MatterControlLauncher' to 'Launcher3'.
- Press the 'Home' icon in the center at the bottom of the screen.
- At the Home Screen (which by default shows a brain background), select the middle button (a circle with squares inside) - this will take you to the apps screen.
- Locate the Google Play Store - sign in and select the Google Drive app.
- Once the Google Drive app is installed it should sync your files over wifi.
- You can add those files to the Queue or Library in MatterControl by choosing 'Add' or 'Import' and browsing to the Drive folder.
Micro SD Cards can be used if Internet access is unavailable.
- On your desktop MatterControl, load a printable file onto a Micro SD Card.
- Place the Micro SD Card into the designated slot on MatterControl Touch.
- Go to the QUEUE and press 'Add'.
- Navigate to 'sdcard' -> 'Downloads', find the file, and press 'Open'.
- Your file will now be in the QUEUE ready for you to view and print.
Great! Now you have several ways to transfer and access files on MatterControl Touch. If you are happy with your print file, here is how to start your print:
Starting a Print
- Navigate to the QUEUE.
- Select the object that you would like to print.
- If you have not already done so, press on the drop down arrow at the top of the screen.
- Press ‘Print’.
Hooray - you have just started your first print using MatterControl Touch!
You can check on your prints with Remote Print Monitoring. Here is how you access this feature:
Remote Print Monitoring is designed to let you keep an eye on your 3D prints from afar using your phone or any web-enabled device. Here is how to benefit from this feature:
- Navigate to 'OPTIONS'.
- Switch Camera Monitoring to 'On'.
- Visit http://sync.mattercontrol.com during a print to view in real time.
MatterControl Touch will notify you when your print is finished. You can also receive a picture of you finished print!
SMS/Email Notifications allow MatterControl Touch to alert you when your print is finished. Here is how you can access this feature:
- Navigate to the 'OPTIONS' tab.
- Press 'Configure' next to 'Notifications Settings'.
- Select how you would like to be notified.
Onboard Camera - You probably noticed the option to “Include a picture of my finished print” in “Notification Settings”. MatterControl Touch is equipped with a camera that can send you a picture of your print, and also keep you updated on how your print is going is going with the Remote Print Monitoring application mentioned above.
You can view your print with the on-board camera by pressing 'OPTIONS' and selecting 'Preview' next to the Camera icon.
With MatterControl Touch, you can also utilize Software Print Leveling. To access this, follow these steps:
Software Print Leveling
- Navigate to the 'OPTIONS' tab.
- Press 'Configure' in the 'Software Print Leveling' section.
- Follow the setup wizard.

MatterControl Touch allows you to modify your object before printing, so let’s take a look at all the features MatterControl Touch has to offer!
Next to your object in the QUEUE, you have the option to 'View', or you can press 'PREVIEW' - select either. This allows you to preview and interact with your 3D models prior to printing. You can do some editing to your object while in 'View' mode by pressing 'Edit'. Here, you have the ability to rotate, scale, mirror, and display your objects in different ways.
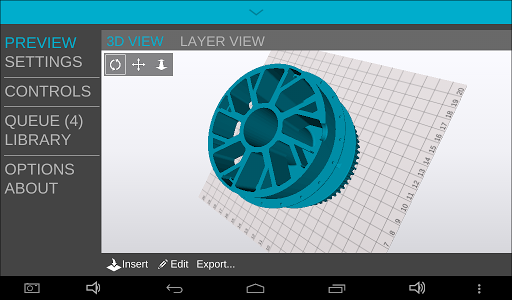
Print Preview
Layer View allows you to see exactly how your print will turn out layer-by-layer. Here is how to access Layer View:
Layer View
- Once you press 'View' or PREVIEW, select 'LAYER VIEW'.
- The Layer View is dependent on your current print settings and is only generated on demand - to create the layer view with your current settings, press 'Generate'.
The Layer Preview allows you to visualize what is happening with a given print based on your current slice settings, which can be useful for troubleshooting or just getting a better understanding of the effect of settings like 'infill' and 'fill pattern'. It also shows you the estimated amount of time a print will take. You can skip to any layer you want with the arrow buttons or by typing your desired layer into the input.
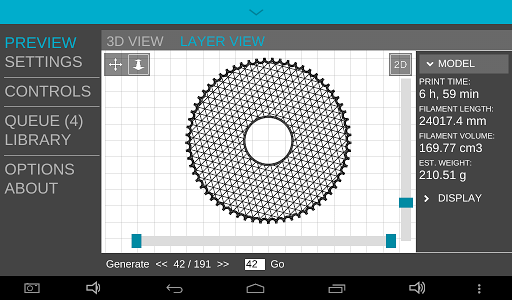
Layer-by-layer View
In the SETTINGS tab, you can further edit your print with a few modifications. Depending on your level of printing experience and the complexity of your print, you can adjust layer height, fill density, and, if needed, skirts, brims, and support material. To fine-tune your print, follow these steps:
Settings
- Press 'SETTINGS'.
- You can select the level of maintenance needed for your print, by pressing 'Basic', 'Standard', or 'Advanced'.
'Basic' is where you can make minor adjustments to your print, like layer height, fill density, and chose to use support material and rafts.
'Standard' is where you can customize layer and perimeters, infill, skirts and brims, and support material with more detail than you would in Simple settings. You can even adjust Filament and Printer specifications.
'Advanced' allows you to control every aspect of your print, including all the above features, plus Repairs, Output Options, Multiple Extruders, and other advanced content.
Now that you are finished viewing and editing your object, you can access certain printer settings and controls. Press 'CONTROLS' - here, you will be able to adjust temperature and axis movement, as well as a few other settings.
Temperature
- Navigate to the 'CONTROLS' tab.
- Press “Temperature”
Here is where you enter Extruder Temperature, and Bed Temperature if needed. Simple press the box and type your desired temperature. To disable heating, press “Off”.
Movement
- Navigate to the 'CONTROLS' tab.
- Press 'Movement'.
This is where you can adjust the axes of your printer. To move your printer manually, select the desired axis (this may differ by printer, but generally z is up and down) and either add or reduce position. You can adjust the movement increment by selecting the amount at the bottom of the movement controls. To “home” your printer on all axes, select the 'All' button to the right of the home icon. To “home” a single axis, select the appropriate button to the right of the home icon.
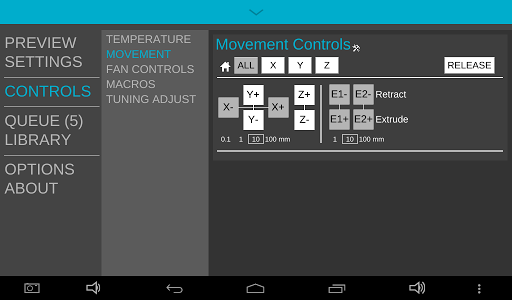
Movement Controls
Is there a certain print that you would like to revisit? Not a problem! You can save all your print files to the LIBRARY where you can easily search for your favorite.
Design Library
- Navigate to the 'LIBRARY' tab.
- Select which section of the Library you want to save a file in and press 'Open'.
- Press 'Add'.
- Find the file you would like to save to your Library.
- Press 'Open'.
Your file will now be available in your Design Library. If you save in the Local Library you can access the file whether you have Internet connection or not. Use the Cloud Library to access files from anywhere!