
The MatterHackers 3D Printing FAQ
All the answers to your Frequently Asked Questions about 3D printing.
We get asked a lot of questions about 3D printing, and rightfully so; it’s a complicated world! After spending countless hours answering phone calls and emails, we realized we should probably have a resource for some basic information, to help those new to the amazing 3D printing universe. So without further ado, welcome to the...

You have some questions, we have some answers.
FAQ Questions:
1. How much stuff can I print with one roll of filament?
2. How long will my print take to finish?
3. Why won’t the plastic extrude properly?
4. I think I may have a jam, what do I do next?
5. How should I store my filament?
1. How much stuff can I print with one roll of filament?
A: In order to answer this, we need to consider a few things. I’m gonna throw out some jargon, but don’t worry, I’ll explain it all in a minute.
• We need to know the dimensions of the object
• We need to know the percentage of infill
• We need to know whether or not the part requires support material
For starters, we know that each roll of filament is 1 kg, or around 2.2 lbs of material. So in order to determine how much we can get out of this, we need a sample part. We’ll begin with something simple, like a chess piece. We’ll use a pawn for this example.
So the first thing that I do when I want to determine the weight of a part, is open up the software MatterControl. (It’s a printer control software available for free on our website.) Then I drag the file for the part I would like to test, and drop it in the main window. From there:
1. I click "Advanced Controls"
2. I click Slice Settings
3. I go to the "infill" menu option
4. I set the value to ".5"
Note that you can set the value anywhere between 0 and 1. Infill is the plastic inside the part that provides internal support. You have the option of making it completely hollow, or making it completely solid. For testing purposes, we’re going to put it at a hefty 50 percent.
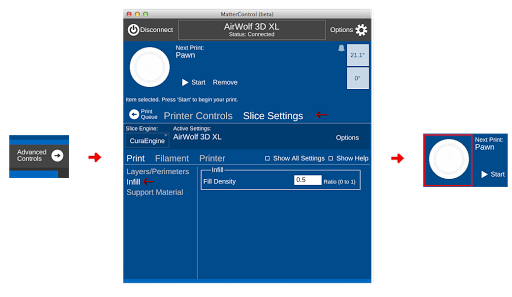
Follow the arrows!
Now:
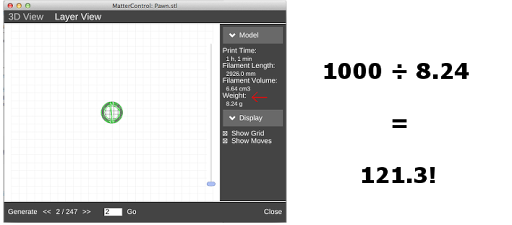
1. Save your changes
2. Click on the preview window for the part you have selected.
3. Switch from 3D view to layer view
4. Press generate.
The window will now slice the part. Once it finishes, it will give you information about how much it weighs, how much plastic will be extruded, and a rough estimate of how long it will take. Once you know the weight of your part, you can determine how much material will be used. Simply divide the total weight of the filament roll, by the weight of the part you wish to create, and you have a close estimate of how many you can make. In the case of this small chess piece, at a 50 percent infill, the number is 121.3.
Wow, that’s a lot of chess pieces!
Aww, nobody told me I had to do math!
If you want to make something bigger of course, the process is exactly the same. That is unless you print something requiring…
SUPPORT MATERIAL
Support material is similar to infill except it used on the outside of an object. Typically it is used when an object has an overhang or bridge. Hot plastic doesn’t suspend itself in the air very well, so on large or complicated parts, it may be wise to enable support material. Support material is a bit of game changer though, because it does require extra filament. Just be sure to take notice of whether or not support material is enabled before you determine the total weight.
2. How long will my print take to finish?
A: I briefly mentioned above how when slicing an object to find out it’s properties, you will also see a time estimate. While this is fairly self explanatory, there are a few layers to this that we should consider. Without slicing the object, you can get a basic sense of how long a print will take by understanding some key slicing options. These are:
1. Layer Height
2. Infill
3. Print Speed
4. Support Material
1. Layer Height is a fairly simple concept. It is exactly the height of each extruded layer. This is the biggest factor when determining the print speed, because amount of layers changes drastically, depending on the input value for your layer height. You can find this in the slice settings once again. It should be noted that you cannot input a layer height that is larger than the size of your nozzle, and still have the layers connect. Generally speaking, a layer height of .2 mm will take half the print time of a print with a layer height of .1 mm. If your nozzle head is .5 mm, you have many options for the quality, and the speed of your print.
2. We already covered the basics of infill, but it’s good to remember: if you increase the infill, the amount of plastic used goes up, and so does the print time.
3. Print Speed is a more in-depth function of our software, and most printers come with default settings that are suited to their use. However, if you really want to get your parts done fast, this is the place to go.
4. Again, we briefly touched on the basics of support material, but depending on the model, it may add a significant amount of plastic to the print.
3. Why won’t the plastic extrude properly?
A: 3D printing is tricky beast, and there are many potential reasons why your extruder is having problems. The first thing to do, is to make sure that you know what material you’re using, and that you have the proper temperature settings.
Each material has an ideal range of temperatures*, so we’ll go over each in turn.
PLA: 190-210°C**
ABS: 220 -240°C
NYLON: 240C-250°C
LAYWOOD: 175-250°C
LAYBRICK: 165-210°C
SOFT PLA/BENDLAY: 220-235°C
GLOW IN THE DARK PLA: 185-205°C
PVA: 170-190°C
*These temperatures are compatible with most printers, but you should always check with either your manufacturer or other 3Ders to make sure your printer follows the same guidelines.
**Note for MakerBot Replicator 2 users: The Replicator seems to run a bit cooler than other printers, so although it may seem that it’s running at the incorrect temperature, know that the default settings are more often than not correct.
If you’re having trouble with any particular filament. I recommend starting at the highest recommended temperature, and with each attempt, scaling your temperature back 5 degrees until you reach the optimal temperature for your environment. It's also important to make sure that your filament is being fed into the extruder properly. If there's too much tension, the filament can get ground out, or worse, break.
If you try a range of temperatures to no avail, and you're sure that your filament is being fed with minimal tension, you may have a jammed extruder.
4. I think I may have a jam, what do I do next?
A: Alright, so you suspect your printer has jammed. Don’t panic! There are many things that can be done. We have a much more in-depth article, that may be able to help you further, available here. It should be noted that jams can be very tricky, so it never hurts to get as much information as possible. However, if you just want a basic rundown, I’ll try to help you out here.
The two most common type of jams are as follows:
• The print nozzle being too close to the bed, therefore not allowing the filament to be released*
• Leaving the heat on while the filament sits unattended for an extended period of time.
*This can sometimes be solved with a simple leveling of the bed. Either with the hardware on the printer or through the automatic bed calibration feature in MatterControl.
There are two very basic techniques to unclogging your hotend.
1. Heat your printer up to a slightly higher than normal temperature, and attempt to push the filament through. For instance, if you have a PLA jam, we recommend heating to 220°C(245°C for ABS). This is much higher than is necessary for normal prints, but not high enough to be dangerous.
2. Heat your printer up to the standard temperature and push the filament part of the way through. Then, allow the filament to cool to about 80°C (135°C for ABS). After it gets to that temperature, slowly retract the filament until the drive block is clear. In the best case scenario, you will pull up anything that the filament bonded with while hot, thereby cleaning the hotend and drive block. I would recommend that you do this once in a while anyway, because buildup in the extruder can occasionally cause jams.
5. How should I store my filament?
A: At this point in your 3D printing career, you may have come to understand that filament is something that needs to be taken care of, to a certain extent. You see, most types of filament absorb moisture from the air, which can make it brittle or degrade. In the case of something like nylon, it can produce bubbles in the print. Let's cover the basics for each type of filament.
PLA/ABS: When we ship these materials, we have them sealed in a bag with a packet of dessicant. When you recieve the package, it's fine to leave them in the bags before you use them. Once you open the package, it is perfectly acceptable to put the filament with dessicant in a large zipper storage bag, or something comparable.
LAYWOOD/LAYBRICK: The packaging for this filament exposes this filament to the open air, so you don't need to worry about anything out of the ordinary. Keeping it somewhere dry should suffice.
SOFT PLA/BENDLAY: Like the previous filament, these materials do not need to be stored any way in particular. Just keeping them from getting directly wet should be more than enough.
NYLON: Nylon on the other hand, is EXTREMELY succeptable to absorbing moisture. Even in a fairly dry envirionment, it can absorb the more than enough to disrupt a print in as little as 24 hours. Fortunately, this filament can also be dried out. For this reason, it is not only necessary to store your filament in a sealed bag with dessicant, but before printing, some customers have found it useful to dry it in the oven at low temperatures (200°F) for an hour or two.
GLOW IN THE DARK PLA: Another filament that need to be kept in a sealed bag. This among the slightly more absorbant filaments, so handle with care.
PVA: When you purchase this filament, it will come in a sealed bag with a dessicant packet, sometimes two. This is a water soluble filament, so keeping it dry is absolutely necessary. If it gets wet, it will very quickly become unusable. I recommend keeping it in the original packaging as long as possible. If you need to put it in a zipper bag, consider doubling down on dessicant.
Typically if you follow these guidelines, you shouldn't have a problem. There are occasional exceptions, as not all environments are the same. It should also be noted that frequent temperature fluctuations seem to increase the chance of making a filament turn brittle.
6. Why won’t my prints stick to the bed?
A: This is dependent on two factors: Printing material, and print conditions.
What we’ll do here is break down each material, and the optimal print conditions for each one. (These are all assuming the bed is properly level, which is VERY important.)
PLA: Blue Painters tape OR a heated bed with Kapton/PET tape at 60Cº (Adhesive optional)
ABS/BENDLAY: A heated bed at 120Cº PLUS some form of adhesive
NYLON: A heated bed at 75Cº With some form of adhesive
TPE: Blue painters tape OR a heated bed with Kapton/PET tape at 70Cº (Adhesive optional)
PLA PLA: Blue painters tape OR a heated bed with Kapton/PET tape at 70Cº (Adhesive optional)
LAYWOOD/LAYBRICK: Blue painters tape
As a quick aside, here are the most commonly used adhesives for 3D printing:
• Aqua Net Hairspray (Extra Hold)
• Glue Stick
• ABS Slurry
The ABS slurry only works with ABS, however, the other adhesives are compatible with all types of filament.
My question isn’t answered here, where do I go next?
A: If your question isn’t answered here, you may have something slightly more advanced going on. I recommend taking a look at our support section. We have many in-depth articles, regarding software, hardware, and everything in between. If you still can’t find a solution, feel free to send us an email, or give us a call! We’re open from 9:30am - 7pm Mon-Fri and from 10am - 4pm (PST) on Saturday, and we’ll do everything in our power to assist you where we can.
Thanks for reading this FAQ!
- The MatterHackers Crew