
3D Printed Animatronic Dragons
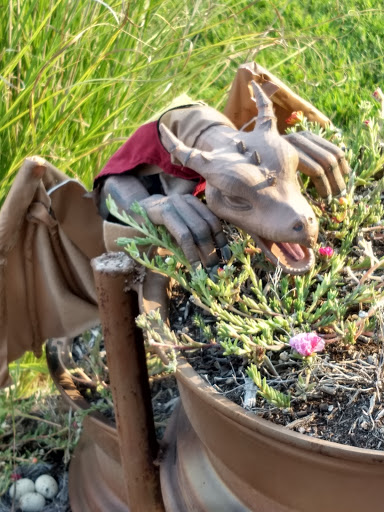
Rusty Atkeisson, our August Hacker of the Month, takes us inside the imaginative process behind his 3D printed animatronic dragons.

Building dragons may be one of those situations where you are training yourself as much as your creature. In the course of breathing life into Vogal, Zeichen Zwei, Saphira, and the other dragons, I have learned innumerable skills and tricks from beyond the classroom and even beyond the almost endless reaches of YouTube and Google. I still have a long road a head of me in creating even more lifelike creatures but here's a bit of a break down of what I've gone through, lessons I've learned, and useful tips to help the aspiring puppeteer along the way. Although, puppeteer doesn't sound quite right in this light; maybe we had best call ourselves a sorcerer's apprentice.
All right, so let's crack open this grimoire of knowledge! Except, there's a small problem; this book appears blank. At the start, all of the ideas were still in my head, and there wasn't really a magic 'how to' book on creating animatronics with a 3d printer and an Arduino. Before I dug into the Arduino and electronics, I started filling my book with sketches. Unfortunately, my drawing skills are not as artistic as Rembrandt, but from the sketches the proportions of the dragon could be locked down to get the general look. Then there were all the doodles, trying to figure out what all the motions this little guy would have, while trying the answer the question “What does it take to make a lifelike dragon?” The answer was copious amounts of time and patience. The mathematics for every movement weren't locked down at this point, but start and finish positions of each life-inducing movement became clear after all of the sketches. At least now we have a few pages filled in this grimoire.
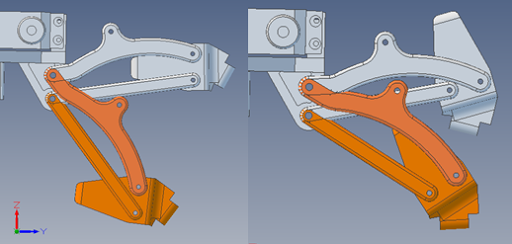
Now we have some pretty pictures in our book, but if this pet was made right now, all it would do is flop about in a not very lifelike manner. This is where that evil math sorcerer starts to sneak in. The head movements and the wings all move with the aide of 4-bar mechanisms, which are like the linkages used to raise and lower the bucket on a skid steer. One of the links is attached to the stationary 'ground' object (in this case the torso of the dragon), another link to the 'output' (like the head), and then the two other links connect the ground link to the output link. If our connector links are parallel to each other and of the same length, then the output link follows an arc and stays at the same angle to the ground link. This is a neat concept, but in practice looks mechanical and lifeless. To add a bit more flare and emotion, one of the connectors is shortened, causing the output link to rotate as it lifts or lowers. That little bit of geometry is enough to make the head emote at least two feelings: when lowered, our dragon seems to be sulking or tired, when raised, our dragon seems mischievous or cocky. Now this dragon is showing a bit of attitude!
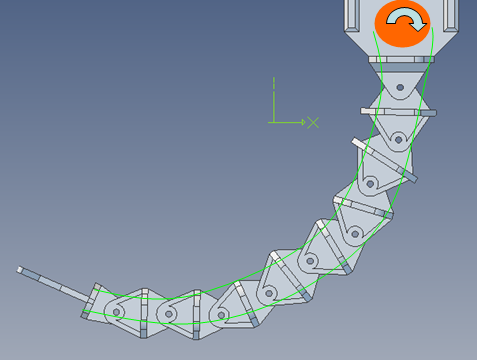
Of course, 4-bar links only cover so many different motions. There is also what is known as a tentacle mechanism (or snake mechanism, or elephant trunk mechanism as some people prefer). This system consists of a series of chain-like vertebrae where one end has a pair of strings connected that feed through the sides of all the other vertebras and out to some kind of pulling device. If both strings run straight up either side of the 'spine' of the chain, we can force the mechanism to curl to one side or the other. If those strings cross and switch sides somewhere in the middle, then the tentacle will curl up in an S shape. Keeping the strings straight was enough to make the tail seem life-like for the first dragon, Vogal. However, if the dragon had a longer tail, the strings could be crossed to give the dragon a spicy attitude. There are ways to have the tail move in more than two directions, but simply swishing left and right was enough to give Vogal a fun but relaxed attitude.
Making a dragon seem intelligent surprisingly didn't take a very advanced controller. As fitting as it would seem to take a high end multi-core snap dragon processor out of a cellphone, all it really takes is a 16Mhz Arduino microcontroller to give this scarecrow a brain. Vogal was my first stab at making a stand alone control system. His brain started as an Arduino Uno with all the connections to the servos and remote (made with the joysticks off a Sony PSP) soldered to a perforated circuit board. As small as the Arduino Uno is, the form factor proved to be a bit bulky, especially when a set of AAs running the Uno and a 3 cell LiPo battery pack running the servos were squished into his small body.
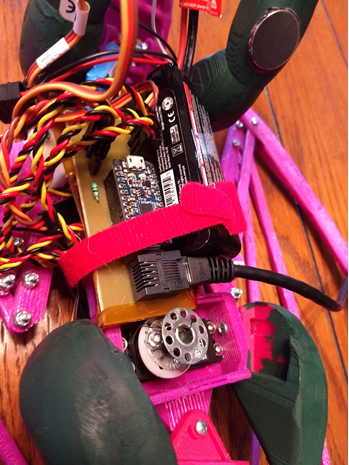
The original programming did not help the bulky feel either. Using the MAP command in the Arduino program editor to relate the input signals directly to the output signals gave the dragon the movement range needed, but since the input signal tended to float, the movements were jerky and sporadic. Thankfully, after meeting some amazing people at the local makerspace, MakeICT, we were able to improve the signals by putting the input signals into an array and use the average from the array to be the input value for the MAP command. Now Vogal's movements were smooth and lifelike, but I still felt like something better could be done wuth the bulky batteries and Arduino. Again, the guys at the makerspace came to the rescue with a quick tip: the Vin pin on the Arduino could tolerate the same voltages as the servos, removing the need for the AA batteries. To make more room, the wallet sized Uno was replaced with a thumb drive sized Trinket Pro and a circuit board milled out of a copper clad board at MakeICT. Not surprisingly, the new setup was a lot more reliable, and felt more like production quality, especially after replacing the homemade cable to the remote with a Cat5e cable and connectors.
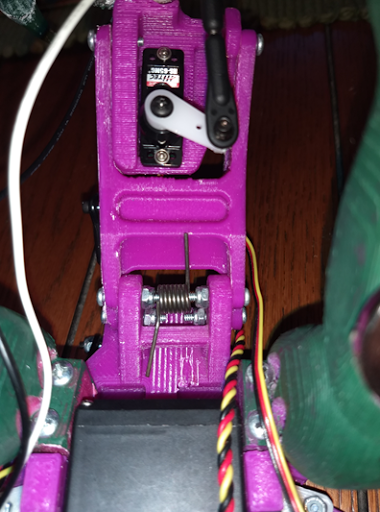
At this point in the story, our dragons have skeletons, tendons, and brains but they're missing muscle. In my haste, I figured “Oh this is easy, just slap in some servos off an old r/c car and be done with this mess.” To my chagrin, I discovered not all servos were created equal. Skipping ahead to give you context, the first dragon Vogal was all shined up and charged for his first renaissance faire, but sadly in his first encounter with a youngling halfway through faire he lost. The plastic gears in the basic servos used stripped and left Vogal as a one-winged dragon for the rest of faire. Thankfully, the local hobby shops were able to teach me a fair bit about servos and helped me find a budget friendly metal gear servo that would stall before failure. The next faire saw other encounters with younglings, but this time Vogal took the abuse in stride. A few events later, and a long run time on display during an art show, found that one of the other servos wasn't quite up to the task on its own. Vogal's head was just too big for his own good! Two hours of continuous use at the art show and that budget friendly servo released its smoky gray death flag! This time, instead of investing in an even more powerful and high priced servo, the servo was given some aide in the form of an almost too itty-bitty torsion spring from a local surplus store. The spring is strong enough to take the weight off of the servo, but not quite strong enough to lift Vogal's prideful head on its own.
There were other ways that Vogal could have flexed his muscle as well. His tail is driven by a servo which moved the tail a little, but not as dramatically as I would have liked. A couple of dragons later, the basic servo was replaced by a continuously spinning servo. The new servo worked well, but finding the dead zone (the area where the servo would not move) proved to be troublesome and thus would often activate while trying to control one of the other functions. On the latest version of the dragon, that servo has been replaced by a high torque metal gear micro DC motor. Surprisingly, the DC motors are smaller, just as powerful, and a significantly more budget friendly than the servo was. Although the DC motor now takes up 2 I/O pins instead of 1 like a servo, the advantage is that the DC motor does not require a PWM signal to run, so the DC motor frees up PWM enabled pins for other fun tasks. Some of the other actions in development for the next flight of dragons also make use of micro solenoids. Actions where you only care about being at one extent or the other can easily be handled by a solenoid, such as the movement of the mouth, or making eyelids that blink. Thankfully, micro solenoids are about as budget friendly as the micro DC motors and again, do not take up a PWM enabled pin on an Arduino.
These days, Vogal is a happy little dragon dancing around on my shoulder, but there have been a few snags along the way! The perky, charismatic dragon would fall back to sleep after only being out for around an hour. It turns out the thick 11.1v 1300mAh (milliAmp hour) 3 cell LiPo battery and regulator were not very well matched for running the dragons. After again taking a lesson from a local hobby shop, I picked up an inline Current Micro Sensor. The little device measured a lot of useful data generally meant to be recorded while flying an RC airplane. It is able to detect the maximum current draw and average current draw during a certain time span. From the sensor, I was able to discover that each of Vogal's 4 big servos were sucking down about .4amps of power under full load, but during actual use the entire system averaged a current draw of about .25amps. With this information, the hobby shop was able to help me find a 7.2v 2200mAh 2 cell LiPo battery and regulator combination that is not only about the same size as the old battery, but gave me an 8hr run time on one charge!
The science and math behind making everything move is now present, but there is also an overpowering artistic side that (quite literally) covers all of that calculator clacking and pencil pushing. Turning those crude sketches into nice 3d models surprisingly followed the same process as a sculptor would trying to make a clay creature. Those crude sketches all had very valuable information in them: the scaled dimensions for each segment of the arms, the legs, the wings, and everything to make the armature of the dragon. The sketches were all on standard 8 1/2 by 11 pieces of note paper, but by knowing the size of all the servos and electronics, the dimensions from the sketches could be scaled up to accommodate everything that would end up going inside the dragons. Again like a sculptor, the next step blocked out and created a rough solid around the armature. At first, all of this clay work was being done in one of my favorite CAD programs, Alibre. Thruthfully, Alibre is a program really made for mechanical design and is not best suited for biological things, so to really give the limbs a more lifelike appearance, the parts were sent over to a different software program, Blender. There I was able to adjust curves and radii to look less mechanical and even play with the textures a bit to give a more reptilian feel to the surfaces. Although challenging the first time, the lessons learned from modeling an arm four or five different ways made it possible to move through the rest of the parts really quickly, and definitely helped give them a more lifelike appearance.
Skinning a dragon is not quite as easy as skinning a cat. There are several ways I have tried, and still several more I want to try, but weight, flexibility, and stretch seem to be the most important factors in choosing a skin. Vogal's first hide would have been leather but after a quick test at the leather store, even the lightest leather they had proved to be more weight than the servos could handle. So his first skin ended up being felt fabric. The felt worked for a guy with no sewing experience and moderate skills with E6000 fabric glue. After searching for some time, I lucked upon a bit of reptile print vinyl fabric with a cotton backing. Unfortunately this fabric was too fragile to withstand my sewing skills, so again the skin was glued together. The glue held up for several shows, but as Vogal has more outings, the glued continues to give way and the fabric has begun to tear. Thus the search continues on for the perfect light weight fabric, or even possibly a technique for casting a latex skin. In the meantime, for the other dragons, my skills have improved enough that their skins have been sewn from a double stretch water resistant Lycra fabric (the same material used in swim suits). The lycra fabric stretches and moves well with the wings, but unfortunately does not have that reptilian look and feel. This is one of those areas still being improved on Vogal, but there is hope that one day he will live in that uncanny space where is difficult to distinguish between handmade and a real living thing.
The more Vogal made it out and about the more fun we had and the more attention we received. Unfortunately, that also meant the more repair work that needed to be done. Although the dragon squared off fairly well with the younglings, there were times that nature and his klutz trainer had the better of him. However, each time Vogal lost, we found a way to make him better. Being over six feet tall myself, one of the most common things he's run into is the nefarious low hanging tree branch, especially in a renaissance faire atmosphere. How the parts failed determined how the parts were redesigned. The redesigns didn't always mean simply thickening up the parts. Sometimes the redesign involved adding more material around the fasteners or making an entire part wider to handle a torsion load that caused the original part to delaminate. Other times, the redesign was as simple as reorienting how the part was printed, for example with long finger like details. Originally, Vogal's claws were printed with the claws pointing downward, but after an incident where a talon broke off completely, a far better part was created simply by rotating the print so that the claws printed sideways. The prints were a bit more difficult to remove the support structure this way, and did not look as finely detailed, but after testing the new claw by pounding the talons with a hammer, I could rest assured that the talons would not break off again.
As more dragons have been forged, through all the efforts, they've each somehow whispered their names. Vogal the brave hearted, Saphira of the waters, Rote Erde from the fields, and Zeichen Zwei from the quarries. As soon as I knew their names, there seemed to form this intangible bond, and all of a sudden these lumps of plastic became mischievous dragons who had a previous lives hiding in nature away from man's eye. Although the backstory seems like an irrelevant addition, it tends to be one of the biggest questions I am asked about Vogal: "How did I meet him?" At first, I would tell people that he was 3d printed, but then it dawned on me that they were asking about the fantasy behind how Vogal came to reside on my shoulder. I have had plenty of chances to craft his story and now the fable of Vogal snatching an arrow from flight captivates both the younglings and busy adults.
Although it seems like this grimoire are filling up quickly, there are still many more blank pages yet to be filled. As technology advances, shrinks, and becomes more affordable, there may be even more ways to make a dragon seem more lifelike. Still, as technology stands today, there is an amazing potential out there for the next young Jim Henson to get his or her start. Amazingly, technology does not seem to be the limiting factor so much as someone's imagination. The first attempt may be clunky, however, as we keep trying, the designs become more awe inspiring. The result might not always be solely one person's idea, but the culmination of the many great minds around them. As we close this grimoire for the day, may these tales open your mind to what is possible.
Want to be our next Hacker of the Month? Email rhonda.grandy@matterhackers.com, and tell us about your 3D printed creation - you could be featured in our next newsletter. Hacker of the Month wins 3 free spools of PRO Series PLA or ABS filament to further their pursuit of 3D printing greatness.