
Slice Settings Explained- Part 1
This is part one of a series that will explain all the various slice settings found in MatterControl so you can unleash the full potential of your 3D printer and get exactly the results you’re looking for.
All the various slice settings can seem a bit overwhelming when you first start 3D printing. Perimeters, wall thickness, infill patterns, support material spacing… all important and useful but not necessarily intuitive when first starting out. This is part 1 of a series that will explain all the various slice settings found in MatterControl so you can unleash the full potential of your 3D printer and get exactly the results you’re looking for.
The Basics
Once you have a printer setup you can adjust the “Basic” settings directly from the print menu. There are 3 settings/options that you can see in the print menu – Layer Thickness, Fill Density and Create Raft.

Print Menu Settings
The two most important slice settings are Layer Thickness and Fill Density. These settings will essentially determine what your print will look like and how dense it will be. They also are the biggest factors in the amount of time needed to print your parts.
Layer Thickness
The Layer Thickness is exactly that – the thickness of each individual layer of plastic that will be printed. Most FFF style 3D printers offer layer thicknesses between .1mm - .4mm. If you don’t know what height you should print at? This picture shows the difference between various layer heights:
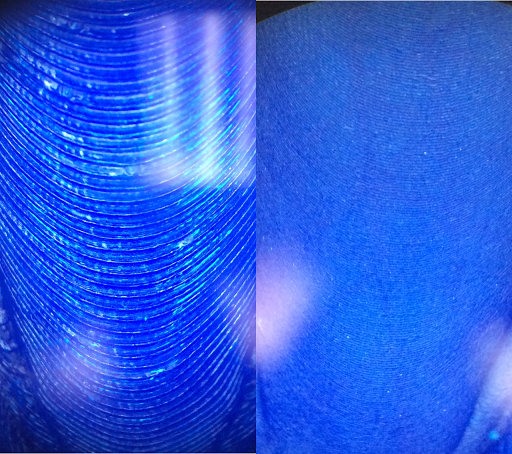
.35mm vs .1mm
It’s difficult to see layer lines at .1mm whereas the layer lines are plainly visible at .35mm. With these frogs, the .35mm frog took approximately 40 minutes to print. The .1mm frog took 3.5 hours. The first thing you need to decide is what surface quality do you want. If you want a high quality, smooth finish, you will need to print small layer heights. If surface finish isn’t important and you want to print quickly, larger layer heights work great.
If you’re unsure of what height to start with, .20mm offers a good combination of surface finish and print time for most prints.
It’s important to note that low layer heights (< .15mm) require excellent bed leveling and machine calibration in order to successfully print.
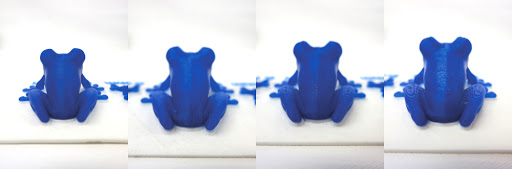
Frogs 0.1mm - 0.35mm
Fill Density
One of the great things about 3D printing, unlike injection molding and other conventional manufacturing methods, is that you don’t have to make a solid part if you don’t want to.
Infill density ranges from 0, which will print a hollow part with no infill, to 1 which will print a completely solid part.
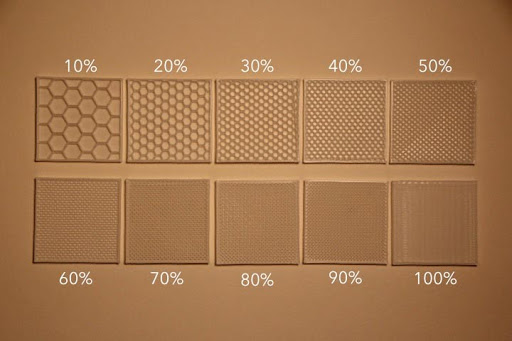
This photo shows Hexagon infill patterns.
In general, there isn’t much strength benefit from 50% to 100%. We recommend using 10% for parts that don’t require much functional strength and 50% for parts requiring high strength. Keep in mind that the more infill you use, the longer the print will take and the more material you use.
Note: The default setting in Simple view is Triangles. This can be changed in the Intermediate or Advanced view modes.
Generate Support Material
If your part has overhangs, it will need support material in order to print properly.

Once our machine printed the legs and started to print the table top, the filament wouldn’t have anything to lay on top of and would just be printing in mid-air. This would either result in a messy or failed print.
If we wanted to print this part in this orientation, we would need to Generate Support Material.
MatterControl will then generate support material that can be removed after the print is finished. There are many support material settings that can be adjusted in Intermediate and Advanced modes. We’ll cover those in upcoming articles.
Generate support material

Of course, we could simply rotate the table 180 degrees so that no support material is required.

Rotate table 180 degrees
Create Raft
The last setting option in the Simple view is the Raft.
The raft is a tool to help with bed adhesion. Some parts have very small contact with the print bed and can be dislodged during printing and some materials are difficult to get to stick to the print surface. In these cases, a raft can be a great tool.
Enabling the raft in MatterControl will generate a large, flat surface of material to print on top of.
It has a fairly thin, small contact area with the print bed, so we’ll use a raft in order to increase bed adhesion.
Generating a raft for better bed adhesion

Once printed and removed from the bed, the raft can be peeled off and discarded.
There are more raft settings in Intermediate and Advanced views, but the Simple mode should work well as a base setting.
That’s all that’s necessary to start printing in MatterControl. We wanted the Simple view mode to provide only the most necessary settings in order to start printing. Once you’re comfortable with these settings, you can explore the Intermediate and Advanced views to have full control over all the possible slice settings.
Keep reading about Slice Settings in Part 2 and Part 3 of this series.
Check out our other articles for more printing tips and tricks.
Happy Printing.