
Slice Settings Explained - Part 2
This is part two of the series that will explain all the various slice settings found in MatterControl so you can unleash the full potential of your 3D printer and get exactly the results you’re looking for.
In Part 1, we covered the Basic view mode of MatterControl. You can view it here if you missed it. Part 2 will cover Some of the more common settings you will find yourself using.


Settings
- Layer Thickness – (see part 1)
- First Layer Thickness – You have the option of adjusting the first layer thickness independently from the rest of the layers. This can be useful for improved bed adhesion with materials that have difficult to sticking to the bed. A thicker first layer means more material will be extruded and more material provides more bed adhesion.
It’s important to note that neither the layer thickness nor the first layer thickness can exceed the diameter of your nozzle. - Perimeters, Top Solid Layers, Bottom Solid Layers – These settings determines the thickness of the walls of your part. Since we do not need to print objects that are 100% solid, we can determine how thick the top, bottom, and side walls will be. Unless you are printing with 100% infill, the strength of your part is greatly affected by this setting.
Below we can see a default 20x20x20 mm cube sliced with a thickness of 1mm.

This is the same 20x20x20 mm cube sliced with 2mm width. You can see that the outer walls are much thicker. The top and bottom will be this thicker as well.

Tip: Lower layer heights (<.20mm) require a thicker Width setting in order to properly fill in top and bottom layers for water tight parts.
- Fill Density – (see part 1)
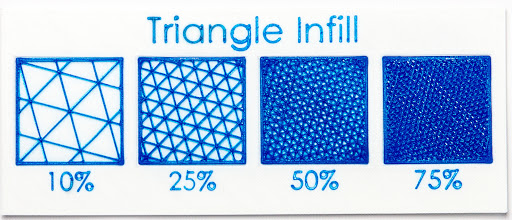
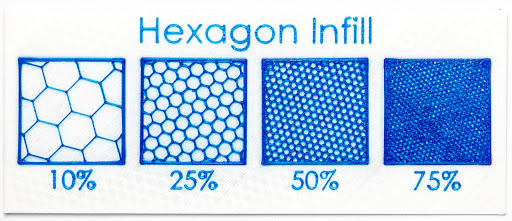
- Infill Type – in the Standard view, we can choose the type of infill pattern used. The default is Triangles. This is the strongest infill type. You can check out our article examining various fill patterns here
The images below shows various Triangle and Hexagon Infill percentages
- Skirt: Distance from Object – The default skirt setting draws 3 lines around the outside of our print in order to prime the nozzle before beginning the first layer.
This is the first layer of a 20x20x20 mm cube with a Skirt – There are 3 perimeters printed 3mm away from the cube.
Brim
- Brim - Just like a skirt you can print a brim. The difference is that a brim will touch right up against your part and can help it stick to the bed.

- Create Raft - (Covered in Part 1 here)
In the support tab you can adjust many of the settings that will effect how support is produced by the slice engine

- Interface Layers – Interface layers are solid layers on top of support material. When printing with a single extruder, they can provide an even, flat surface for your part in the event that standard support is not enough.
When printing with dual extruders, the interface layers can be printed with a dissolvable material which allows for easy support material removal with no trace of material leftover.


Air Gap
The air gap is the space between the top of the support material and the bottom of the print. Air gap is the most critical support material setting, since it controls how well the support structures will stick to your print.
The larger the air gap, the easier it will be to remove the support material. However, it will also make the bottom surface of your print messier. A smaller air gap will give a smoother, higher quality bottom surface, but also make the support material harder to remove.
Choosing the right air gap requires a lot of experimentation, and it is heavily dependent on the material you are printing. Materials that typically have stronger inter-layer adhesion, like PLA, will require a larger air gap.
Unlike other slicers, which simply skip layers, MatterControl takes a unique approach to the air gap. For the first layer of the print above the support material, the nozzle is lifted by the air gap distance. Since the nozzle is higher than it normally would be for that layer, the plastic falls a short distance onto the support material below, and cools a little while it is falling. By adjusting the air gap, you can precisely control how much the plastic cools while it falls and thus how well it sticks to the support material below.
For subsequent layers, the nozzle drops back down to the height it would be at otherwise. The air gap only affects the part of the first layer that is directly above the support material. Other parts of the layer will be printed at the normal height.


- Support Options: Pattern Spacing – This allows us to specify the distance between support material lines. More spacing will generate less support material which allows for easier removal, but may cause more sagging.
- Extruders: Support Material Extruder – If you have a machine with dual extruders, you can choose to print support material with the 2nd extruder.
The Filament tab allows us to change the settings for our extruder and heated bed.
- Filament: Diameter – This is one of the most important settings that affects print quality because it is used to calculate how much filament to extrude. The two standard sizes are 1.75mm and 3mm, but these are nominal diameters – not actual. Every spool of filament is going to be a little different. For best results, we recommend you measure a few places at the beginning of your spool with calipers and take the average. If you frequently change out spools, take the measurement, write it down on a piece of blue tape, and stick on the spool so you don’t have to re-measure.
- Extruder Temperature – this is the temperature of your hot end. Each type of filament extrudes at a different temperature. We recommend starting in the middle of the filament manufacturers recommended range and then adjusting according to results. For example, PLA is typically recommended 190 - 210°C. It’s a good idea to start at 200°C and then observe printing results.
- Extruder Wipe Temperature – This feature is only applicable to machines with a wipe procedure at the start of prints, i.e. Lulzbot Mini. Please consult your machine’s user manual for recommended settings.
- Bed Temperature – this is the temperature of your heated bed. Some materials require a heated bed in order to get bed adhesion. Like Extruder Temperature, we recommend starting in the middle of the recommended range for the filament and adjusting according to results.
- Bed Remove Part Temperature – this feature is only applicable to machines with a part removal procedure at the end of a print. Please consult your machine’s user manual for recommended settings
- Retraction: Length on Move – Retraction relieves pressure in the melt zone of the hot end to prevent filament from oozing during non-printing moves. Retraction does not create a vacuum and “suck” filament back up through the nozzle. It simply retracts the solid filament above the melt zone in order to relieve pressure that causes oozing/stringing. Each hot end has different retraction settings, and too much retraction can cause jams, so consult your manufacturer’s recommended settings before adjusting this.
- Retraction: Speed – The speed at which filament is retracted. Faster speeds can relieve pressure more quickly, but too fast can cause missed/skipped steps.
- Z Lift – When specified, this setting causes the hot end to lift up in the Z axis before retracting and moving to another location on the print. It can be especially useful on Delta machines to reduce/eliminate stringing.
- Retraction: Wipe Before Retract – Typically, once filament is retracted and pressure is relieved from the melt zone, slight oozing occurs immediately and then stops. When Wipe Before Retract is enabled, filament is retracted, and then the hot end moves backward along the previously printed area for a few mm, and then moves to the next printing location. This allows the material that will ooze to be deposited in an area that is not noticeable, or is less noticeable, and can greatly reduce stringing.
You're now an expert when it comes to the Standard view in MatterControl.
Keep reading Part 3 of this series, which covers the Advanced View and all of the settings that are currently controllable.
As always, Happy Printing!