
Beat Moisture Before It Kills Your 3D Printing Filament
Don't let moisture in the air affect your filament or your 3D prints. Take an in-depth look at the science behind your filament and how water in the air affects it.
All plastics, including 3D printing thermoplastic filaments, are polymers. Polymer science is a vast and complex field, but it’s fairly easy to understand what a polymer is. A polymer is a material made up of multiple repeating monomers. That probably sounds like another language, so let’s put it in terms of a material you are likely familiar with – PVC.
The Basics: What Is A Polymer?
PVC, which is short for Poly (Vinyl Chloride), is a material made up of multiple vinyl chloride molecules joined together in long chains. Vinyl chloride is the monomer, and there are many of them, thus, ‘poly’. Easy enough, right?
Most of the time, the “P” in a material abbreviation stands for “Poly”. Common examples include:
- PET – Polyethylene terephthalate, commonly known as Polyester
- PLA – Polylactic acid (also called polylactide)
- PP – Polypropylene, or polypropene
- PE – Polyethylene
- PS – Polystyrene
- PA – Polyamide, commonly known as Nylon

Now, you likely have come across the terms ‘copolymer’ and/or ‘copolyester’ when looking at filaments for your 3D printer.
A copolymer is simply a polymer made up of more than one monomer. ABS is probably the most familiar copolymer. It is made up of 3 monomers – Acrylonitrile, Butadiene, and Styrene. Specifically, ABS is a terpolymer, because it is made of 3 monomers, but ‘copolymer’ covers everything comprised of more than 1 monomer. Other examples would be Taulman’s line of Nylon copolymers – 618, 645, Bridge, and Alloy 910.
A copolyester is formed when PET, aka Polyester, is modified. Copolyesters have gained popularity as 3D printing filaments recently – PETG, PET+, Colorfabb XT, nVent, nGen, and T-Glase are all copolyesters.

Hydrolysis - Sounds Fancy; Is It Bad For My Filament?
Now that we have a basic understanding of what a polymer is—a long chain of monomers—it’s time to talk about water and a process called hydrolysis.
When monomers are joined together, it’s called polymerization. Note that this is not a one-way street. Polymer chains can degrade and be broken down—or depolymerize—and there are various ways that this happens. One of these ways is hydrolysis. Hydrolysis is when a water molecule breaks a polymer chain. All sorts of complex chemistry occur when polymers hydrolyze. We’re not going to get into those details, but the material properties affected when hydrolysis occurs (they are changed anytime the polymer chain length is decreased or increased) are loss of tensile strength, change of clarity, etc.
When you extrude filament that has absorbed water, the water in/on the material vaporizes and creates air bubbles. This can break apart polymer chains (shortens them), weakening the material and creating voids in the strands of filament which weakens inter-layer adhesion. It also leaves an undesirable surface finish.
You may not know it, but it’s likely that you have already experienced the effects of hydrolysis on your 3D printed parts. Pictured below test prints made out of Taulman Bridge nylon. The left was dried before printing. The right was not dried. These were printed with material from the same spool.
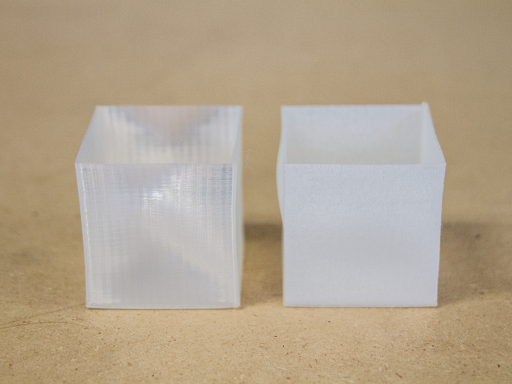
The print on the left was dried before printing while the print right was not dried.
After drying the nylon spool in a vacuum oven before printing, we produced the print on the left. Then we left that same spool sitting out for 2+ weeks before printing, which resulted in the print on the right.
The dried nylon is fairly transparent. The wet nylon is nearly opaque. It may not be clear in the image, but the dried nylon has a smooth, glossy finish, whereas the wet nylon has a rough, textured finish. Both objects are tough, but the wet nylon is considerably easier to pull apart at the layers. You can also see that nylon tends to warp—regardless if it’s wet or dry.
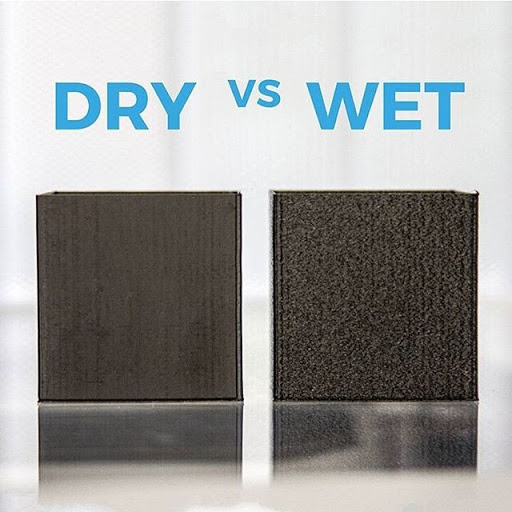
This is MatterHacker Black Pro Series PETG. The left cube was dried before printing, and the right one was allowed to sit out for 2+ weeks.
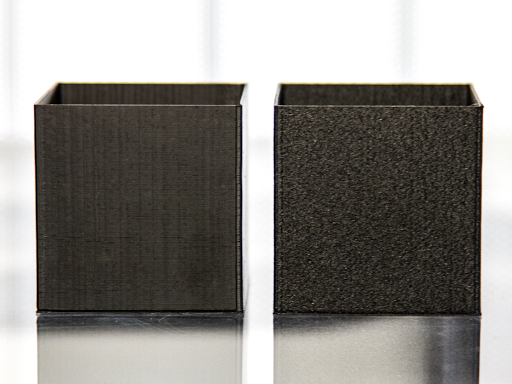
The left cube was dried before printing, and the right one was allowed to sit out for 2+ weeks.
As you can see, there is a clear difference in surface finish and texture. It’s hard to tell in the picture, but the dry cube is glossy and has a consistent finish from top to bottom. The wet cube is textured, with a satin-matte finish. The texture is where air bubbles left voids. Wet PETG is significantly more brittle than dry, and the interlayer adhesion is significantly reduced.
Fortunately, most of the filaments we print with aren’t very susceptible to hydrolysis at room temperature without the presence of an acid or a base. They are, however, very susceptible to hydrolysis when heated to extrusion temperatures. This means that we don’t have to worry once a part has been properly printed, but we do need to take steps to prevent hydrolysis when printing.
Since many of the common 3D printing materials are hygroscopic (readily absorb moisture from the air), we must take steps to both dry our filament and keep it dry.
Nylon, polycarbonate, and copolyester filaments are all very hygroscopic and susceptible to hydrolysis when printed in the presence of water. Nylon and PC can absorb enough water in 48 hours to ruin prints.
How Do We Know If Filament Is Wet And Needs To Be Dried?
The easiest way is to extrude some filament and watch it come out of the nozzle. If you see any bubbles, hear any hissing/popping/cracking, or see steam coming off the filament, then it’s definitely wet and needs to be dried out.
This video shows a clear difference between wet and dry nylon. (This was Taulman 645 nylon)
The Easiest Way to Dry 3D Printer Filament
Although the methods that we have listed are tried and true, the easiest way to dry 3D printing filament is with the PrintDry PRO Filament Drying System. Its compact frame allows you to dry and store filament right from your desk or workspace, both outside of printing hours or during printing. It even comes with one vacuum-sealed container and pump for extra storage space. We here at MatterHackers have been using the PrintDry for quite some time and are very pleased with the results.

If you have nylon, polycarbonate, TPU, TPE, or PETG and the spool has been sitting out for more than a day or so, then you likely need to dry it. PLA and ABS are also susceptible, but it takes quite a bit longer for them to absorb enough water to cause major issues.
How Do You Dry Filament And Keep It Dry?
There are a few ways to dry out filament and keep it dry.
First, it’s important to dispel a common myth. You cannot effectively dry filament out by storing it in an airtight container with desiccant. You can keep filament dry this way and it is highly recommended when not using a spool. However, to properly and thoroughly dry it once it has been saturated you need to actively dry it.
The most available method to dry your filament is to bake it in an oven. However it is easy to overheat your filament which can cause off gassing from the plastic. These gasses can be toxic, which can be dangerous to inhale or have food near. Ovens are not recommended for drying filament, however it still can be done with caution. Convection ovens work very well as they constantly circulate hot air around the spool. This is essentially how the raw resin pellets are most commonly dried – hot air is passed over and through the raw resin pellets before they are extruded.
There is one important thing to know before baking your filament. You must preheat your oven and allow it to reach the set temperature before putting the filament in. Ovens work the same way that hot ends on 3D printers work – with PID temperature control – and it’s common for ovens to overshoot the target temperature a bit. This doesn’t affect food, but it definitely can ruin your filament by fusing the filament and/or melting the spool that it’s on. To completely remove any possibility of accidentally fusing/melting your filament during drying, we recommend using drying systems specifically designed to remove moisture from filament like the PrintDry.

How To Dry 3D Printing Filament:
1) Preheat your oven to 160-180°F (or 70-80°C).
2) Place spool in the oven for 4-6 hours
3a) Remove and place it in an airtight container, preferably with desiccant. 5-gallon buckets with airtight lids from local hardware stores work very well for filament storage. Uncooked rice works as a cheap desiccant alternative.
3b) If using a PrintDry PRO, you can alternatively feed filament out of the system's port and directly to your 3D printer for dry storage while printing.
Filaments with lower glass transition temperatures (Tg) like PLA, use lower temperatures to dry. Lower temperatures also require more time to thoroughly dry.

That’s pretty much all that’s necessary to dry out your filament and ensure optimum material performance and surface finish. Many of our customers typically resolve bed adhesion issues and rough surface finished parts by simply removing the moisture that has accumulated in their filament. If you have some spools that have been sitting out for a while and aren’t printing as well as they used to, dry them out and try again. Chances they just need a little drying off to print like new again.
As always, Happy Printing!
