
Finding The Right 3D Printer for e-NABLE Projects
Join the e-NABLE community and 3D print assistive devices for those in need. This guide will walk you through the steps of considering which 3D printer you'll need to print e-NABLE devices.
This article coincides with the exciting announcement of MatterHackers e-NABLE Hub. Check it out HERE!
The e-NABLE Community is an amazing group of individuals from all over the world who are using their 3D printers to create 3D printed assistive devices for those in need. Using 3D-printing technology, users are able to create 3D printed upper limb assistive devices to provide to children and adults who would otherwise not have access to them. It’s a touching story, and MatterHackers is here to facilitate the growth of this community and to make this knowledge more accessible.
To learn more about the origins of e-NABLE and the community, visit the website: http://enablingthefuture.org/about/
This article is intended for current followers of the project, future volunteers who wish to become involved, and schools or organizations who do not currently have access to 3D printing but are interested in obtaining a machine and establishing a curriculum. We will be guiding you through the process, step by step, to ensure you are able to achieve fantastic results with 3D printed e-NABLE devices.

e-NABLE Assistive Device Design
Currently, the most common questions about the e-NABLE 3D Printing project are:
Which 3D printer should we purchase that will be able to make these hands?
MatterHackers has many 3D printers that work, and we have created easy-start bundles so you can shop and save: MatterHackers e-NABLE 3D Printers
Which 3D printer will be the easiest to use in my classroom?
Machines chosen for the e-NABLE bundle are all easy to use and ready for any classroom.
What 3D printing materials do we need to buy?
The most commonly used 3D printer filament is PLA. Our bundles come with Pro Series PLA.
How do I get started using my 3D printer to make e-NABLE hands?
MatterHackers created a web series to help guide users through the process of getting the 3D printer running: 3D Printing 101: Getting Started with 3D printing
Are there any resources that show the parts of a 3D printer and how it works?
Here is an article that breaks down the Anatomy of a 3D Printer into components and how they work.
What programs are used to make 3D designs?
There is a great guide that overviews 3D design software and how they are used: Finding the Right 3D Modeling Software for you.
I’ll answer each of these in more detail - the “which printer to buy” question is usually the big one, and as you read on you’ll come to understand why there is no real one-size-fits-all answer to that.
Here is a 10-step guide to deciding which 3D printer is right for you, materials and accessories you’ll need, and how to start printing e-NABLE projects.
1. Determine what age group will be using the printer
Who’s going to use the printer? Especially considering children, the users’ average age (and maturity level) makes a difference when selecting a printer. 3D printers have a few very hot components, and can be dangerous if proper precautionary measures aren’t taken. Similar to any piece of machinery, it’s important for anyone who is planning to use the printer to know how a 3D printer works, in addition to the proper safety information for dealing with them. If everyone knows what can and can’t hurt them, the likelihood of injury decreases dramatically.
Learning about 3D printing first is essential to the process and will help eliminate the possibility of danger and mishaps. We’ll go deeper into this later.

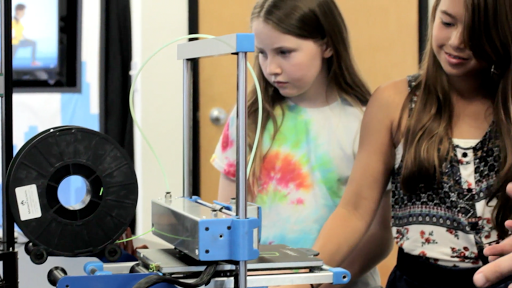
Even with the right knowledge, younger users are probably better off with a printer that has an enclosure or a way of isolating the potentially hazardous components. If they can’t physically reach them while the printer is active, then there is a much lower chance that any harm will be done. As the age of the average user increases, this is less of a concern and open printers are much more acceptable and practical.
3D Printer With Open Design and MatterControl Software UI
User Interface (UI) is another important consideration for different age groups. The more intuitive a printer and its control software is, the easier it will be to operate. More complex printer-software combinations can be confusing to younger people, and if they can’t operate it they won’t be able to complete the project.
No matter what 3D printer you purchase, you will have to connect it to a device like a computer or laptop so it can communicate with the software. To make 3D printing easier, you could use something like the MatterControl Touch 3D printer controller. It’s an easy-to-use alternative to investing extra dollars into additional laptops for every printer you buy, or tying up valuable classroom computer resources.
2. Determine a budget
Once there is a defined age group for the users of the printer, the next step in the process is to define a budget you or your organization are willing to spend. Consumer-level 3D printers range from about $300 to several thousand dollars, and it is important to keep in mind the maximum amount you may be willing to spend to get the features and capabilities you need before you proceed. Some of the cheaper models may seem like a good deal, but require more tinkering and adjusting than a novice user is willing to do, so be sure to do your research before making a purchase.

If you decide that you want a printer that is more expensive than your maximum budget, you might consider waiting and saving up. For schools, fundraisers can be a great way to raise the money-- people might be more willing to purchase a candy bar or donate some extra money if they hear about the intended use of the funds.
3. Learn about 3D printing
Getting educated about 3D printing will help you determine alignment of your budget and your goals. With more knowledge going in, you’ll have more confidence in the printer you buy, and you can bet it will be the one that suits your particular needs and skill level - not just the one that was on sale or the one that works for someone else.
There are many resources to help gain familiarity with 3D printing technology. Here at MatterHackers, we are involved in 3D printing every day and regularly churn out online content aimed at helping people become more proficient and gather new skills for 3D printing.
Here are a few noteworthy articles, videos, and guides you may be interested in reviewing:
-
3D Printing 101 Video Series With YouTube’s 3D Printing Nerd
-
General Printing Knowledge: MatterHackers 3D Printing Article Index
-
Learn the parts of a printer and what they do: Anatomy of a 3D Printer
-
Troubleshooting guide for 3D Printing With PLA
-
Overview of the 3D-printing process: Getting Started with 3D Printing
-
How to use printer-control software: MatterControl Wiki Manual
-
Designing in 3D: MatterHackers 3D Design Article Index
-
Choosing a CAD program: Finding the Right 3D Modeling Software For You
4. Determine which e-NABLE hand(s) to print
The next consideration is that of which e-NABLE design you'd like to print. The “Raptor Reloaded” and "Phoenix Hand" are two common prints, but other designs make use of other filaments, like flexibles. Printing with these require certain printer capabilities which could play into your decision on which one to buy.
You don’t necessarily need to be able to print flexible filaments, but if you buy a printer that doesn’t have that capability, you probably won’t be able to add the functionality later on if you decide you want to. It’s better to make the right choice the first time after careful consideration than to make a hasty choice that leaves you without certain abilities.
I’ll talk more about filament choices in the next section. For now, just consider which hand you’ll want to print and make sure your eventual filament choice is congruent with the hand’s requirements.
5. Determine the type of filament
To be considered along with which hand design(s) you want to print is the type of filament you want to print with. Each filament type has unique characteristics, and some are more advantageous for certain results than others.

The major ones worth noting are:
-
PLA - easy to print with, but it’s got a relatively low tolerance for heat which can cause it to warp; is brittle meaning low impact resistance. (3D Printing With PLA Guide)
-
ABS - more difficult to print with and melting it produces fumes, but has good mechanical properties PLA lacks and can be post-processed for a nice finish.
-
PET - combines the strength of ABS with the easy printing of PLA, but can be more expensive, requires a higher temperature to print that some printers may not have, and isn’t able to be finished like ABS.
-
Nylon - excellent mechanical properties, but is very difficult to print with and absorbs moisture.
-
Flexibles (TPE, TPU, and Soft PLA) - require advanced skill and specific hardware configurations to print correctly, but have unique properties that can be advantageous for e-NABLE designs.
Beginners will definitely have an easier time printing PLA or PET. More advanced users can explore ABS, Nylon, or Flexible options, but due to the larger sizes of some of the hand components, filaments that tend to warp (like ABS and Nylon) will be much more difficult to print, especially on a printer without a heated enclosure.
Flexibles aren’t necessarily more difficult to print, but unless the printer is specifically designed for printing them or has modifications made to it that will allow them, it’s probably easiest to stick with other types of filament.
For more information about different types of filament, consult our guide: MatterHackers 3D Printer Filament Comparison Guide
6. Determine the size of the hand you want to print
Sizing is specific to the person who will wear the hand, so the print will be scaled to match that person. For the test print, you can just print the model as it comes.
Most hands come as a set of files to be printed individually. Some have a file that combines all models into one print. Generally speaking, the larger the size of the print, the larger print area your printer will need. It’s probably best to print each component (or at least group of like components) by itself so if something goes wrong with one print you won’t be left with several partially-printed components.
The largest parts of the hands are typically the palm and the gauntlet, and you just have to make sure that the largest possible scaled models (that you intend to print) of those will fit on the printer. To put it another way, you don’t need a printer with a huge bed in order to print these hands; a smaller one can be just as effective as long as the biggest part will still fit.
Scaling the models is fairly straightforward, once you know roughly how big the hand needs to be. MatterControl has a scale function in Edit mode, which allows for quick resizing to exact measurements or by ratio.
Some of the hands have already been sized to certain percentages, like the “Raptor Reloaded,” seen here: http://www.thingiverse.com/thing:1033475/#files
Others have scaling recommendations based on age, like the “Cyborg Beast”: Scaling Chart: Cyborg Beast
For a little more tailored approach, some web apps can help:
-
the Hand-o-matic can take measurements and create models of the ‘Raptor” or “Cyborg Beast” for printing: http://enablingthefuture.org/handomatic/
-
the “Cyborg Beast” project has a tutorial for measuring: http://www.cyborgbeast.org/#/measurements
One thing to keep in mind is that some of the hardware requirements (the screws etc. used to put everything together) may change as the model is scaled. Screws that would have fit in the original holes will now need to be replaced with larger or smaller ones, depending which way you scale the model. Cords and strings likely won’t be affected, so those can still be the same as originally specified.
7. Selecting a printer
Now that you have reviewed all the necessary considerations, you are ready to make an informed decision. You want a printer that has a large enough build area, can print the particular materials you need for your project, is easy enough to use considering the age group and skill level that will use it, and most importantly, fits within your budget.

Other questions to ask when making your choice:
-
Is quality documentation available for this printer?
-
Check out each manufacturer’s website; if documentation cannot be easily found or is poorly made, then you might consider a different manufacturer.
-
Does the manufacturer or reseller offer support if anything goes wrong?
-
Manufacturers can vary greatly on support offered, and some will charge you for it, so include this in your research. Amazon, for example, does not offer support. If you happen to purchase from MatterHackers, we have an email address and phone number you can contact for questions about your machine.
-
What does the 3D printing community think of this printer?
-
Review general 3D printing forums and search for printers you are interested in. What is the common sentiment about it?
-
Are there places I can ask questions about this printer and get a good answer?
-
The MatterHackers Forum is available for specific hardware or software questions.
Once you’ve got your printer, you can proceed to the next steps in assistive device creation.
8. Become familiar with your 3D printer
The moment has arrived! With your new 3D printer in hand (or better, on a desk in front of you) you’re ready to begin the hands-on process of iterative 3D printing. 3D printing has a learning curve, and that goes for any printer you buy. Some printers make it easier than others, but at its core, the concepts behind the process are all worth paying attention to and learning the intricacies of.
You’ll want to start off by reading through your 3D printer’s documentation and user manual to become familiar with manufacturer's recommendations. Doing so will save you time in the long run and you will be alerted of any specific cautions - such as knowing where heating elements and pinch points are located on the machine.
You may also want to review the links to articles and videos in section number 3 - learning about 3D printing - to practice these tools and how they relate to the printer you now own. The step-by-step guides and videos will help you to navigate your way to a clean first print, and avoid the inevitable frustrations of guesswork if you try to figure it out on your own.
9. Print and submit a test hand
To make sure your printing skills are up to the challenge of creating a real e-NABLE assistive device, you’ll need to print and fully assemble a “Phoenix” or “Raptor Reloaded” to send to one of e-NABLE’s volunteers for review.
Remember, this is a confirmation to ensure the quality of the printed parts you are creating meet the group's expectations. It might take a few tries to get the kinks worked out, but practice makes perfect.
Once you’re satisfied with your own results and have the printed hand assembled, you can send it to a volunteer: Submit a Test Print
If you are 3D printing e-NABLE projects in the classroom, you may also want to check out these guides, resources, and curriculum suggestions.
Discover these and more educational resources from e-NABLE educational participants: e-NABLE Educational Resources
3D Printing Shaping Young Minds
10. Get matched with a recipient
After your test hand is approved, you will have the ability to be matched with a recipient. At that time you can register as an approved volunteer here: Intake form
Educators can sign up for e3STEAM, a special branch of the e-NABLE project, to collaborate with other educators and project leaders aimed at expanding the involvement of educational institutions: e-NABLE Educators’ Exchange
Once matched with a recipient, you’ll be provided with measurements or possibly even scaled files, and can start printing for real.
After the model is printed, it will need to be assembled along with the necessary hardware. Hardware can be tough to source, so MatterHackers has taken the liberty of assembling kits with all you’ll need to complete some of the more popular designs: MatterHackers e-NABLE Hardware Kits
Assembling the hands can be a complex process. I’ve amassed some of the better resources to limit the amount of time you’ll need to spend figuring it out:
Raptor Reloaded
Hand Challenge Assembly YouTube Video Series
Raptor Hand
Cyborg Beast
Other hand assembly information can be found on the enablingthefuture.org website: BUILD A HAND
Conclusion
That’s the basic process for contributing to the e-NABLE community and giving back to those in need. We’d love to help you select the products you’ll need to begin printing assistive devices for the e-NABLE community. MatterHackers is honored to provide a selection of printers, filament, and accessories to ensure volunteers are creating the highest quality e-NABLE devices possible, while also sharing a portion of proceeds from our e-NABLE Hub with the enablingthefuture.org website, to continue their volunteer-based work for generations to come.
Happy printing!
If you have any questions, comments, or suggestions please join the forum discussion.