
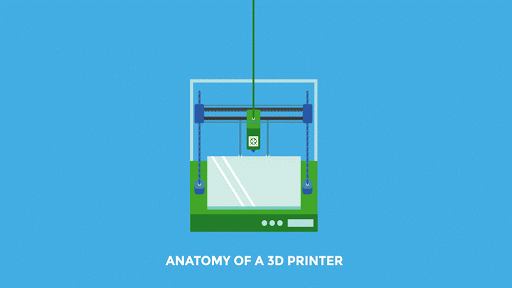
Anatomy of a 3D Printer: How Does a 3D Printer Work?
Get an understanding of how 3D printing works, from the inside and out. This guide will walk you through each of the critical components of a 3D Printer, answering the question: "How does a 3D printer work?"

Between the names of the parts and their functions, it can be hard to keep it all straight. Here is a quick guide of the anatomy of a 3D printer. We will focus on mechanical and electrical components of the most common desktop 3D printer type: fused filament fabrication (FFF) or fused deposition modeling (FDM).
Mechanical Components:
Print Bed
The print bed is the surface that your objects are printed on to. Typically it will consist of a sheet of glass, a heating element, and some kind of surface on top to help the plastic stick.
Heated/Non-Heated
Most print beds are heated in order to prevent the object from warping while it is being printed. Due to thermal contraction, the plastic will shrink slightly as it cools. This causes the object to warp upwards around the edges and peel off the bed. Heated beds keep the bottom of the object warm, in order to prevent this.
See also; Enclosure, Bed Surfaces. Some printers do not have heated beds. This limits them to printing a narrow range of materials including mainly PLA (the material that is least prone to warping) and sometimes PET.

Print Bed
Bed Surfaces
The bed surface helps the plastic stick to the bed during printing but also allows it to be removed easily when printing is done. There are many different kinds of bed surfaces. Most printers will come with some kind of all purpose surface, like BuildTak or PEI film. However, for best results you will want to use different surfaces depending on the material you are printing. Use this guide for print bed recommendations based on the material.

Bed Surface
Bed Leveling
Many printers have some kind of a system for automatically making sure that the bed is level with the nozzle. Some do not, though, and must be calibrated by hand. MatterControl also has the ability to compensate for unlevel print beds with software. For more information, see our expanded article here.
Filament
- This is the plastic that's consumed by the printer. It comes on a spool. Printers use two different sizes of filament, 1.75 mm and 3 mm. There are a variety of different materials. To learn more about them, check out the MatterHackers filament guide.

Filament
Extruder
- The extruder is the core of the printer. It is where the plastic gets drawn in, melted, and pushed out. It is essentially a fancy hot glue gun. It is small, but it is where most of the printer’s technology is located. The extruder consists of two parts; the hot end and the cold end. The cold end has a motor that draws the filament in and pushes it through. The hot end is where the filament gets melted and squirted out.

Direct Drive vs Bowden Extruders
-
On direct drive printers, the hot end and cold end are connected together, one on top of the other. The filament goes straight down through the cold end and into the hot end.
- With a Bowden setup, the hot end and cold end are separated. The cold end will be stationary and bolted somewhere onto the printer’s frame. The filament is pushed through a long tube (called a Bowden tube) to the hot end. This means that the printer has less weight to move around.
Hobbed Gear
-
This gear bites the filament and pushes it down through the hot end

Hobbed Gear
Idler Gear
-
The idler is a spring loaded wheel that pushes the filament up against the hobbed gear. Most printers have a way to adjust the tension on the idler, so that it neither squeezes the filament too hard or too little.

Idler
Hot end - All Metal vs PEEK/PTFE
-
By not using any plastic insulators in their construction, all metal hot ends are able to reach much higher temperatures and print a wider range of materials. However, they require active cooling.
Hot end - Heat Sink / Hot End Fan
- This ensures that heat does not travel up the plastic and melt it prematurely before it reaches the nozzle. This phenomenon is called heat creep and it causes jams, especially with PLA. This fan should be running whenever the hot end is warm.

Heat Sink
Heater Cartridge
- The heater cartridge is pretty self explanatory. It heats the plastic. It is simply a high power resistor. Almost all modern printers use cartridge heaters, but many older printers used coils of nichrome wire (like the kind in a toaster). If you are replacing your heater cartidge, of even your entire hotend, make sure you know if your system is running 12v or 24v.

Heater
Thermistor/Thermocouple/RTD
- These are all various types of sensors for determining the temperature of the hot end. They are essentially electronic thermometers. Thermistors are the most common type of sensor, but some printers will use thermocouples for extremely high temperature printing.

Thermistor
Nozzle
- The nozzle is simply a piece with a small hole for the melted filament to come out of. Nozzles are interchangeable, and come in various sizes; 0.4 mm is normal, while you might use a smaller nozzle for finer detail or a larger nozzle to print faster. Nozzles can also sometimes get clogged. This is one of the most common issues with 3D printers. See this article for advice on unclogging your nozzle.

Nozzle
Layer Cooling Fan
- This fan cools off the plastic immediately after it is deposited by the nozzle. It helps the object hold its shape. The slicer will turn this fan on and off under different circumstances, depending on what material you are printing. It is not to be confused with the heat sink fan, which cools the hot end itself and not the printed object.

Layer Cooling Fan
Motion Control - X, Y, Z Axis:
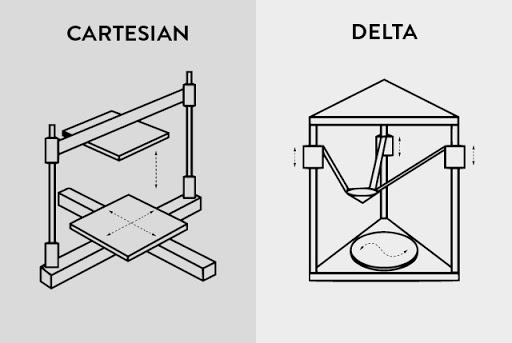
Delta VS Cartesian
- Cartesian printers move one or two motors along each of the X, Y, and Z axes and the name was derived from the Cartesian coordinates system. They typically have a rectangular build area and the printers themselves tend to have a cube-like shape. The Lulzbot Mini is a fine example of these types of printers.
- Delta printers have three arms that come together in the center to suspend the extruder above the build area. Deltas also use a Cartesian coordinates system to move around in, but instead of moving one motor per axis at a time, all three arms move at different rates or times to precisely move the nozzle with triangulation. The SeeMeCNC Rostock MAX V2 is a prime example of a delta printer.
End Stops (one for each axis)
The end stops are how the printer knows where it is. They are little switches that get pushed whenever an axis moves to the end. This is how the printer finds it’s starting point before printing. Most printers use mechanical switches, but some are known to use optical sensors.
Threaded Rods / Leadscrews
-
These are usually used on the printer’s Z axis. They rotate, thus forcing nuts to move up and down. Inexpensive printers will use simple threaded steel rods, which are essentially extra long bolts. Higher quality printers have smooth chrome plated leadscrews designed to minimize backlash.

Lead Screw
Belts
-
Belts move things. The X and Y motors have sprockets that drive the belts. Most printers also have some way of adjusting the tension on the belts.

Belt
Stepper Motors
-
Unlike regular DC motors, which rotate continuously when given power, stepper motors rotate in increments. This gives them precise control over their position. Most printers use NEMA 17 type motors with 200 increments (steps) per revolution.

Stepper Motor
Frame
- The frame holds everything together. Early printers had frames made out of lasercut plywood. Printers now have frames made of sheet metal, aluminium beams, or plastic. Many parts of the frame are often 3D printed themselves. The more rigid the frame, the more precise the printer’s movement will be.
Enclosure
- Enclosures for 3D printing are used for safety. There are moving parts and heating elements that users will want to protect themselves from. If you printer does not offer an enclosure it is easy to construct your own. Something as simple as a cardboard box could suffice.
Electrical Components:
Power Supply
-
This takes the 120V AC electricity from the wall and converts it to low voltage DC power for your printer to use
-
ATX Power Supplies- These are the same power supplies used in desktop computers. They have been repurposed for use in many printers. They are very beefy and efficient, and have separate lines that provide power at a variety of voltage (12V, 5V, 3.3V).
-
Voltage - some machines run 12 volt systems, while others run 24 volt systems. This becomes critical if you are going to replace components - especially your heater cartridge or hotend. Make sure you order the appropriate parts.
Motherboard/Controller Board
- The motherboard is the brain of the printer. It takes the commands given to it by your computer (in the form of G-Code) and orchestrates their execution. The motherboard contains a microcontroller (essentially a tiny, self contained computer) and all the circuitry needed for running the motors, reading the sensors, and talking to your computer. Here is a comparison of the different motherboards we carry.
- We also have an in-depth article and video on controller boards here.

Motherboard
SD Card Slot
Some printers also have an SD card slot from which they can load G-Code files. This allows them to run independently without a computer.
Stepper Drivers
- These chips are responsible for running the stepper motors. They fire the coils of the motor in sequence, causing it to move in increments. Many motherboards have the stepper drivers built in, but some also have them in modules that can be unplugged. By balancing the power fed to each coil, the driver is also able to divide steps up into further increments. This is called microstepping, and allows more precise control over the motor than is normally possible. The stepper driver also controls how much electrical current is fed to the motor. More power makes the motor stronger, but also makes it run hotter. See this article for more information on adjusting your motor current.

Screens and User Interfaces
- Some printers have an LCD screen so they can be controlled directly without hooking them up to a computer. These can be basic black and white displays like the VIKI 2 or advanced enabled touchscreens like the one included on the new Ultimaker S5 3D printer.