
How To: 3D Print Custom Wall Mounts
Learn how to design and 3D print personalized wall fixtures to organize and display all your favorite things.

Around the office, Nerf blasters are loved and closely guarded. Impromptu skirmishes are a regular occurrence and arms races are alive and well. You may have the best blaster that Nerf has, but give it a couple months and Nerf has something even bigger and badder than before. In this battlefield, I need to be at the ready to strike back or strike first. With the help of some 3D modeling and 3D printing, I’ve mounted my blasters both above and hidden under my desk - it was really easy to design and assemble these mounts. Let’s prepare for war and develop some mounts for your arsenal. This process will work with any item that you'd like to see displayed on your wall, or, you know, hidden discreetly under your desk.
Check out some other weekend builds project ideas.
Step 1: Identify the Target - What Do You Want To Mount
In general, any “gun rack” or mount is going to be a basic hook big enough to fit any blaster, which works, but it’s boring. To make the most secure fit mount, especially if you’re mounting a blaster with four D batteries in it above your PC like I did, you need to make a custom fitting to closely hold the contours of the blaster. One of our Product Associate's, Matt, has a Sledgefire Nerf that didn’t have a mount, so I’m going to design one for his blaster.
Step 2: Reconnaissance - Identify the Best Place for Your Mounts to Grip
You need to figure out where would be the best place for the mounts to grip. In the case of the Sledgefire, I know that some people like to leave the stock unattached (Matt), while others keep it standard with the stock installed (other Matt). Knowing that, I want the mounts to grip in the same place on both so it’s a standard mount. For previous mounts I’ve used a set of calipers to measure and closely estimate how wide and how long the features of the blaster is. This works fairly well, but I’ll admit there are probably better ways to do it. You could probably use a contour gauge, but I know how to use my handy calipers, so that’s what I’m going to show you.

A contour gauge with the complex shape of the Sledgefire=E2=80=99s grip.
Step 3: Develop a Plan - Measure and Sketch Your Object
I figured the best place to trace for the mount is under the barrel and below the trigger guard, so I took the necessary measurements and transferred them onto some notepads around a very exaggerated sketch so I had an idea of what the final shape should kind of look like.
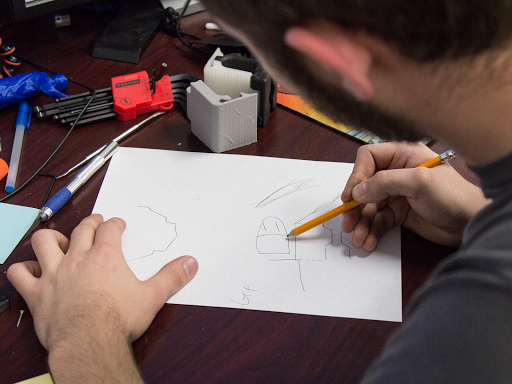
I made some quick lines to get me started on the contour of the blaster.
Step 4: Begin Modelling - Match the Mount to Your Object
Under the barrel, it has a complex cross-section, so I will model the holder into that shape, but the grip of the blaster has a simple cross-section. I could make it a holder that’s perfectly square, but where’s the fun in that? I took some more measurements across the various edges of the blaster to get enough reference points to shape it in Solidworks.
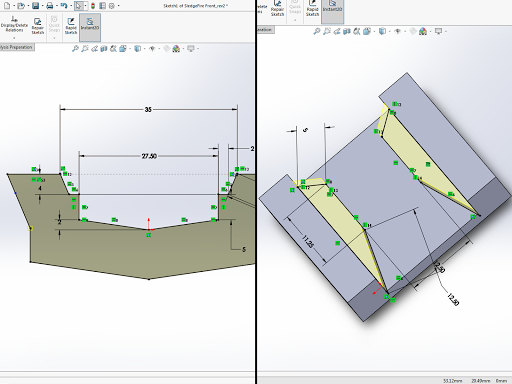
All these dimensions are used to constrain the model into the right shape.
Step 5: Test Fit and Iterate Your Design
For the first iteration, I made it without any clearance so it fits the blaster as closely as it can. Instead of printing the entire holder and finding out it doesn’t fit, I only printed enough to see where I need to trim or expand contours. Each of these was enough to see that I could extend the grip just a tiny bit to more securely lock into it, and the front needed to be a bit wider to fit around the barrel and a bit shorter so it can slide straight back and miss the faux bolts.
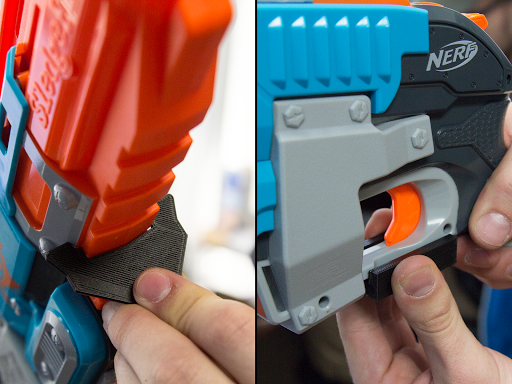
This version was a little too tight in some spots and a little too loose in others.
Step 6: Design for Ease of Assembly
After a couple more iterations, taking material away in some spots and adding material in others, I had a shape that fit pretty well to both parts of the blaster. For the “arm” that extends out of the wall, I have a standardized shape that thus far has fit even the widest of blasters. To make it easier to install on the wall and not have to drill around the arm, the thickness of this whole part is specifically designed so the pegs have just the right amount of clearance where they will fit tightly into the wall part and not need any glue to keep it in place. Our PRO Series Light Blue PLA is remarkably close to the same blue that Nerf used for the Sledgefire, and the Ultimaker Orange PLA is the brightest orange that matches pretty closely to the Nerf safety orange color. The other set was requested in PRO Series Pearlescent PLA and PRO Series Black PLA.
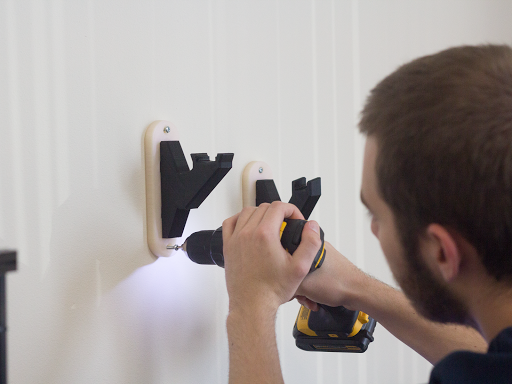
That’s all there is to it! One of these was mounted directly into the side of the desk for quick draw, and the other was mounted above the desk. You can adapt this to make custom pegboard holders, TV stands, whiteboard marker holders, or anything else that needs to fix against the contours of an object.
I hope that this article was informative and has inspired you to create your own Nerf wall mounts with the help of 3D printing. The various mounts that I’ve designed are now in the MatterHackers' Design Store, and I will be updating if I create more models for the rest of the office.
Is there something you'd like to see Alec create using 3D printing? Let us know in the comments below, or send an email to support@matterhackers.com.