
Troubleshooting for MatterControl Print Leveling
Interested in using MatterControl's 7 and 13 point print leveling? Although, this system is easy to use, there might be some hardware or firmware settings you'll need to fix first. Here's how!
MatterControl recently introduced 7 and 13 point software print leveling. These are great options for delta 3D printers, as well as Cartesian printers with large print beds.
Though very easy to configure and use, there are some hardware and/or firmware settings needed in order for MatterControl's software leveling to function properly.
There are two basic configurations for 3D printers as it relates to endstops and leveling – Z Minimum and Z Maximum. If you have not been able to achieve proper leveling with MatterControl, we’ll cover the solutions for both types.
In order to get good leveling results - regardless of what kind of printer you have - the nozzle of your hot end must be able to pinch a piece of paper (or feeler gauge) against the bed. If you have a machine with a Z Minimum endstop setup – where the Z endstop triggers at the bed, Z=0 – it’s possible that one area of the bed may be below Z=0. Since most Z-Min setups do not physically allow movement past Z=0, this will not allow you to get good software leveling results without some adjustments. If you have a Z-Max setup, you likely have firmware endstops enabled that also prevent you from contacting the bed. Fortunately, both of these issues are easily resolvable.
Most Delta printers use a Z Maximum endstop configuration. This means the Z axis homes to the top of the build envelope, not to the bed. To prevent damage to the print bed, there are often software endstops enabled in the firmware. These most often are set to not allow the machine to move below Z=0, but it’s also common for them to be set to a very small negative Z value.
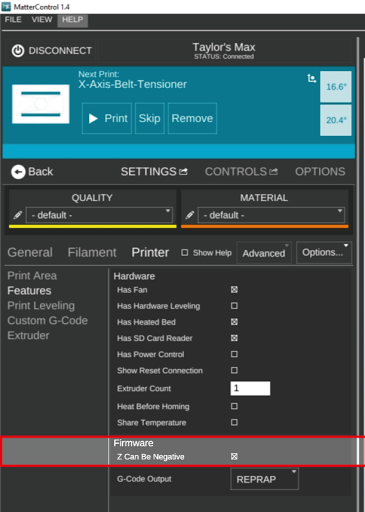
MatterControl, by default, does not allow you to go below Z=0, but you can change this setting.
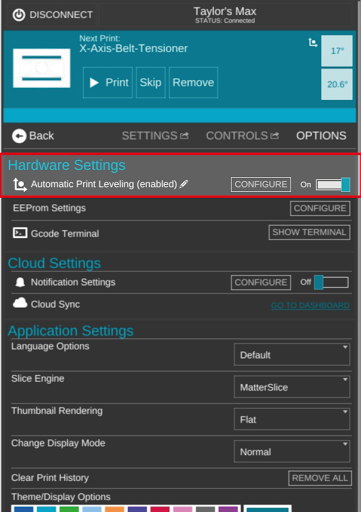
Once you have allowed Z to be negative, configure the auto leveling through MatterControl. Upon completion, click the pencil icon next to the Automatic Print Leveling.
This will open a window showing all of the sampled positions.
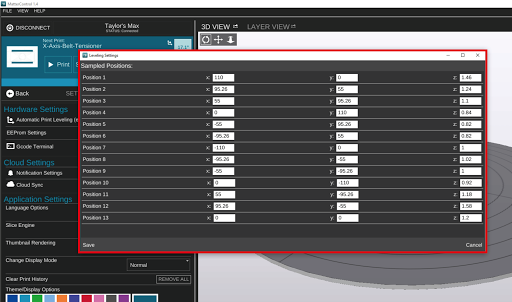
What we are looking for are any negative Z values. If any of the positions have a negative Z value, it’s likely the firmware will prevent proper print leveling.
If you do have some negative Z values, it’s easy to resolve. First, find the lowest negative Z value. Let’s suppose the lowest value you have is -1.46. We would then need to increase all the Z values at least 1.46mm in order to get them out of negative range. As long as we shift all the Z values the same amount, our software leveling will still work properly.
In this case, adding 2mm to all Z values will get everything into the positive range, and will be much quicker than adding 1.46mm to each value. You can use the Up/Down arrows on your keyboard to quickly add/subtract 1mm. So, we would click on every Z value – not just the negative values - and increase it by 2 mm.
Once this is done, click Save in the bottom left corner of the window.
We’re not quite done yet. The last thing we need to do is adjust our Z height to account for the 2mm we just added.
Most firmware on Deltas have the Z height in the EEPROM.
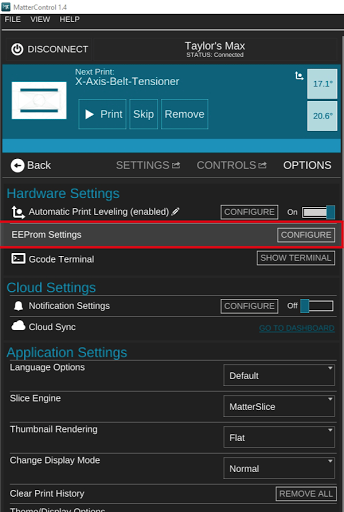
You can access EEPROM under the Options tab. Locate the Z height field. On this machine, it’s called Z Max Length.
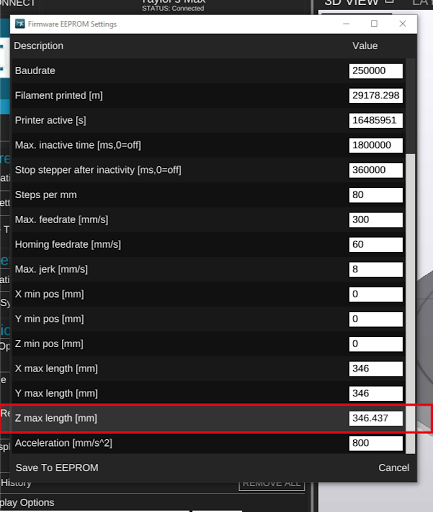
Increase this value the same amount you increased the Auto Leveling numbers. Click Save to EEPROM in the bottom left corner. And we’re ready to print!
This should resolve any issues you’re having with a Z-Max style machine and MatterControl Automatic Print Leveling.
Got a Z-Min setup?
It’s not common for Z-Min style machines to have issues with the auto leveling, but there are 2 options to resolve this issue.
1) Run Software Print Leveling. If you reach an area on the bed that you are unable to move Z lower to appropriately pinch a piece of paper against the bed, adjust the height of your bed until it reaches the nozzle. If you need to move the bed during the configuration process, you will need to run it again once completed as other sampled positions will have been affected by the bed movement.
2) Adjust your Z endstop to allow the nozzle to move lower. Warning: This is only recommended on machines that home the Z axis with the nozzle positioned off to the side of the bed. Doing this could allow your nozzle to smash into the glass when the machine homes at the start of the configuration process.
If you are able to properly move the Z axis to pinch a piece of paper against the bed at all the points in the leveling process, the software print leveling will give you a perfectly level print, regardless of the physical flatness of your print surface.