
3D Printed Animatronic Talking Tiki Statues
Learn how Jim Leemhuis is using PETG 3D filament to create amazing talking tiki statues.
My name is Jim Leemhuis. I’m 34 years old from Lexington, Kentucky. By day, I’m a mechanical engineer helping design laser printers for Lexmark International Inc. By night, I spend my time 3D printing, coding, and assembling animatronic figures.

I’ve spent the last ten years using 3D printing to compliment my design work at Lexmark. We use large SLA resin and Objet printers to create and test printer parts and fixtures before releasing products to market. Being able to create and test parts quickly was crucial for me at work and, in 2015, I purchased my Lulzbot Mini so I could create parts at home. I found I could turn around designs for work overnight and ensure they worked before using the larger (and more costly to run) SLA/Objet printers at work to print the final working.
I’ve always had a fascination with Disney audio animatronics from a very young age. It seems, today, like many theme parks are moving more and more towards digital projections, but in my opinion, nothing beats a physical figure moving, talking, and interacting in front of you. I knew when I was older that I would try to build my own animatronics. 3D printing, along with open source platforms like Arduino, has allowed me to do that.
My first major animatronic project was an audio animatronic bust with a Haunted Mansion theme. This was a huge leap into open source electronics and a great starting point to ensure I could design and print functional parts. You can see a video of the final project here: https://youtu.be/g5WGrtmRxQU
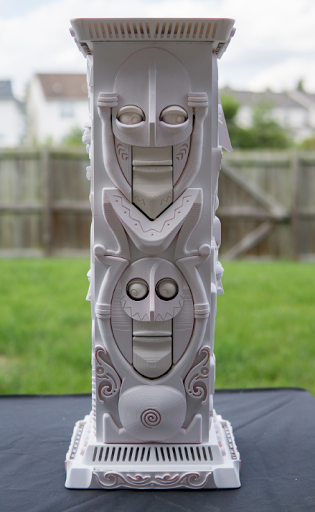
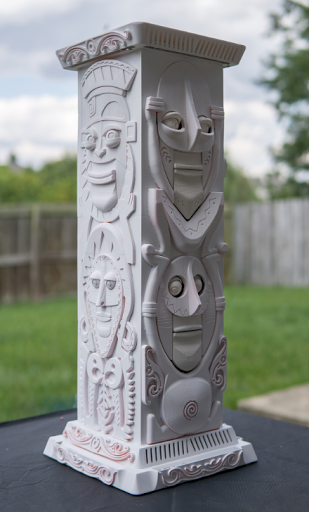
Once I had successfully completed my Haunted Mansion audio animatronic, I knew I wanted to do a project based on the first show to use audio animatronics, Walt Disney’s Enchanted Tiki Room. Everyone I know loves the chanting tiki totems in the show. After studying them for a bit, I realized the animatronics wouldn’t be as complex as my last project, but it would definitely be challenge to test my 3D design and printing skills. I had seen people who had designed and printed tiki poles before; but no one I knew had taken on the challenge of recreating an enchanted talking tiki totem that included motion, audio, and synchronized lighting. It’s would be my own small tribute to those original Disney Animatronics.
The totem design uses a majority of Matterhackers PRO PETG, with PLA and some ABS used as well, in smaller amounts. The totem pole structure, top, and base are all made out of PETG. Why was PETG the right material for this job? PETG has a great combination of strong layer adhesion, minimal warp while printing large parts, higher glass transition temperature, along with being much more durable and much easier to post-process compared to PLA. This allowed for very large parts to be printed without worrying about layer splits (more common in large ABS prints), breaking printed pieces due to brittleness, and having the ability to have parts flex to create tight fits.
Check this link to see the Tiki go through its “show” (Note: at the time of publication, paint has not been fully applied yet): https://youtu.be/DhtXnlpF3e0
After using PETG for this project, there are a few tips I’ve learned through experimentation with the material as well as from others.
Epoxies and other glues will NOT bond to PETG. You need to use a special solvent used for acrylics. I used SciGrip Weldon #4. Note that this solvent has the consistency of water and needs to be applied with an applicator with a thin needle. You should have good ventilation when applying this solvent. Applying outdoors is best. However, it dries within a few minutes.
I was able to bond PETG parts together easily as well as bonding PETG parts to PLA parts (although the bond isn’t quite as strong as PETG to PETG) using Weldon #4. Thanks, @keebie81, for telling me about this great solvent!
In my experience, PETG can be very sensitive to over extrusion. Be sure to set your slicer’s flow % as low as possible that still give you a solid first layer. This is especially true of parts with large initial surface areas. Once you have it dialed in, however, it prints without any issue. This also minimized the chances of PETG material sticking to the nozzle during printing. PETG seems to want to stick to the nozzle more-so than ABS or PLA. If you’re experiencing this issue, try reducing your flow rate a bit and make sure the Z height is correct.
PETG and ABS have very similar sanding properties. Through testing, I’d rank ABS easiest to sand with PETG in a very close second and PLA in a distant third. If you’re looking to post process your prints, keep this in mind if trying to decide between PETG and PLA due to their similar anti-warping properties. Sanding those pesky layer lines out of PETG will be much quicker than PLA.
While warping during printing with PETG is minimal, you may still experience a small amount on larger prints. This may cause a gap between prints if you’re adhering two parts of an assembly together. To fill gaps or seams, using ProBond Wood Filler works amazingly well. It’s easy to apply with your finger, cleans up nicely with water, dries quickly, and sands flush to the part extremely easily. I used this to fill in all my seams on my Tiki totem assembly.
Thanks to @UncleJessy4Real for initially pointing out this great filler product to me.
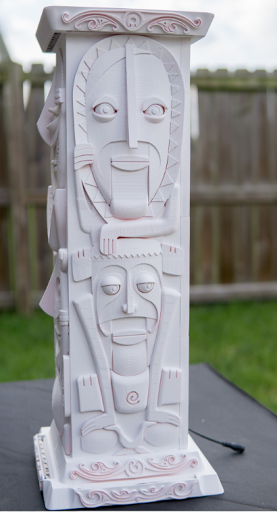
PETG paints well when first coated with a spray can primer. The Talking Tiki is coated with Rust-oleum Universal Bonding Primer. I was then able to paint the parts using standard acrylic paints and a protective clear enamel coat to protect the paint.
Overall, I’m very pleased with how PETG worked for my project. While it does have its own challenges, such as gluing; the minimal printing warp, ease of sanding, increased part strength, higher glass transition temperature, and part flexibility more than outweigh the challenges.
My final piece of overall advice: Pursue a project you are extremely passionate about. You are more likely to push yourself, learn from mistakes and try again, and put in the required time and effort when you are truly “addicted” to your project. Find that project that fits what you’re passionate about and don’t quit until you achieve your goal!
------------------
Follow along with Talking Tiki progress by following Jim on twitter @jimscuba2386 or following the project on Twitter by searching for #talkingtiki.
Do you have cool project where you use a specific MatterHackers filament? Let us know in the comments below or send an email to support@matterhackers.com.