STEM Lesson for Middle/High School: Toy Robot Product Design
Learn how to design custom robots for 3D printing in the classroom to engage middle and high school students in STEAM learning with product design.
Teach Your Students to Design Their Own Robots

MatterHackers Education ambassador and head of technology at BIS Washington, David Williams, leads a workshop in 3D design using TinkerCad, featured at the ISTE21Live EdTech conference. David guides teachers through a step-by-step lesson 3D modeling custom robots that students can design and then fabricate with 3D printing in the classroom.
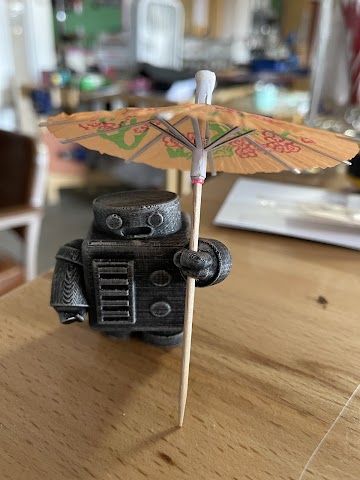
Create a free TinkerCAD account or use MatterControl to emulate the steps and practice making your own robot before sharing with students. Once your design is complete, learn how to implement a variety of physical, software and hardware techniques to make your idea a reality and check out David's example robots created by students that have been printed on an Ultimaker 3D printer using MH Build Series PLA.
Skills Learned in this Lesson
This is an introductory lesson intended to teach the basic fundamentals of 3D design software all implemented within a single model, including the following key concepts:
- Making basic shapes such as cubes and cylinders
- Editing shapes by scaling, rotating, adjusting the number of sides, and adding rounded corners
- Creating negative/hollow space (aka subtractions)
- Generating a custom 3D shape from a 2D drawing
- Grouping and combining objects
Lastly, learn how to transform your students' 3D printed toys into real-life products by implementing the Mayku Vacuum Former, as demonstrated by David at the end of the lesson.
Follow along with the video tutorial below for an easily adaptable lesson into your STEAM curriculum that will engage students in learning product design with fun digital manufacturing techniques.
Digital Manufacturing for Middle Schoolers: Product Design Made Possible
[To see more of the inspiring educational projects, live speaking sessions, and reviews of 3D printing tools and resources created by David Williams as a featured MatterHackers Education Ambassador, visit his collection page on the MatterHackers website here.]