
MatterControl - Viewing and Modifying Parts
A guide to viewing and modifying your 3D printable parts within MatterControl using the 3D View panel. This is a convenient toolkit for modifying your objects in basic ways - allowing you to rotate, scale, and mirror your prints with ease.
The 3D View within MatterControl provides a convenient set of tools for modifying your part. These tools are a great way to make simple edits to your part prior to printing.

Previewing your part within MatterControl.
This guide will cover the following transformation tools and options included in the '3D View' panel when previewing your 3D designs in MatterControl:
To get started, click on the icon representing your part, found either in the Queue or in Settings; it will open in a pop-up window. If you'd like the extra options on the right-hand side to be omitted, click the 'Show Options' button in the bottom left-hand corner. This will still allow you to move the object around and use the zoom function while giving you more screen real estate for your design.
Rotate Tool
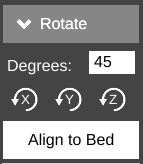
With the Rotate Tool, you can spin a part along any of the three major axes (X,Y, and Z). Simply click on the letter representing the axis that you'd like the object to rotate on. Clicking on a letter enough times will cause the object to end up where it started. You can also fine tune rotations by adjusting the degrees in your rotation.

An object being rotated on its X Axis.
Align To Bed
The "Align to Bed" button will cause MatterControl to attempt to bring your part down flat, adjacent to the bed of the printer. It is useful for resetting the object, if you want to go back to the starting position, as well as creating a new baseline for the object after it has been rotated in various ways. For advanced users: This tool functions by aligning the lowest polygon, with the smallest relative angle, to the bed.
Scaling Tool

Is your design too big or too small? Have you downloaded an object to find that the scaling is incorrect and have no knowledge of design programs? Have no fear, because the Scale Feature is here! With this tool, scaling an object to any size you want is as easy as a click of a button. The scaling will not save until you click “save”, so if you don’t like how it turned out, you don’t have to worry about downloading the file again. If you want to keep the changes, then the save button is there to overwrite the file - so you will never have to rescale it each time the file is opened.
Scale Presets
The Presets options will convert the object from one unit of measurement into another. The default unit on the print bed is centimeters. The Presets option toolbox can be useful if you are having issues with unit conversions when importing a part into MatterControl. If your part looks like it has been scaled incorrectly you can find the correct scale by selecting an option from the list and pressing the 'Apply Scale' button to preview. No changes will be saved until you select the 'Save' button. Prior to saving you may reset the changes you have made, by either clicking 'Reset' in the Preset options or typing in a value of '1' within the Ratio box.

List of scale presets- because sometimes, size does matter.
When scaling an object, it's original size will be denoted as a ratio of 1. To change the ratio, just enter the desired size as which you want the object to be reduced or enlarged. For example, to double the size, enter a ratio of 2. Conversely, to decrease an object's size to 80% of the original, enter a ratio of .8. Click "Apply Scale" to see the changes, which will not overwrite the file until you click Save. This method is recommended for people who just want to change the sizes of objects for aesthetic purposes.

An object being scaled to two and three times its size.
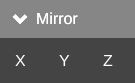
Wish your object could be on the same plane but faced the opposite way? The MatterControl mirror tool takes care of that on every axis, even if you’ve rotated and scaled it to a different angle or size.

An object mirrored on its Z Axis.

The default display options.
By default, the 3D View shows the object as a solid on a print bed grid, which you can choose to toggle on or off by selecting Show Print Bed.

Toggling the print bed off and on.
If the build height has been defined within your Slice Settings, you have the option to view the volume of the print area by selecting Show Print Area, which will be shown as a transparent grey box. This is a handy way to see if your object will fit within the printable area of your 3D printer.

Toggling the print area off and on.
If you enable the 'Polygons' view, then the preview will display a colored wireframe of the model.
The 'Shaded' view shows the model with no black outline for a more natural look.

The different model display options.
And that's the 3D viewer! Have these newly added features allowed your minor editing process to be smoother and easier? What future features would YOU like to be able to access within MatterControl? Let us know in a comment below.