
MatterHackers Lab: Design 3D Printed Assemblies
As part of the Design For Manufacturing (DFM) process, addressing and designing for part tolerances across a wide range of materials and fabricating processes is key to ensuring that the end product is easily assembled and of high quality.
Many people that I speak with about 3D printing often ask me, "So, what can you make with a 3D printer?", or more succinctly "If I get a 3D printer, can I actually do something useful with it?" These queries boil down to the fundamental reason why many of us got into 3D printing.
I know that we all want to “make stuff," but in my case I have always wanted to “make useful stuff." This leads us to the basics of product design. To make “useful stuff," 3D printing is just one of the methods utilized to produce parts or components that, once assembled, result in a complete product.
This is not to say that useful products cannot be made through the printing of one part. Often times the best or most elegant solution is the most simple and may be produced with a single print. However, if the solution is more complex and needs some off-the-shelf components to become fully functional, e.g. electronic boards, wiring harnesses, ball bearings / hardware, etc., then assembly of these components to include 3D printed parts becomes necessary.
As part of the Design for Manufacturing (DFM) concept, printing for assembly is part science, part mathematics and a heavy dose of art. One must understand how materials are used, material properties, fits and allowances and printer limitations. Mastering all the necessary design elements and printing inputs comes with practice, so do not become discouraged if initially components do not fit well together or if the end result does not “look right." Producing a fully functional product is not a simple task and multiple iterations may be necessary to get it right.

First, I cannot stress enough that one has to be able to design parts that are printable and that can easily be produced on the available printer. Each printer is different and what may be printed on one printer may fail on another type of printer. This is especially true when dealing with supports and the tight angles produced by overhangs and part details. Sometimes it is as simple as the correct positioning of the part to be printed, but it all begins with part design and whether the component can be printed.
The next consideration is the material choice for printing the parts. Most of us use either ABS filament or PLA filament, but one may need to use some other materials such as Nylon or PETG to provide component strength or heat resistance. Some of these materials may undergo transformation during the printing process which include shrinkage, warping or stringing. These effects may be mitigated through the advanced settings in MatterControl, but these issues may never fully disappear. Just be cognizant that the rendition of the part in CAD software or in MatterControl may be slightly different than the part that comes off the printer.
How the components fit together often leads to the most frustration for those desiring to reproduce unique product designs. Products are visually appealing and durable if the component parts are designed for the proper fits, e.g. running and sliding fit, clearance fit, transition fit or interference fit. Each one of these fits dictates the tolerance and allowable function of the part should there be part motion. These tolerances should be included in the initial design to ensure that the printed parts “fit." This is a standard practice for DFM. Your 3D Printer is a form of manufacturing that the designer must account for when considering tolerances and fitment.
For example, I should not realistically expect a cylinder or shaft with a 16mm diameter to fit into a 16mm diameter hole. The cylinder diameter needs to be smaller so that it will easily fit into the hole (see Figures 1-3).
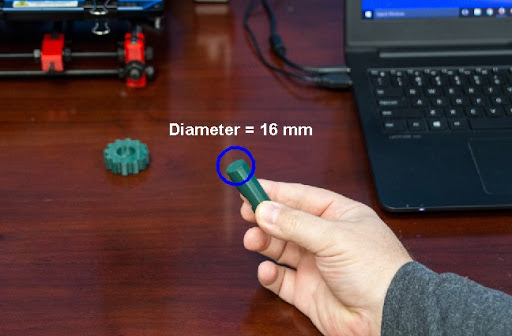
Figure 1
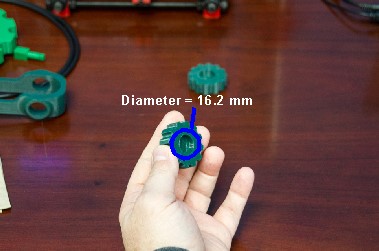
Figure 2
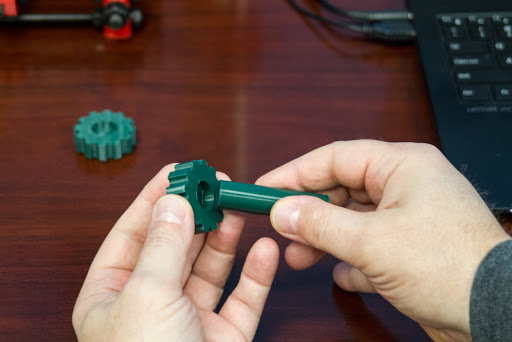
Figure 3
This is also true for parts to be assembled with overlaps. The portion of the part that overlaps for assembly with a component part will have slightly greater dimensions than the portion of the part that connects with the overlapping part. These tolerances are material specific and may be affected by both the material properties and machine printing accuracy (See Figures 4-9).
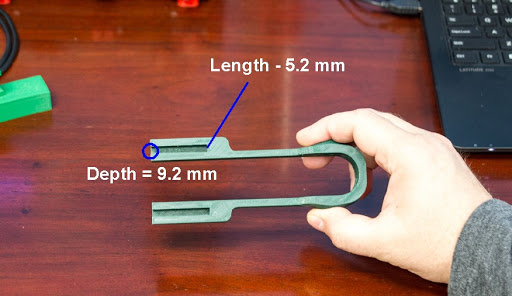
Figure 4
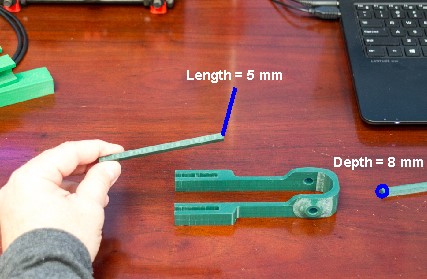
Figure 5
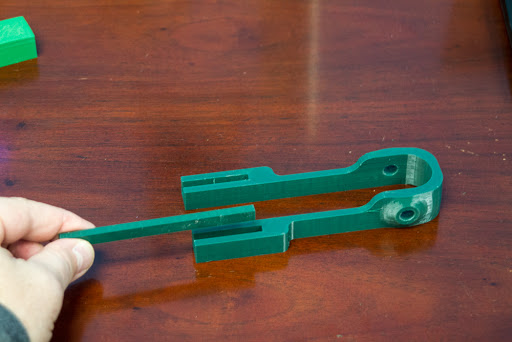
Figure 6
From past experience practicing DFM, machined parts usually have the most accuracy. Often times, the two adjoining parts easily fit together with part tolerances of .1mm. This translates into the connecting dimension of one part being .1mm less in value than the corresponding connecting dimension of its mated part. With 3D printing, the tolerances will need to be much greater. I have experienced necessary tolerances of up to .8mm depending on the material. As a rule of thumb, I usually allow a .5-.6mm difference when printing with ABS and Nylon, and about a .3-.4mm difference with PLA and PETG. In general, the smaller the part dimensions, the more these tolerances come into play.
Finally, the limitations of the printer need to be considered. If you're into prototyping and need the printed parts to be close to final part specifications, then a higher end, more expensive printer may be necessary. Usually the more expensive printers are the most accurate and have lower variability from part to part. If you only print one-off unique parts, then a lower end printer may suffice. This is where the art of 3D printing comes into full display in producing the best result. Trial and error to determine the optimal machine setup and multiple iterations are key to a successful product solution.
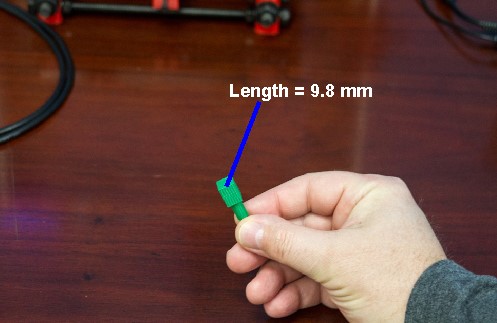
Figure 7
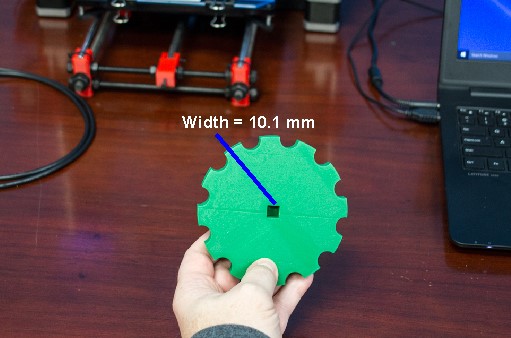
Figure 8

Figure 9
Bringing ideas to fruition and developing a useful and desirable product has never been easy, but with the advent of 3D printing, development and production has now transitioned into the realm of possibility. The cost effectiveness and production versatility is now in the hands of the maker and is limited only by one’s imagination and creativity. Now is the time to start producing “useful stuff”.
As always, Happy Printing!