
Tech Breakdown: The Master Spool
Discover the sustainable concept and history of the Master Spool 3D Printer Filament solution with the Pros at MatterHackers.
Filament without a spool? Why are we making this?
The short answer: because the community wants it. We had enough questions, comments and plenty of tweets asking if we had plans to pick up the Master Spool concept. Seeing the response and interest within the community made it clear to us: we needed to bring this idea to the States. With a joint effort between MatterHackers and Village Plastics, you can now purchase Master Spool refills from within the US.
What is the Master Spool?
Earlier in January, Richard Horne, who goes by RichRap within the 3D printing community, released Version 1 of his spool concept. While this wasn’t the first printable spool that you could find online and download, it was the first that was designed with a specific intent in mind: to reduce plastic waste from the leftover spools after printing. “Reduce, Reuse, Recycle” not only refers to how to reduce the impact of plastic usage, but also the order that helps reduce it the most. By getting rid of the plastic spool, we reduce how much plastic is being created and the energy that is put into its creation, creating a solution that’s better for the environment than most traditional methods.

What are the benefits of the Master Spool?
Not only is there the benefit of reducing plastic waste, using a Master Spool will also reduces shipping costs for new spools, and limits the clutter from amassing of a huge collection of used or empty spools. Rather than throwing away, trying to recycle dozens of spools, or trying to come up with a way to reuse them in some (like the Spool Tool), using the Master Spool means you can use all those filament scraps you have laying around on something useful and have one spool for all of your filament.
How do I use it?
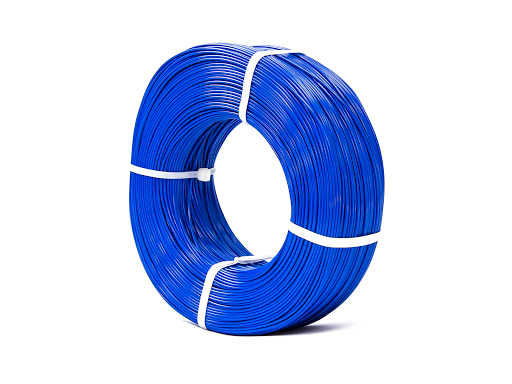
When you receive your filament coil, DO NOT REMOVE THE TIES. There is a combination of zip ties and twist ties that hold together the filament coil, and if those are removed before the coil is properly secured on the spool, you will have a tangled mess worse than Christmas lights on your hands.
The first thing you need to do is print out a Master Spool. Whether you are using the Richrap, MatterHackers, or Village Plastic spool, this refill will fit on it, but the setup will be slightly different.
If you are using a Village Plastics Master Spool, you will need to print two of the 1kg spool halves. Each half is exactly the same so you can use the same Gcode twice. The spool design is 200mm in diameter, so your printer will need to have a build plate at least that large. It doesn’t need supports and layer height, infill, and material don’t really matter. When we printed our first set, we used 0.3mm layers, 10% infill, and PLA and that one worked really well.
The two spool halves insert into each other in one spot, and then twists clockwise to lock them together. Test putting them together before you try putting the coil on.
MatterHackers 1kg Spools
The refill packs that we provide are 1kg instead of the previous 850 gram spools most users are familiar with. Therefore, we came up with a more robust design for the 1kg spools that can handle the additional material without getting pinched in the 850g spools. You can find the new, larger, 1kg Master Spool design 1kg Master Spool design.
Once you feel comfortable with the spool, take your coil and find the end of the filament in the center. This will thread through a hole in the channel in the center of the spool, with a smaller hole for 1.75mm filament and the larger hole for 3mm filament. Make sure to thread it all the way through, as the coil comes with the end pre-bent so you know how far to insert it.
Once you’ve done that, slide the coil onto the one half, slide the other half through it, twist, and lock them together. Take the outer end of the filament and stick it through on of the sets of holes on the outer rim (one set is sized for 1.75mm filament and the other is sized for 3mm filament).
Only once you’ve done that are you ready to remove the twist ties or zip ties. Carefully untwist the ties and use a set of flush cutters to remove the zip ties. Once you’ve done that, congratulations! You are ready to print using your new, refillable Master Spool and filament coils.
If you ever want to change filament, you can use reusable zip ties and slide them around the the coil using the holes in the side of the spool to make it easier to guide it around. Once it held back together, simply unscrew it, remove the coil, and insert the new filament and keep printing!
Once you’ve got the technique down, it’s really easy to swap out different filaments or different colors.
Get started using the Master Spool and print yours today!
Happy printing!