
Maintenance for your Pulse 3D Printer
Take a look at what you might need to replace, modify, or change out after you've put your Pulse 3D printer through its paces.

Like any machine, 3D printers will need some maintenance. While you won't be doing entire teardowns or rebuilding parts of it like you might with a car, there is still a form of consumables in the construction of your 3D printer. Here and there you might need to tighten some bolts or clean off your bed surface, so here you will find all the little things that you might encounter that means your Pulse 3D printer needs some care.
Changing Your Nozzle
If you’ve never changed a nozzle before, you might be wondering why you’d even want to. Well, there are a couple of reasons. While most stock nozzles are brass and have a 0.4mm diameter, nozzles come in a huge variety of materials and sizes. Brass nozzles are standard and are great at heating up and holding temperature, but stainless steel and hardened steel won’t wear out nearly as quickly as brass will with abrasive materials, like copperfill or NylonX with its carbon fiber. There are 0.25mm nozzles for high-details models and even nozzles as large as 1.2mm for incredibly strong, structural parts. In addition, it’s really nice to be able to minimize down-time by taking out a clogged nozzle, installing a clean one, starting a print, and then worrying about taking care of the clogged one. Every nozzle has it’s purpose and specialty, but first, you need to know how to change them out, so let’s get to it.
- Gather tools
- You’ll need are a set of channel-locks or a crescent wrench to grip the heater block, and a wrench to hold the nozzle. The nozzle installed on your Pulse will need a 7mm wrench to grip it.
- Heat up the hot end
- When the metal heats up, it expands just enough to make the threads just a little bit easier to loosen. When they’re cold, they shrink together tight, to the point that you can tear out the thread of the heater block or shear off the nozzle when removing it. We’ve seen it happen plenty of times over, and I’ve done it myself when I first started 3D printing. Heat up your extruder to the printing temperature of the material you last had loaded, then unload filament. set the extruder to 285C to maximize how much the hotend expands.
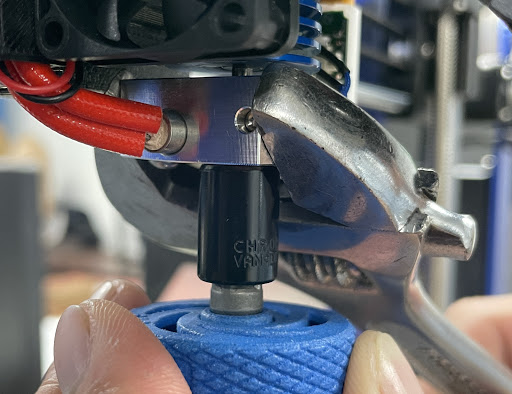
- Remove the nozzle.
- With the hot end at temperature, use the channel locks to grip onto the heater block. You don’t need to grip it tightly, just enough to keep it from rotating while you remove the nozzle. With your other hand, grip the nozzle with the small wrench and begin unscrewing it clockwise (if you were looking at the hot end from above). Once you break the tension, it should come out easy, just keep unscrewing it until it’s out. If it really doesn't feel like it wants to give, be extra careful that you don't shear off the nozzle.
- Install the new nozzle.
- Since the new nozzle isn’t hot it’ll be a little harder to turn because its threads haven’t expanded, but you can do it mostly by hand to start with since it’s cool, then finish it off with a tool. You want to be extra sure that you don’t over torque the nozzle and tear out the threads at this point as well. You could print this nozzle torque wrench designed by Anders Olsson, and once it’s been tightened enough, the wrench will click and prevent you from turning it any further. If you have experience changing nozzles, it’s pretty easy to feel when it’s properly seated, otherwise this tool is super handy; we even have a couple floating around the office.
- Start printing!
It’s really that easy to change a nozzle.
The MatterHackers kit includes some of the most essential tools for getting clean prints and reducing downtime. Composite materials such as NylonX can sometimes lodge themselves in the nozzle leading to a clog. With the included 0.4mm needles you can immediately resolve this by heating the hotend inserting it through the nozzle opening. Another common source of quality reduction is the build-up of material on the nozzle which can reduce the surface finish of printed parts. With the wire brush, you can easily heat up the nozzle and wipe off any excess material.

Cleaning Your Bed Surface
Depending on the model of Pulse that you have, there are different bed surfaces that you could have, and each needs to be cleaned differently.
Buildtak
Cleaning
This is the black sheet that is stock for the base model Pulse and even a fully upgraded Pulse (unless you have a PulseXE, in which case proceed to the next section). It's a plastic sheet with an adhesive backing that is attached directly the the PCB mounted to the Y-axis carriage. If you find that parts aren't sticking to it like it use to, you can clean the surface with a paper towel and some isopropyl alcohol. DO NOT use acetone to clean it off, as that will ruin the surface and you will need to replace it. In most cases, this quick wipedown is enough to remove residue from prints, your fingers, and any dust that may have been on the bed, bringing new life to your Pulse!
Replacing
If you have chips, tears, or bubbles in your Buildtak, you should replace it. True Buildtak uses a specific adhesive backing that removes with the Buildtak sheet so you don't need to spend ages scraping off a gummy residue from your bed to be able to install a new sheet and do it all over again later.
To remove Buildtak, find a loose edge and peel it off. There isn't a best way to do this, just pull in such a way that you won't hurt yourself if it pulls off all at once. Once you have it off, use some isopropyl alcohol to clean off the PCB. Line up the sheet to get an idea of how you want to place it, then remove the backing from your new sheet, being careful not to get any debris stuck to it or on the bed. Carefully line it up, and lay it across the bed. Don't use a credit card to squeegee it on, as that will add creases to the surface rather than a clean bed. You can use a sharp razor blade to trim off any overhanging plastic if you'd like to.
Once you have the new sheet applied, you should run the bed leveling wizard again for good measure, but then you're ready to go and start printing again!

Garolite
Cleaning
If you have a PulseXE, then your 3D printer came with a garolite bed surface. To ensure proper adhesion to nylon, PVA gluestick is the recommended adhesive to keep your nylon and NylonX parts stuck to the bed until you're ready to remove them, but it's essential that you renew the glue stick when necessary, but to also keep the layer of glue from getting too thick. If you need to clean off glue stick, it's really easy; it's water soluble! Get a paper towel, thoroughly soak it in water, and wring it out until it stops dripping. Take you paper towel and lay it over the garolite bed and heat up the bed to 40°C to help soften the glue even more, then wipe it up and take a look at your renewed garolite bed.
Replacing
Through normal use, you should not need to replace your garolite build plate, however if you weld a part to the bed or grind through the top surface because a part printed too close, you're going to have your work cut out for you. It is removable and can be peeled off, much like Builldtak, but will need more care and elbow grease to make work. Heat up the buildplate to 55°C to soften the adhesive and make it just a little easier, then carefully start pulling up the garolite. Be careful that you don't bend it too heavily because it can snap and will be sharp enough to cut. Also mind that you don't use a tool to remove it, as this can mar the PCB bed underneath. It'll take some work, but it is doable to remove and replace a garolite bed.

LayerLock PEI
Cleaning
Powder-coated PEI is an excellent build surface that gives printed parts an excellent finished look and does not need cleaning. However, if you find prints not adhering after a couple of prints due to debris or dust, use isopropyl alcohol with an IPA 91%+ on a paper towel or lint-free cloth to wipe down the print area. As with any build surface, make sure you are not printing too close to the bed to avoid possibly infusing the filament into the build surface.
Replacing
Through normal use, you should not need to replace your PEI build plate, however, if you weld a part to the bed or grind through the top surface because a part printed too close, you will have to replace it to avoid artifacts in your print. If printing PETG, TPU, TPE, and RYNO, make sure the bed is heated BEFORE attempting to remove the print from the bed as this can pull PEI pieces off of the

Firmware Updates
Thanks to the integration between MatterControl and Pulse, you can easily update the firmware without having to recompile code! Under the "Controls" tab of MatterControl, find the "Firmware Updates" section at the very bottom. If MatterControl is connected to your Pulse you can click here to check if there is new firmware for your model of Pulse. If your firmware is out of date, simply click "Update" and your Pulse should be ready to go in a couple of minutes.

Firmware updates for the Pulse are quick and easy using MatterControl
As always, we've got your back.
Still got questions about the Pulse? Send one of our MatterHackers' Technicians an email at support@matterhackers.com or call them at (949) 613-5838. We're here to help!