
Hack Your MakerBot with an E3D All-Metal Hot End
Finally take the leap away from your stock Makerbot extruder and indulge in the precision printing that only an E3D All-Metal HotEnd can provide. Check out our step by step guide to get your Makerbot up and running with an E3D HotEnd.
At MatterHackers we are constantly tinkering with our machines. In the back of the office we discovered a discarded Makerbot Replicator 2 just itching for a face lift. Since we have gotten quite a few requests to make this upgrade available for you makers, we thought we'd give it a shot. As it turns out, with just a few tools it is an easy modification, and (more importantly) the results are fantastic.
Note: This guide will work for any machine with a Mark8 (MK8) Extruder. For example: MakerBot Replicator 2, Makerbot Replicator 2X (dual extrusion), Flashforge Creator X, Flashforge Creator Pro, Powerspec PRO, Monoprice Maker Architect, CTC Bizer, Wanhao Duplicator 4 and a few other equivalent machines.

What You'll Need
- E3D V6 All-Metal HotEnd - 1.75mm Bowden - 24V
- EZR Struder - Cold end extruder
- E3D Type K Thermocouple Cartridge
- M3x10 screws(9)
- M3 Nuts (2)
- M3x14 screw (1)
- M3x16 (1)
- 2.5mm Allen wrench
- 2.0mm Allen wrench (provided in E3D kit)
- Phillips screwdriver #11.5mm
- Allen Wrench (provided in EZStruder kit)
- Printed Parts: Makerbot E3D Hotend Swap Kit Digital Design (includes files for single or dual extrusion conversion)
- Mount Hole Template
Preparation
- Print out required parts: E3D Mount, E3D Lock, and the EzStruder Mount (E3D Mount - dual, if appropriate)
- Remove and disassemble the Makerbot hotend(s)
Assembling the E3D V6
- See E3D's wiki for detailed assembly instructions.
- Screw nozzle and heat break into heating block. When properly assembled there will be a slight gap between the head of the nozzle and the block.
- Apply thermal compound to heat break threads.
- Screw the heat break into the heat sink.
- Attach the cooling fan.
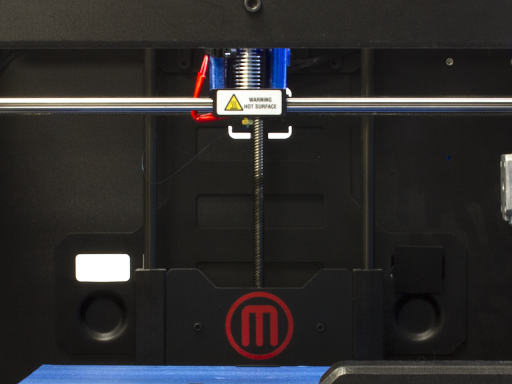
- Attach the E3D Mount Lock to the top of the heat sink.

- Insert the heater cartridge into heat block of the E3D hotend. Secure the cartridge using provided screw and 2mm allen wrench.
Note: The MakerBot uses a 24 volt heater cartridge. Use the original cartridge, but in the event that the part needs to be replaced be sure a 24 volt heater cartridge is used.

The MightBoard RevG does not support the thermistor that comes in the E3D kit. Instead you will need to purchase the E3D Type K Thermocouple Cartridge.
- Insert the thermocouple into E3D.
- Secure with the thermocouple in place using a 3 mm grub screw.

- Place E3D Mount on the printer's carriage with the E3D hotend placed so that the wires are below the carriage. Secure with M3x10 screws and nuts.

- Attach the E3D Mount Lock to E3D Mount using M3 x 10mm screws as pictured.
Important Safety Note - be sure that the heater block is clear from touching any part of the bracket. The heat will melt any plastic that comes into contact with the heater block.

Wiring for E3D
- Remove the covering from the bottom of the Makerbot. Find and unplug Extruder A and the original thermocouple. Also remove Extruder B if you are working on a dual and want to replace both.

- Snip the black/white wires and the red/black wires to 12cm (Do not cut the green/black or yellow/black wires).

- Strip heat sink fan and heating cartridge wires to prepare for splicing.

- Solder or crimp wires together (match wire colors for fan, colors do not matter for heater cartridge).

- Plug extruder(s) back into the board.
- Plug in the E3D thermocouple. The black wire goes to the red terminal on the board and the red wire goes to the yellow terminal.

- Use the 'Preheat' utility to test heat the new block.
Important Safety Note - DO NOT walk away when executing this test. In fact, keep your finger on the power and be sure the heating is performing as expected.
If the temperature decreases instead of increases, then you have the thermocouple plugged in backwards.

- While the hot end is warm, tighten down the nozzle to make sure the heat break and the nozzle are snug and no oozing can occur.

Assemble the EZR Struder
- Remove the hobbed gear from the old extruder motor using the 1.5mm Allen wrench (skip this step if you are replacing this motor with a new Nema17 motor).

- Attach the hobbed gear that came with your EZR Struder with the hobbed part up and the set screw towards the motor.

- Screw the EZR Struder to the stepper motor using 4 screws.
- Do not remove the zip tie on the EZR Struder until you have some screws in place. The two halves of the extruder are under tension and the zip tie is holding them together.
- Make sure the red lever is oriented opposite the wire connector.

- Attach the EzStruder Mount Template to the back of the machine making sure that it lines up above where the filament will be located and is clear of the motors on the inside.

- Drill holes for each screw using the template as a guide.

- Screw the mount into place from the inside of the machine (M3x10 [4]).

- Place the EzStruder into the mount and screw it in place using two screws.

- Attach the bowden tube to both the extruder and hotend
- Plug in motor
- Wrap wires back up in wire sheath.

Finishing Touches
- Put silicone sock on heater block.
- Put knob on EZR Struder.


There you have it! You just upgraded your printer.
You will next want to calibrate your extruder. Here is a guide to do so.