
How To: Create A Custom 3D Carved Cutting Board
Break into 3D carving and make a customized wooden cutting board to step up your culinary game and woodworking skills.

Who doesn't want a custom cutting board? And with the holidays right around the corner, it's time to start thinking of things that earn you serious brownie points with your loved ones - enter your Inventables Carvey and the customized cutting board project.
Check out some other weekend builds here.
MatterHackers is located in California, and as a surfer, I have a tremendous amount of California pride, so for this project, I am going to create a California inlay on a 12-inch walnut cutting board. Here is how i make the cutting board:
Step 1 - Choose Your Materials
I love walnut. It's easily my favorite wood to work with and looks amazing, especially after some sanding and an oil finish. For the inlay, I am going to use hard maple, both for strength and color contrast. Also to complete this project you’ll want to have some wood glue, mineral oil, 100 grit sandpaper, and a clean rag. Here is what I used:
- Walnut wood
- Maple wood
- 100 grit sandpaper
- Type II wood glue
- Mineral oil
- Clean rag

Step 2 - Create the Cutting Board Design
I cheated - the Carvey’s program, Easel, created by Inventables has a few ‘stock’ cutting board shapes to use, which I took advantage of. Here is a link to the one I used for this demo [12” x 6” rounded cutting board]. When you click the blue ‘Open project in Easel’ you're ready to go.

Step 3 - Design the Inlay
I probably sound like a broken record, but this is super easy also. Easel allows you to import any picture and it turns it into an inlay by using the ‘Inlay App’ (from the Apps tab). I chose a California and used a tolerance of 0.004”. The inlay wood I used was a Hard Maple that is 0.125” thick, so I made the inlay on the cutting board that deep. The exterior of the cutting board goes through my entire 0.75” walnut wood blank.

Step 4 - Layout the Workpieces
For this cutting board I used 2 workpieces: one for the cutting board which cut out the exterior of the cuttingboard as well as the California pocket, and one for the inlay itself.
Be sure to set:
- Material Dimensions
- Walnut cutting board base: 0.75" x 6" x 12"
- Hard Maple inlay: 0.125" x 6" x 8"
- Depth of cut for each feature
- Exterior: 0.75 inches (full thickness of cutting board)
- Califonia Pocket: 0.125 inches (thickness of inlay wood)
- California Inlay: 0.125 inches (Full thickness of inlay wood)
- Bit used for each cut (Shop Carving Bits)
- Check the 'Use Tabs" for the inlay cut - they ensure the inlay does not break free before the carving is complete
I used a ⅛” up-cutting bit, which created some tear-out (rough edges that form when carving against the grain of the wood) that needed to be sanded - next time I'll use a straight cut bit to reduce the cleanup needed.

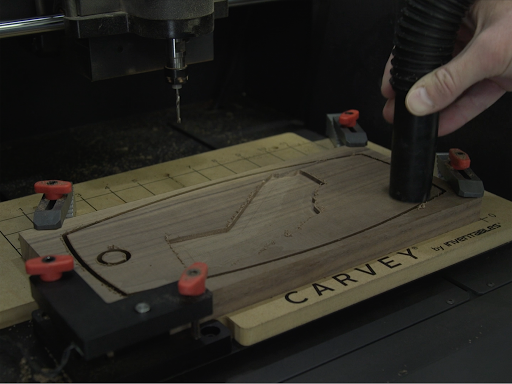
Step 5 - Start Cutting with the Carvey
You’ll want to grab a cup of coffee for this step because your involvement is very passive. Once you have the board clamped in the machine and the Carvey plugged into your computer (must be connected to communicate with Easel) - hit the big green button and take a seat. When the 3D Carving for the cutting board is finished, unload the walnut and throw in the hard Maple. Clamp, start, and repeat.
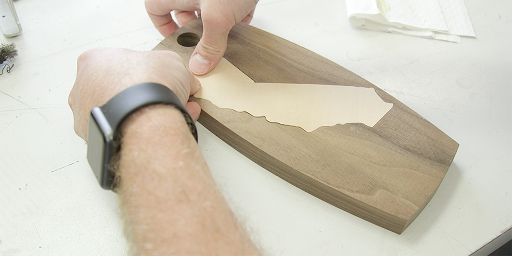
Step 6 - Assemble Your Cutting Board
The inlay may need a bit of sanding to fit just right. Use 100 grit sandpaper - that should do the trick. Make sure you sand down the tabs used for the inlay well. Clean the inside of the pocket and use a few dabs of wood glue to bond the inlay into the pocket. If there are any gaps, use a mixture of wood glue and some of the leftover sanding dust to fill them.
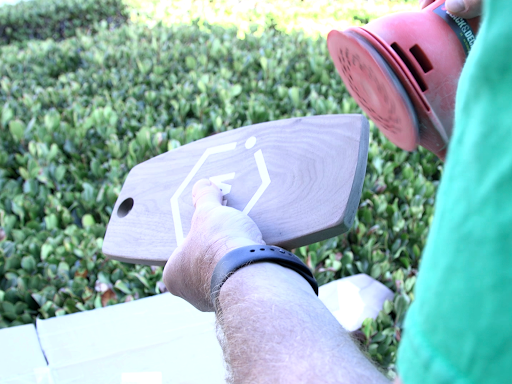
Step 7 - Sanding the Custom Cutting Board
You’ll want to make sure you sand the top flush (the inlay with the cutting board base top surface) and generally touch the entire exterior surface with 100 grit sandpaper. Ease the edges so they are not sharp. For this step, I used a random orbital sander with 100 grit sane paper, but some of the final touches I did by hand.
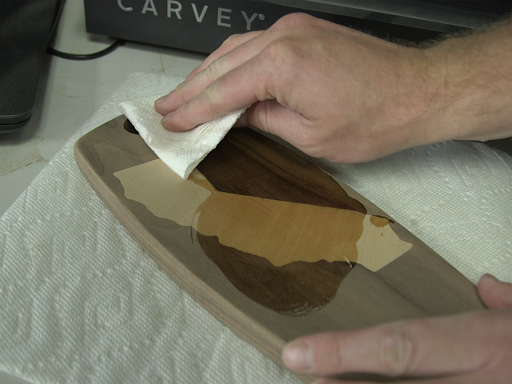
Step 8: Coat the Cutting Board with Mineral Oil
Use Mineral Oil (it is food safe and does not spoil, so is perfect for cutting boards) and apply a generous coating, wipe off the excess. You may want to do this twice, wood loves to drink up that oil.
Step 9 - Enjoy Your New Custom Cutting Board
Now you have a rad, customized cutting board to use for yourself or give as a gift. This will impress loved ones and friends, especially when they find out you made it yourself.
If you are interested in learning more about 3D Carving, feel free to email support@matterhackers.com - we'd love to help you get started!