
Weekend Builds: Neon Signs
Creating custom neon signs traditionally needs Noble gases and glassblowing, but thanks to LEDs it's a lot easier to do it yourself!

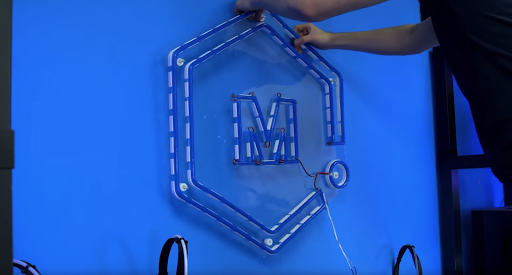
We’ve been doing some Spring cleaning and renovating in the Creative Office; desks are moving around, backgrounds are getting set up, and recording spaces are being finalized. Part of that development was figuring out how to decorate the main set, and by chance a recommended YouTube video was the spark we needed: a neon sign of the MatterHackers logo. Figuring out how this would all go together did take some trial and error, but if you follow along you’ll find the steps I took that actually worked.
To start off, here are the materials and tools that this project needed:
Materials:
A design to follow - I’ll get into more detail on what you need for this.
- Acrylic sheet - This is the background for the sign. The acrylic makes the neon look likes it’s floating and gives it more depth, but you could just as easily use a sheet of plywood instead.
- Printed brackets - I made a couple basic brackets at specific angles and some brackets in a specific shape to hold the neon lights.
- Neon LED lights - It’s like rope lights but better! Because of how they’re designed, you get a much better diffused light, so you can’t even tell these are just made from a bunch of LEDs. Huge tip: do not get AC powered Neon LEDs. In what I found, AC powered lights only allow you to cut them every 20 inches; cut between there and you get a long dead section. DC powered LEDs had a variety of cut lengths, but it was a lot easier to find one I could cut every inch. This is the exact listing I purchased from for this project.
- Power supply -The description of the Neon LEDs had a recommended one, so I went with that; 12V 120W.
Tools:
- Hot glue gun/hot glue - To adhere the brackets to the acrylic. This may not work as well for a wood backing, so you may want to use screws.
- Super glue - To adhere the sections of LED too small to use brackets
- Soldering iron, solder, and wires - to connect each section of LED into one complete circuit.
- Sharp knife - art knife, razor blade, exacto knife, whatever you have that’s sharp and you can control.
- Mounting hardware - I used drywall screws and anchors, but depending on where and what you are mounting against will determine what you need.
Drill and drill bits - to make room for the standoffs for mounting.
Designing the template
Before you dive too deep into this, you need to figure out what kind of sign you want to make. Of course, I did a MatterHackers logo, but the key thing to remember when designing your sign is to think about how each section will connect to each other: where are the line breaks going to be, where will separate islands connect to each other, etc. The neon light is flexible, but not super flexible; don’t expect to make a sharp 90° turn, rather a gradual bend. To more closely replicate the MatterHackers logo, it worked best to create lineart of it - basically just the outline - and use that as the base rather than making the logo one solid color.

Designing the brackets
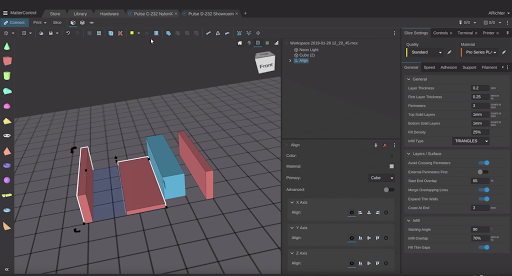
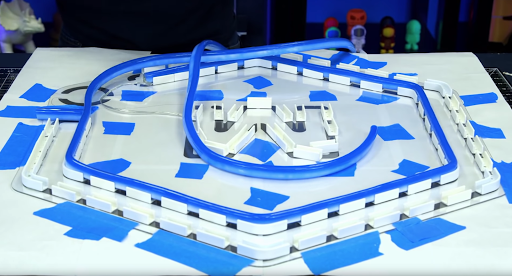
Looking at the MatterHackers logo, there are a lot of angles and straight lines, and not a lot of natural curves. This meant it was hugely important to keep the lights straight along each path because any waviness to it would be incredibly obvious. Initially, I only made brackets for the corners and you could tell - it was a disaster. On the second attempt, basically the entire sign was supported by brackets, which made assembly a lot easier too. While designing the brackets, I used MatterControl to first do a mockup of the general shape of the light and made the bracket to fit around it. I got lucky and had the first attempt fit really snugly on the light but not to such a degree that it was stressing the 3D prints. In the end I had three styles of brackets: straight sections, 120° sections, and one large circle for the circle of the logo (with a small cutout for wires to pass through). In the video you will probably see the hole through all the brackets, and that’s because I originally intended to make these use screws, but surprisingly hot glue held on way stronger than I expected and they weren’t necessary. If instead I wanted to use a wood backing, then they would definitely come in handy.
Designing and cutting the acrylic
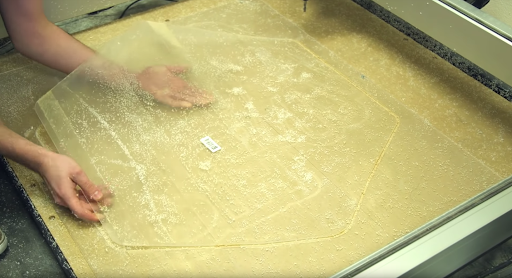
We took the graphic create as the template and expanded the border of it ever so slightly to have a bit of negative space around the sign. This also gave me a vector file I could utilize to cut it out. I have a lot of tools at my disposal. Not a lot of power tools but a ton of computerized tools like 3D printers and CNCs. For me, it was a lot easier to create a vector file from the original design and cut it out using a Shapeoko XXL and a ½” bit than it was to try and freehand it using my nonexistent jigsaw or bandsaw. Use the tools you have available to you to cut this part done, whether it’s cutting out a piece of plastic or making a nice wooden background.
Printing the brackets
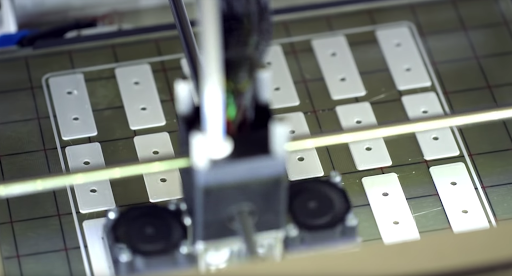
This is the easy part. I would recommend printing with as many perimeters as you can since these need to flex a tiny bit without breaking. I printed mine with 4 perimeters at 30% infill and I was able to get the brackets printed out in about eight hours on the Pulse XE.
Setup for assembly
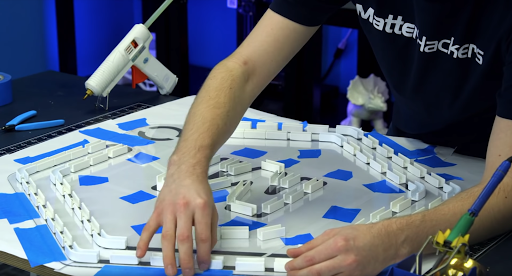
Start by printing out the design and tape all the pieces back together into one big template. You’ll want to be as precise with this as you can, because this will be your guide in assembling the sign. I just used whatever tape was closest, which was blue tape, and got to work taping each page together like a big puzzle. You’ll then want to lay your acrylic sheet on top of the paper and finalize your spacing around the edges, then tape the acrylic to the paper so it doesn’t slip.
Take your brackets and lay them out over the entire sign. Check for anywhere that looks like it might need more support or where it might benefit from a constraint to keep its shape. It’d be handy to take a picture of it at this point, because just moving around the neon light will get in the way of the brackets.
Cut off an end piece of light from either end of the LEDs; 5 inches should be enough. You will use this as a ruler so you can get at the end of a complete section of LED to avoid dead zones. It doesn’t matter where you cut through for this piece, just be careful with the delicate strip of LED on the inside, you want to remove that in one piece; don’t rip your ruler in half.
Assembly
Pick one major section of lighting and start there. Once your glue gun is hot and ready, put a glob of glue onto the back of the bracket and press it onto the path of your sign. Start with things like corners and unique shapes before doing long straghtaways; you don’t want to put a straight piece too close to a corner and not have enough room. Make sure you don’t go overboard with the glue - you just want enough to squish between the bracket and the acrylic, but not so much that it oozes out. It’s fine if it does, but your sign will look messier on a closer inspection.
Hold the “ruler” over the end of the neon light, matching up the solder points of the light to the ends of the ruler and start marking where each section ends (or every other, whatever works). Once you’ve got a decent length measured, weave the full length of light through the brackets until you reach a point where they can’t make the turn as cleanly as you’d like (in my case the corner at the ends of the hexagon) and find the cut line closest to where you want to end the lights. Carefully press your knife into the sheathing, being gentle enough to not cut through or scratch the strip inside. You’re first checking that your ruler was on the mark and that there is indeed the end of a section where you marked it and not right through an LED. If you can see that your mark was accurate and there’s a cut line visible, cut along it and separate the two sections. Repeat this for the rest of the lengths of light in this section: threading it, lining it up, and cutting it off.
Once you have all your loose sections, carefully tin the contacts each strip, and cut,strip, and tin short lengths of wire to bridge the gap between each section of LED. If the length of LED is too short to comfortably fit in a bracket (as in the bracket will crowd that area), I found that superglue holds the lights onto the acrylic really well. It’s basically a permanent solution, so try and design your way around this hole if you can avoid it (but it’s not like you’d take apart your beautiful sign when it’s done, right?) Repeat this for the rest of the sign. There’s going to be a lot of cutting, stripping, and soldering, but it will all be worth it in the end.
Mounting
Like I mentioned before, I wanted this mounted on the wall in the background of our videos, so I needed to do more than a picture hanging hook and call it good. After doing a little research, I was reminded of how glass is traditionally mounted on walls: a hole through the glass, a standoff that screws into the wall, and a cap that threads into the standoff and through the glass. Creating a cap that has screws on it is doable but would take some work to get tolerances down, but a simple friction fit relying the layer lines would be easy enough. With half an hour’s work I modeled a standoff around the drywall anchors and the screws it came with.
- Standoff - thick enough at the bottom of the hole to give the screw enough plastic to press against, holes wide enough for it to easily pass through but not sloppily, and a small hole on the bottom to fit the drywall anchor (since they don’t press in completely flush with the wall).
- Insert - thick enough to have enough plastic for the screw to press against, enough space between the insert and standoff to support the acrylic
- Caps - Just enough tolerance to press into the insert and not fall out, but easy to pry out if I need to access the screws again.
After some experimentation with cutting holes in some scrap acrylic, I found that starting with a pilot hole and immediately moving to the full size drill bit shattered chunks out of the acrylic, gradually increasing the size of the bit caused some chipping, and taping both sides of the acrylic and taking it easy still formed micro-fractures in the acrylic. With one last attempt before breaking out the soldering iron again and melting the holes in it, I tried a spade bit. It was perfect. Taking it easy I was able to carve through the acrylic a lot gently than a regular bit, and then I could clean up the hole with a regular bit to get it to the right size.
With the sign on the wall, I took a long section of wire and fed it behind the display shelf to the power supply down below, cut it, stripped it, and inserted it into the power supply with its protective case. All that was left was to turn it on, and it actually worked!
So while this article is verbose, from start to finish, I actively worked on the MatterHackers neon sign for only five or six hours, and that was still with trial and error going into it. I hope this gives you some ideas of a sign you want to create, big or small. Either way, I’d love to see what you come up with.
Happy printing!