
Software Setup for Pulse - MatterControl
Once you connect your Pulse to MatterControl, you unlock the full potential of your 3D printer. Take a look at how easy it is to set things up and get started.

Every 3D printer needs a companion slicing software to turn 3D models into the language that a 3D printer can understand. For Pulse, that software is MatterControl. MatterControl works with the most popular printers on the market, but some features have been specially built and designed to work in tandem with a Pulse.
That being said, you aren't locked into slicing with MatterControl if you don't want to, but you will need to import your sliced files (or Gcode) that was exported from the other slicing program. To utilize the Pulse's auto bed-leveling, MatterControl needs to be part of that process.
Let's get started.
Step 1 - Download MatterControl
- Go MatterControl, and click the "Download" button to install MatterControl based on your operating system.
- Follow the installation wizard and you should be good to go after a few minutes.

Pick your Operating System and start using MatterControl in minutes. If any issues arise during installation/initial use, go to the product page to make sure your operating system meets the minimum requirements.
Step 2 - Setup Wizard
- Open MatterControl.
- Click the ‘Setup New Pulse' button to create a printer. Go to Step 3.
- If the Setup Window pictured below does not appear upon startup, continue reading this step for the alternative setup.
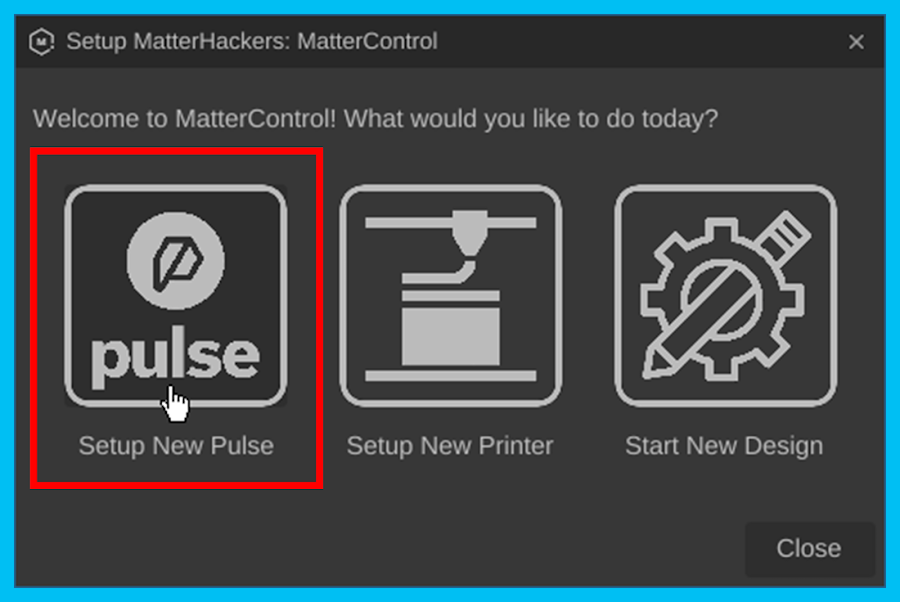
Click the left option "Setup New Pulse".
ALTERNATE SETUP
Go to Step 11 if you already followed the instructions above. Follow the two bullet points below if were unable to follow the instructions above.
- Click the "Printers" tab (A) at the top if not already on the page.
- Click the "Create Pulse" button (B) located next to "Printers" on the left.
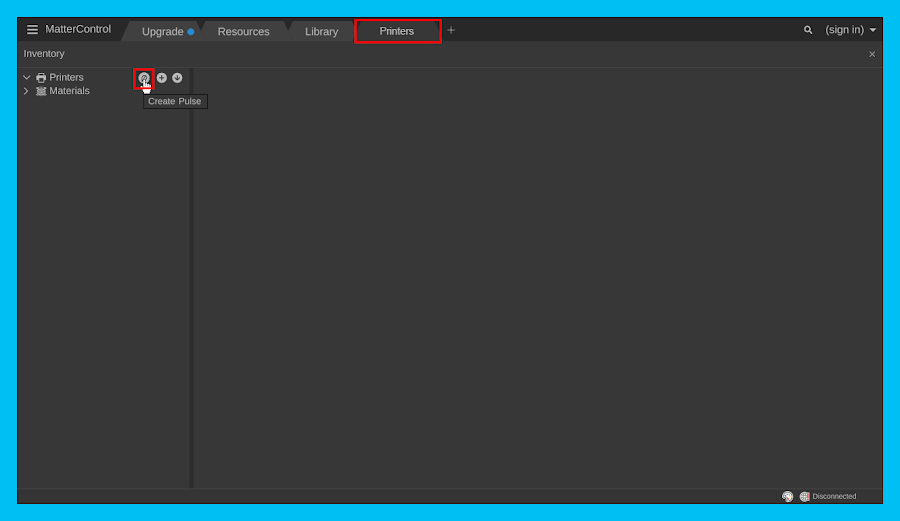
Alternate Setup: Go to the "Printers" tab, then click the "Create Pulse" button (an icon of the Pulse logo)
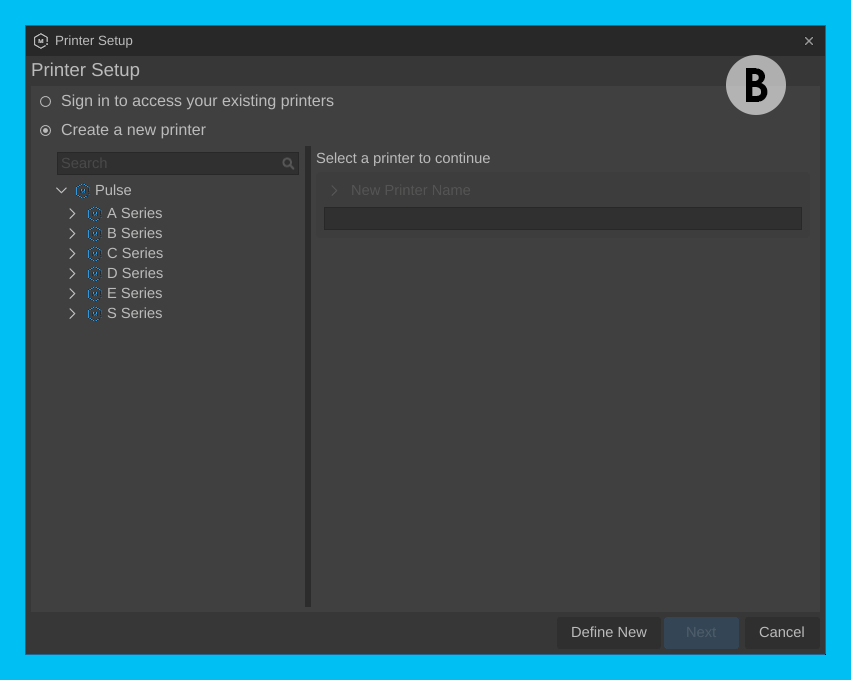
Step 3 - Create Printer
- Locate your Pulse's model number on the sticker that's on the back of the blue aluminum frame. (A)
- Type in and click the Pulse profile based on your Pulse model. (B)
- Then you can either...
- Customize the name of this printer profile (edit in the text box under "New Printer Name") and select "Next"
- Or simply select "Next"
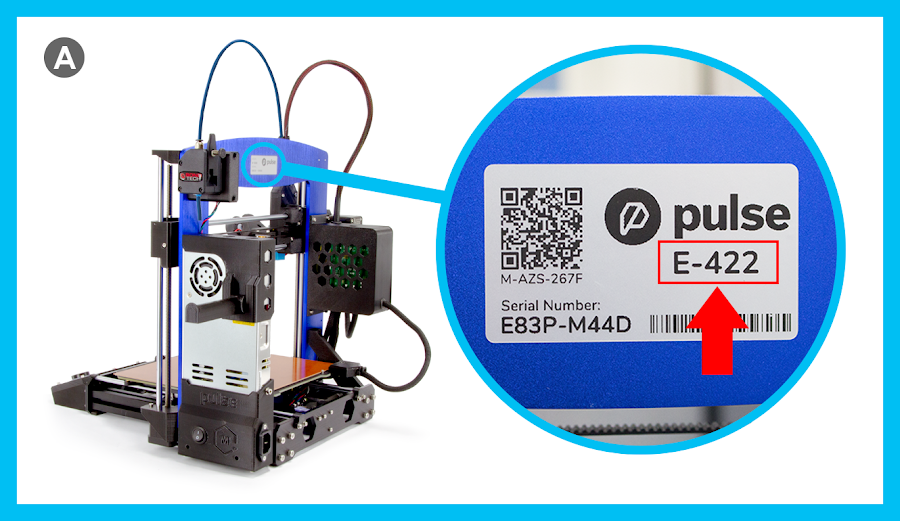
The model sticker can be found behind the blue aluminum frame of the printer.
Type in the model number, click the model number, and then click "Next".
Step 4 - Prepare Connection
- Make sure the printer's USB cable is unplugged from the computer (if connected).
- You could also disconnect the USB cable from the printer instead of the computer if that is within easier reach. The main goal is to have one end of the USB not connected to anything.
- Click "Continue".

The Setup Wizard instructions will direct you to have the printer's USB to remain unplugged before clicking "Continue".
Step 5 - Connect Printer
- Connect the USB cable to computer and click "Connect".
- Your Pulse will have successfully connected if the Setup Wizard window disappears and the "Connect" button on the top left side of MatterControl now says "Disconnect".
- If you have issues connecting, make sure the printer was turned on before clicking "Connect". If issues persist, reach out to support@matterhackers.com

Step 6 - Open Printer Setup
- Click the "Print" button (A) and then click "Setup" (B).
- Note that you must go through the setup process before you can print.
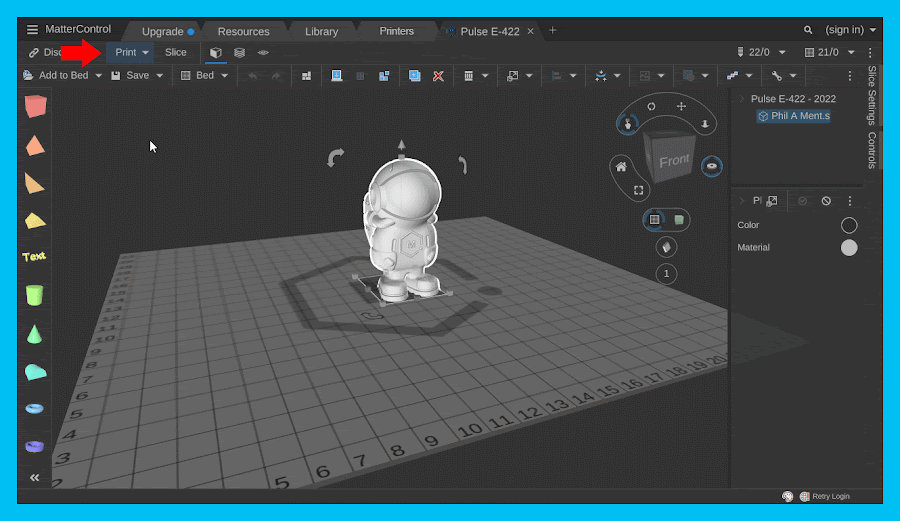
Click "Print" button > Then click "Setup". Printing capabilities will be unavailable until the Setup process has been completed.
Step 7 - Prepare for Z Calibration
- Read the overview to understand what Z calibration is and the purpose of calibrating the Z height on any 3D printer. (A) Then click "Next".
- Grab a piece of paper (preferably one that has a thickness equivalent to printer paper). (B) Then click "Next".
- Note that if your hotend hasn't heated up, it will before the manual Z-calibration process begins. (C) Click "Next" once the button becomes available.
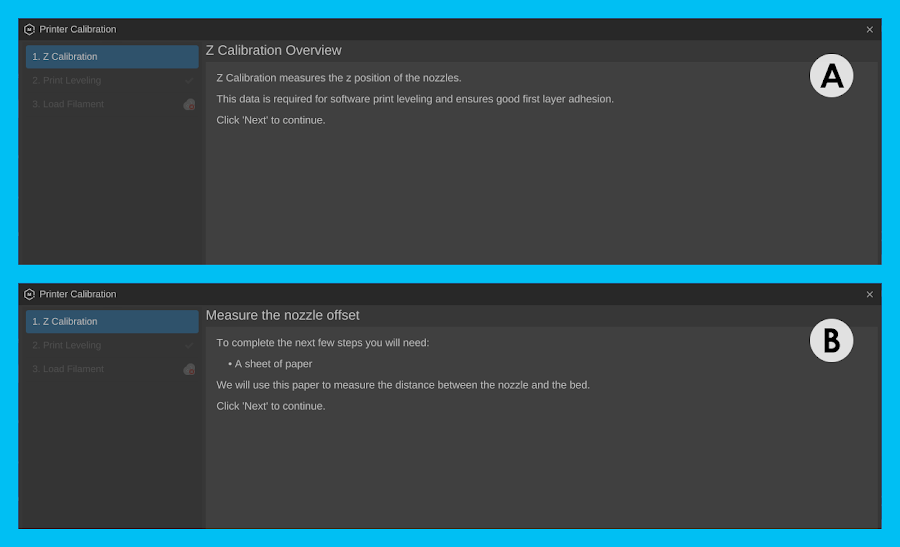
Understand what z-calibration is and why it's important. Then grab a piece of paper before beginning the process.

Your hotend must be heated to the temperature it will be printing at before Z-calibration can begin. If it's not already at that temperature, it will automatically heat up to that temp before continuing.
Step 8 - Calibrate Z-Height
- Follow MatterControl's 3-step instructions for calibrating your Z height.
- In Step 1, lower your Z height down to a level before it hits the bed. (A)
- If your nozzle touches the bed, click "Z+" once. Then click "Next".
- In Step 2, lower your Z height until you feel some resistance from the paper making contact with the nozzle. (B) Click "Next".
- In Step 3, lower your Z height until the nozzle causes enough resistance for the paper to fold up as you push the paper towards the hotend. Then hit "Z+" twice. (C) Click "Next".
- Do NOT match the numbers in the screenshot. The Z height at each step varies from printer to printer so the numbers pictured below may not match your specific printer's Z calibration needs.
- In Step 1, lower your Z height down to a level before it hits the bed. (A)
- Remove your paper when complete and click "Done".
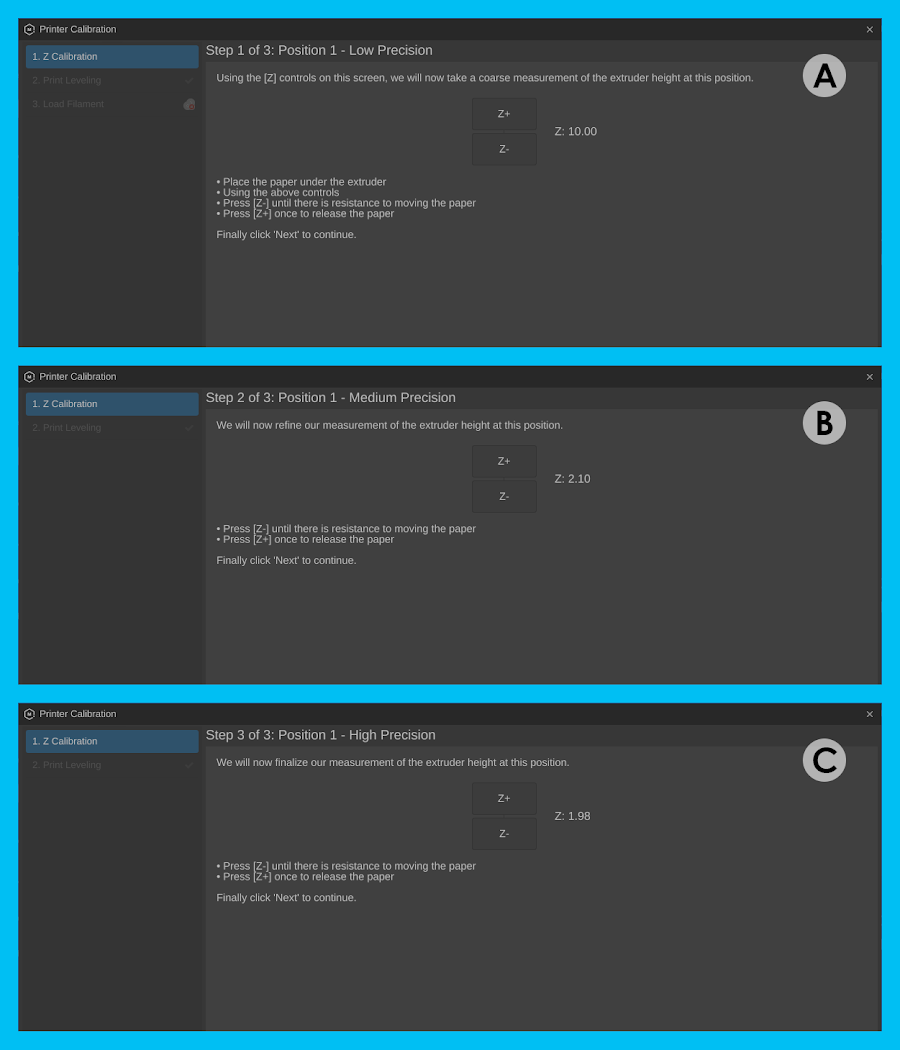
Do NOT mimic the values achieved in this image. Every printer is unique and will most likely be calibrated at different values.
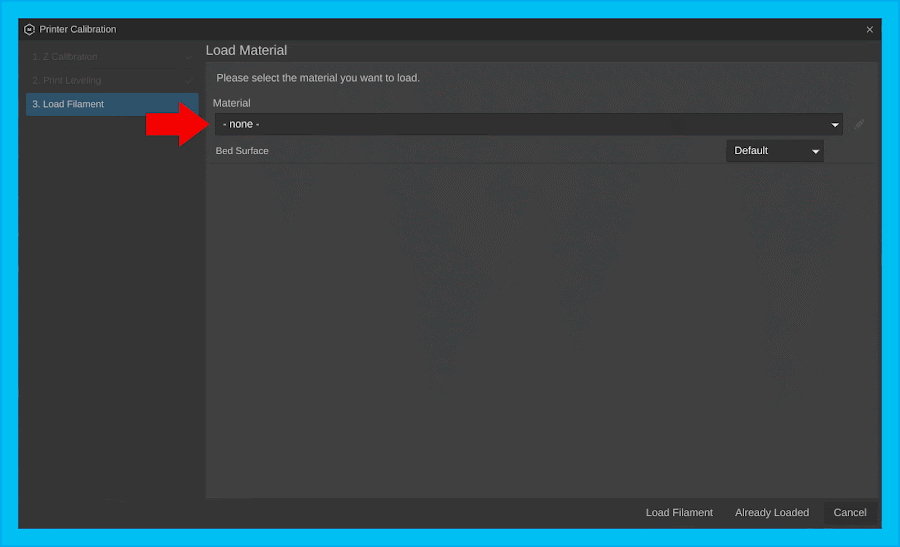
Step 9 - Choose Material & Bed Surface
- Once you've calibrated your Z height, follow MatterControl's next instructions for loading material.
- Click the dropdown menu and select the material you will be printing with and then select the bed surface you will be printing on. Then click "Load Filament".
- If no options currently exist in the list, then click add new material from the drop list.
- If you already have filament loaded, you can skip the next step by clicking "Already Loaded".
- Click the dropdown menu and select the material you will be printing with and then select the bed surface you will be printing on. Then click "Load Filament".
- If the hotend is no longer/not at the temperature needed to print the material you selected, then you will need to wait until the hotend finishes heating up before proceeding to the next step.
Step 10 - Load Filament
- Continue following MatterControl's next instructions for loading material.
- Trim the end of your filament down to a point (recommended to use flush cutters). (A) Click "Next".
- Feed it into the PTFE tube opening sticking out from beneath your extruder.(B) Click "Next" once the extruder has grabbed onto the filament.
- You'll know it has grabbed on if you are unable to pull it back out easily.
- Wait until the software finishes automatically loading your filament.
- Wait to click "Next" until the filament purges out the filament you fed into the extruder.
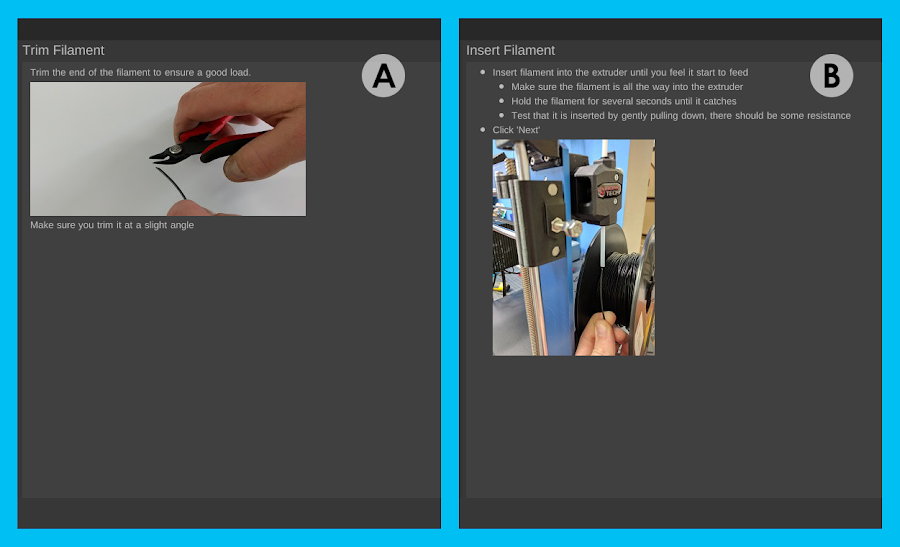
Trim the end of the filament into a fine point so the extruder grabs the end more easily. Then feed it into the PTFE tube opening sticking out below the extruder.
What's Next?
With your software setup for success, start your first print with some assistance from our guide "Starting Your First 3D Print on Your Pulse".
Troubleshooting
Check out our 3D Printer Troubleshooting Guide if you have any issues and as always, call us here at (949) 613-5838 to speak with one of our support representatives. Our top priority is for you to be successful in 3D printing, please do not hesitate to call in with any issue you are having.
As always, we've got your back.
We don't expect you to run into any problems, but if you do, please do not hesitate to contact a MatterHackers Technician at support@matterhackers.com or by phone at (949) 613-5838. We're here to help!
About MatterControl:
MatterControl is the software that you’ll use to run your Pulse 3D Printer. The software is Open Source software developed in house at MatterHackers and is optimized to be paired with Pulse 3D printer. Pulse is also open source, so you’re free to slice and use other software to create G-Code - we still recommend running that g-code using MatterControl. The most important aspect is bed leveling which MatterControl stores and augments signals sent to the machine to ensure a perfect first layer every time.