
3D Printer Troubleshooting Guide
Use this guide to help you identify and solve the most common issues that may occur while 3D printing.

When printing, unexpected challenges may arise that will need to be resolved in order to complete a successful print. Often times, the appropriate response to a printing issue is not immediately apparent. This guide outlines some of the most common issues faced by 3D printing practitioners and highlights steps that may be taken to resolve those issues.
If you need some extra guidance, you can always book a virtual training session with our services team - professional development training and support.
 |
 |
 |
 |
| Not extruding at the start of the print | Print not sticking to bed | Jammed nozzle/clogged extruder | Pillowing, e.g. incomplete top layer fills, top layer holes/gaps |
 |
 |
 |
 |
| Smashed first layer, aka elephant’s foot; bulging first layer | Warping or corner lifting | Layer separation or warping within the part | Shifted layers or leaning prints |
 |
 |
 |
 |
| Stringing / hairy prints | Overhangs or sagging sections in the print | Support material difficult to remove | Under extrusion, e.g. not extruding enough plastic or insufficient material |
 |
 |
 |
 |
| Grinding filament and/or extruder motor skipping | Small features not printed | Scars on top surface | Blobs and/or pimples on exterior surface |
 |
 |
 |
|
| Weak infill | Stops extruding in the middle of a print | Infill showing on exterior of print |
Table of Contents
The guide is organized into a table with the following format.
| Issue/Title | This highlights the action of a printer or print result that is not optimal or correct. This is comparable to a medical examination where the doctor inquires about the symptoms or behavior the patient is exhibiting or experiencing while being ill. |
|---|---|
| Example Image/Graphic | This is an image or graphical representation of the issue. |
| Issue Details | This provides additional information on the issue from actions during printing or the results upon completion. |
| Cause and Suggested Solutions | This lists in order from highest to lowest probability the source or cause of the issue and suggested solutions to follow for issue resolution. |
Not extruding at the start of the print
Print not sticking to bed
Jammed nozzle/clogged extruder
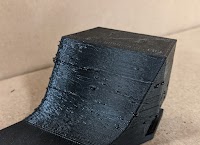
Pillowing, e.g. incomplete top layer fills, top layer holes/gaps
Smashed first layer, aka elephant’s foot; bulging first layer
Warping or corner lifting
Layer separation or warping within the part
Shifted layers or leaning prints
Stringing / hairy prints
Overhangs or sagging sections in the print
Support material difficult to remove
Under extrusion, e.g. not extruding enough plastic or insufficient material
Grinding filament and/or extruder motor skipping
Issue 14Small features not printed
Scars on top surface
Blobs and/or pimples on exterior surface
Weak infill
Stops extruding in the middle of a print
Infill showing on exterior of print
How to Level Your Print Bed
If you are specifically running into issues that relate to having an unlevel printing surface, please refer to our Anatomy of a 3D Printer: Bed Leveling article - it has comprehensive solutions for any type of leveling system!

Troubleshooting Guide
Not Extruding At The Start Of The Print
| Issue/Title | Not extruding at the start of the print |
|---|---|
| Example Image / Graphic | 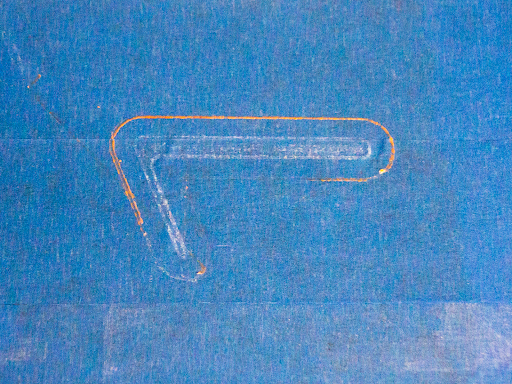 |
| Issue Details | Print grooves left in bed with no filament and/or flaky or intermittent lines of filament on the first and subsequent layers |
| Cause 1 | Incorrect extruder calibration/offset |
| Suggested Solutions 1 |
|
| Cause 2 | Clogged extruder/nozzle |
| Suggested Solutions 2 |
|
Print Not Sticking To Bed
| Issue/Title | Print not sticking to bed |
|---|---|
| Example Image / Graphic |  |
| Issue Details | Insufficient bed adhesion |
| Cause 1 | Bed is not level |
| Suggested Solutions 1 |
|
| Cause 2 | Incorrect nozzle calibration/offset |
| Suggested Solutions 2 |
|
| Cause 3 | Improper bed surface or settings for filament |
| Suggested Solutions 3 |
|
Jammed Nozzle / Clogged Extruder
| Issue/Title | Jammed nozzle/clogged extruder |
|---|---|
| Example Image / Graphic |  |
| Issue Details | Extruder is unable to feed filament through nozzle and is often accompanied by a grinding or “clicking” sound from the feed motor |
| Cause 1 | Heat creep for PLA |
| Suggested Solutions 1 |
|
| Cause 2 | Particle or carbonized filament blocking nozzle |
| Suggested Solutions 2 |
|
Pillowing, e.g. incomplete top layer fills, top layer holes/gaps
| Issue/Title | Pillowing, e.g. incomplete top layer fills, top layer holes/gaps |
|---|---|
| Example Image / Graphic |  |
| Issue Details | Pillowing is usually PLA filament specific |
| Cause 1 | Layer cooling too fast for PLA |
| Suggested Solutions 1 |
|
Smashed first layer, aka elephant’s foot; bulging first layer
| Issue/Title | Smashed first layer, aka elephant’s foot; bulging first layer |
|---|---|
| Example Image / Graphic |  |
| Issue Details | Side profile of the printed part shows a bow near the bottom or next to the surface that was adjacent to the print bed |
| Cause 1 | Bed is not level |
| Suggested Solutions 1 |
|
| Cause 2 | First layer height is too low |
| Suggested Solutions 2 |
|
| Cause 3 | Extrusion rate for the first layer is greater than 100% |
| Suggested Solutions 3 |
|
Warping or corner lifting
| Issue/Title | Warping or corner lifting |
|---|---|
| Example Image / Graphic |  |
| Issue Details | Edge near the bottom of the print or surface adjacent to the print bed is not level or flat |
| Cause 1 | Materials, e.g. ABS and Nylon may shrink upon cooling and/or curing |
| Suggested Solutions 1 |
|
| Cause 2 | Design of part has sharp corners or thin areas |
| Suggested Solutions 2 |
|
Layer separation or warping within the part
| Issue/Title | Layer separation or warping within the part |
|---|---|
| Example Image / Graphic |  |
| Issue Details | Layers do not adhere to previously printed layers and pulls from print bed |
| Cause 1 | Print temperature is set too low |
| Suggested Solutions 1 |
|
| Cause 2 | Too much layer cooling during and after deposition |
| Suggested Solutions 2 |
|
| Cause 3 | Ambient air temperature is too cold and uneven |
| Suggested Solutions 3 |
|
| Cause 4 | Printer is printing too fast |
| Suggested Solutions 4 |
|
Shifted layers or leaning prints
| Issue/Title | Shifted layers or leaning prints |
|---|---|
| Example Image / Graphic | 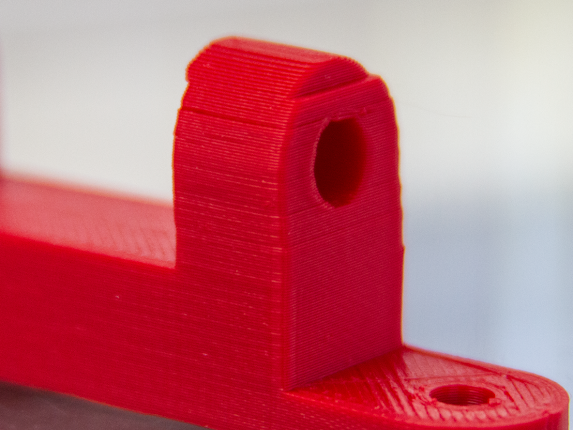 |
| Issue Details | Layers shift in the z-direction as print progresses |
| Cause 1 | Printer is printing too fast |
| Suggested Solutions 1 |
|
| Cause 2 | There nozzle is getting caught on raised or warped sections of the print |
| Suggested Solutions 2 |
|
| Cause 3 | There are loose pulleys on the x-axis and/or y-axis |
| Suggested Solutions 3 |
|
| Cause 4 | Belts are skipping teeth on the x-axis and/or y-axis |
| Suggested Solutions 4 |
|
Stringing / hairy prints
| Issue/Title | Stringing / hairy prints |
|---|---|
| Example Image / Graphic |  |
| Issue Details | Filament in the hot end of the extruder continues to ooze out of the nozzle during non-print moves |
| Cause 1 | Slow extruder movement between sections of a part or more than one part |
| Suggested Solutions 1 |
|
| Cause 2 | Length of filament retraction is too short |
| Suggested Solutions 2 |
|
| Cause 3 | You are printing with PET |
| Suggested Solutions 3 |
|
| Cause 4 | Printer crosses gaps when moving from one place to another |
| Suggested Solutions 4 |
|
Overhangs or sagging sections in the print
| Issue/Title | Overhangs or sagging sections in the print |
|---|---|
| Example Image / Graphic | 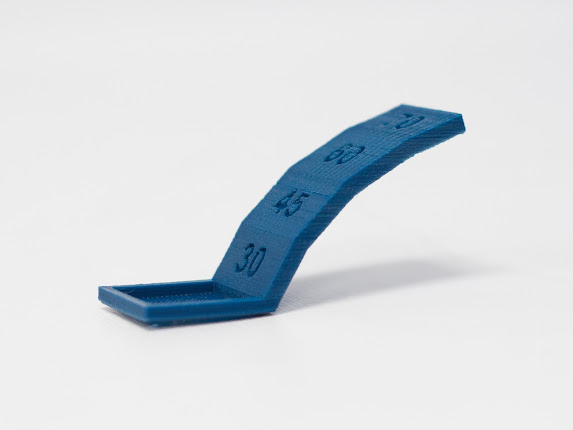 |
| Issue Details | Unsupported or protruding part faces may not print properly or not print at all |
| Cause 1 | Design of model or positioning of part |
| Suggested Solutions 1 |
|
Support material difficult to remove
| Issue/Title | Support material difficult to remove |
|---|---|
| Example Image / Graphic |  |
| Issue Details | Removing supports is difficult due to fused support material with the initial part layers and often results in pitted initial layers once supports are removed |
| Cause 1 | No gap or layer height offset between support layer and initial part layer |
| Suggested Solutions 1 |
|
Under extrusion, e.g. not extruding enough plastic or insufficient material
| Issue/Title | Under extrusion, e.g. not extruding enough plastic or insufficient material |
|---|---|
| Example Image / Graphic |  |
| Issue Details | Under extrusion is identified by “silky” residue or gaps between extrusion lines or layers |
| Cause 1 | Printer settings for filament size is incorrect |
| Suggested Solutions 1 |
|
| Cause 2 | Filament extrusion temperature is too low |
| Suggested Solutions 3 |
|
| Cause 3 | Nozzle or extruder may be clogged or not properly calibrated |
| Suggested Solutions 3 |
|
Grinding filament and/or extruder motor skipping
| Issue/Title | Grinding filament and/or extruder motor skipping |
|---|---|
| Example Image / Graphic |  |
| Issue Details | Noise from the feed motor makes a grinding or clicking sound |
| Cause 1 | Heat creep from the extruder that creates a “bulb” at the end of the filament between the gear and the extruder |
| Suggested Solutions 1 |
|
Small features not printed
| Issue/Title | Small features not printed |
|---|---|
| Example Image / Graphic |  |
| Issue Details | Small details such as sharp corners, thin walls, or intricate designs are not fully formed or are missing in the final print. This can often be seen in highly detailed models or prints with small, intricate parts. |
| Cause 1 | Features are below the nozzle extrusion width is the most common cause of this issue |
| Suggested Solutions 1 |
|
Scars on top surface
| Issue/Title | Scars on top surface |
|---|---|
| Example Image / Graphic |  |
| Issue Details | Filament residue is “leaked” upon the top of the print surface |
| Cause 1 | Lack of z-lift or retraction between moves |
| Suggested Solutions 1 |
|
Blobs and/or pimples on exterior surface
| Issue/Title | Blobs and/or pimples on exterior surface |
|---|---|
| Example Image / Graphic |  |
| Issue Details | The exterior surface of the print has small, unwanted extrusions or bumps, often referred to as blobs or pimples. These can occur randomly or at consistent intervals, disrupting the smooth finish of the print. They can vary in size and are usually more noticeable on the surface of the print. |
| Cause 1 |
Incorrect retraction settings and/or temperature fluctuations Blobs and pimples often occur when the printer retracts the filament too slowly or not far enough, causing excess filament to leak out of the nozzle. This can also be caused by inconsistent temperature control, where the heat from the extruder causes the filament to ooze out in unwanted areas. |
| Suggested Solutions |
|
Weak infill
| Issue/Title | Weak infill |
|---|---|
| Example Image / Graphic | 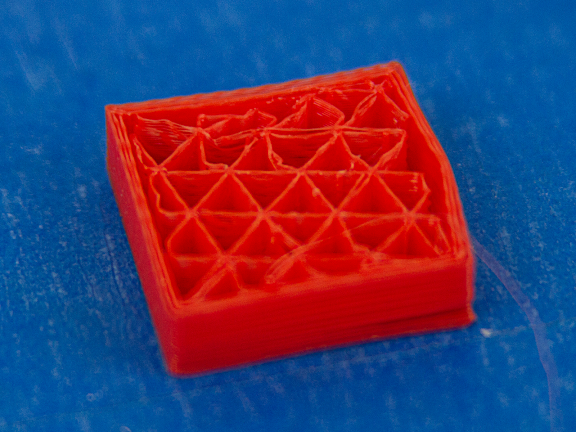 |
| Issue Details | The infill of the print, which provides internal support, is not strong or dense enough. This may result in a print that is weak, flimsy, or more susceptible to breakage. The infill may appear sparse, incomplete, or may not adhere properly to the rest of the print. |
| Cause 1 |
Incorrect infill settings and/or low print temperature Weak infill is often caused by incorrect infill settings in the slicing software, such as a too low infill density or an inappropriate infill pattern for the specific print. Additionally, a print temperature that is too low can lead to poor layer adhesion, resulting in a weak infill structure. |
| Suggested Solutions 1 |
|
Stops extruding in the middle of a print
| Issue/Title | Stops extruding in the middle of a print |
|---|---|
| Example Image / Graphic |  |
| Issue Details | The printer abruptly stops extruding filament during the print process. This can result in incomplete prints, with layers missing from the point of stoppage. The issue can occur at any point during the print and can affect any part of the model being printed. |
| Cause 1 |
Filament feed issues and/or extruder hardware problems The printer may stop extruding if there are issues with the filament feed, such as the filament running out, getting tangled, or being stripped. Additionally, hardware problems like a jammed nozzle or heat creep (where heat travels up the extruder, causing the filament to soften and jam before it reaches the nozzle) can also cause the printer to stop extruding. |
| Suggested Solutions 1 |
|
Infill showing on exterior of print
| Issue/Title | Infill showing on exterior of print |
|---|---|
| Example Image / Graphic | 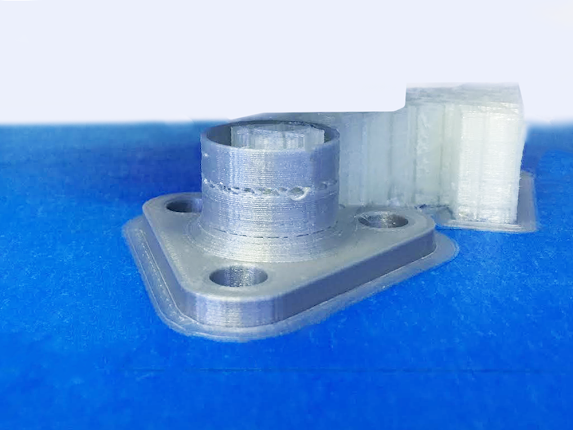 |
| Issue Details | Infill structure is visible on the top, bottom or sides of a printed part |
| Cause 1 | Infill shows on top or bottom surfaces due to insufficient number of top/solid bottom layers or wrong layer speeds |
| Suggested Solutions 1 |
|
| Cause 2 | Infill shows on side surfaces due to insufficient number of perimeters or too much infill overlap |
| Suggested Solutions 2 |
|