
Lighting Up 3D Printed Cosplay
Our April 2018 Hacker of the Month, Alina Granville, uses ABS, programmable LEDs and perseverance to create amazing props and cosplay!

Our April Hacker of the Month is an amazing cosplayer from Cambridge, Massachusetts who goes by the name of Spoon Makes; Alina Granville.
As a young girl growing up, Alina was given the Spoon moniker in grade school when mysteriously, a spoon flew out of her lunch box much to the amazement of her peers. As she grew older and began to create things, especially cosplay and props, she added the Makes as the second portion herself.
Alina’s first introduction to 3D printing was for an architecture class project back in 2009. She was able to print one section of her design on a powder-based, Z-Corp printer. After this, she continued to dabble in 3D printing for architectural design, broadening her efforts on Stratasys printers as well, but she really didn’t start getting serious about 3D printing cosplay until 2016.
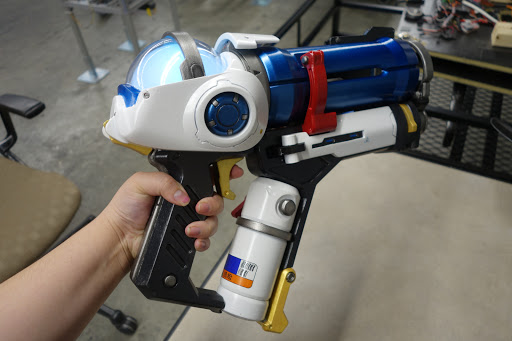
Mei's Endothermic Blaster
“At the time, the prop I was making had a very complicated shaped tail that needed to be glued to a vacuum, so I printed my only PLA prop ever on an Ultimaker2. The other half of the prop was carved from XPS foam sitting on my kitchen floor. My apartment isn’t big enough for tons of hand building and the mess it generates, so 3D printing seemed like the way to go in the future.”
Currently, she prints with a custom designed Core-XY printer with a build size of about 310x410x350mm - roughly based on the D-Bot build, it uses linear rails instead of wheels and a direct drive BondTech v6.
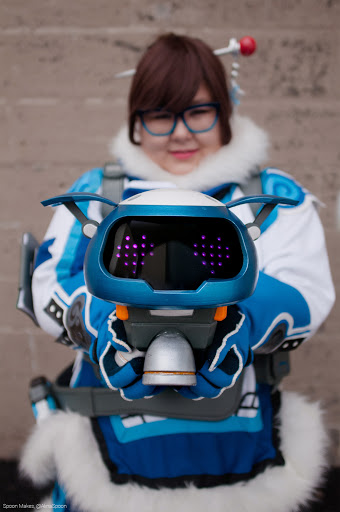
Alina as Mei from Overwatch, with her sidekick, Snowball
“It's design was driven based off my printing preferences and my need for producing props and cosplays. At the time I was looking for a way to 3D print some oversized clear flexible boots for my Torbjorn build, so my fiance and I built it last spring/summer to make the boots... it's our first personal printer! We could have bought something off the shelf, but nothing really suited my needs in a reasonable price range and it turned out to be an amazing experience and not too complicated. The process taught me how printers worked and since I know how everything goes together it is way easier to troubleshoot or make changes. I also regularly borrow a Flashforge Creator Pro; it's nothing fancy but it reliably gets the job done. On occasion, parts will be printed on a Markforged with nylon if a part needs to be a mechanically functional.”
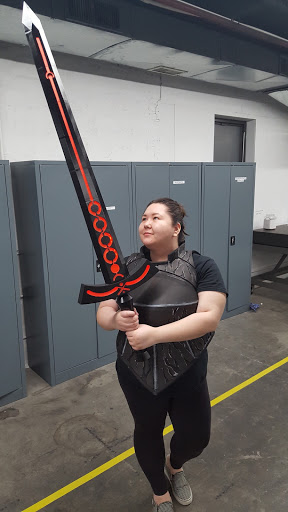
Alina likes to use ABS primarily because of its strength and ability to be welded. Last year her focus turned to transparent color ABS, which was perfect for her Torbjorn cosplay because there are few other materials that are structural, translucent, affordable and lightweight. She started to print with nylon for her cosplay, but she reports that the finishing options are more limited than ABS, and much more technically challenging for printing large cosplay objects. Because of her affinity for translucent ABS, her initial prop was a glowing sword for a Saber Alter cosplay. She also used translucent ABS and TPU primarily for her Torbjorn cosplay with various finishing techniques for the different components:
“Since I use ABS my finishing techniques differ from most cosplayers that use PLA, compared to them I use a lot fewer putties, fillers, and primers. My main post-processing method involves a combination of sanding and bushing on acetone to smooth and refine the prints. I've tried passive vapor polishing, but it didn't work that well for cosplay; there are issues fitting larger parts in the contained vapor, the vapor doesn't evenly distribute on all faces, it takes a long time to dry, and it just blurs all the detail. While labor intensive, brushing on acetone and allowing it to evaporate works well for me without eroding the details and the sanding dust seems to help smooth the print (also as a plus the acetone seems to bond the layers together better). I'll usually finish with 1-2 layers of sandable/filler/auto primer before paint, however, I had fine results skipping primer on my Torbjorn build. I stay away from using too much primer, it erases details and too thick layers are easy to chip. For joining pieces together I also use an acetone ABS juice, it's my go to. I know a lot of people like to use a thicker slurry, but I work with a thin consistency – it dries fast and doesn't get gummy; the key is to apply enough layers of the thin juice to soak/soften the parts before pressing them together. To fix gaps, cracks, and seams I have started using a 3D printing pen, followed by the brushed on acetone to weld it to the part, then sand it level with the print. I'll still use the filling putties if necessary or to be quicker, but there's no need to waste as much material slathering it all over the print to sand it off. For parts with glowing bits I found it is best to stay away from putties and sanding layers of primer. Even opaque filaments can have light bleed so anything with uneven layers can be seen under the paint. Finishing TPU, on the other hand, is an entirely different beast, which I haven't figured out any amazing consistent solution yet, right now I've been using a soldering iron and different flexible coatings and paint. Another fun technique I use on some pieces is dye! It's a good way to color translucent pieces if you don't have an airbrush.”
Alina's cosplay characters so far have been picked from some excellent sources, many of which come from Blizzard Entertainment; Nova from StarCraft/Heroes of the Storm, as well as Mei and Torbjorn from Overwatch. She has also completed a cosplay for Saber Alter, an anime take on the legend of King Arthur.
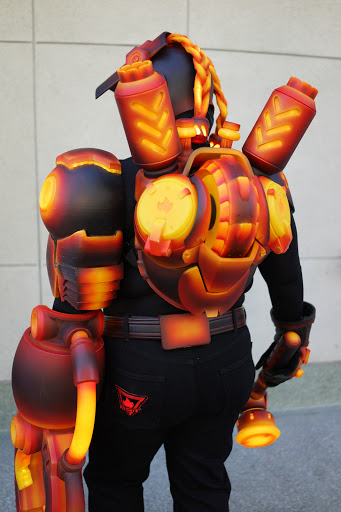
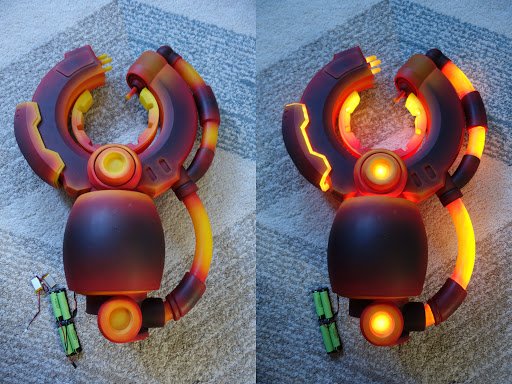
Alina's Tobjorn Cosplay Showing the Engine Detail (Picture by Eurobeat Kasumi)
“In cosplay, there are so many different techniques and materials people are using. The main reason I focus on printing is that it is relatively compact. Apartment living is rather tight, there's no garage or yard, there's no devoted messy space, there are no extra tables for big molds to cure. Printing, on the other hand, takes up a lot less space, easier to store filament spools than other materials, is, for the most part, an additive process (versus carving foam with a knife or Dremel which make a big mess), and as a plus produces lightweight, ultra clean and detailed results.”
As to why 3D printing is such a large part of her process for producing cosplay props?
“In terms of cosplay, it allows me to produce a clean product with high accuracy and detail. The final product is durable and can withstand the high stress traveling, sitting in hot cars (don't try that with PLA!), and the rigors of convention accidents (had a prop take a 5'+ fall onto rough concrete and all the epoxy joints broke but the print was only lightly scuffed up), all while being relatively lightweight. There are lots of other materials used in cosplay like EVA and XPS foam, worbla, and thibra, and casting resins...but I see 3D printing as a middle ground between them all in terms of price, weight, strength, and ease of use.”
Torbjorn's Claw With the Lights On and Off
“I also say the printer is like an extra set of hands. It's almost like I can double my work time since I can spend the time modeling, then while it's printing I can work on other things! However, I personally don't feel 3D printing speeds up the cosplaying process significantly if anything focusing solely on printing is slower than working by hand (due to long print times and dealing with print striations). Most people are using personal printers for printing very small and detailed things, but cosplay is large and detailed. I'm likely to spend extra time perfecting my models from references when I'm working in CAD, then if I was strictly working by hand where I might be more forgiving if it isn't as accurate. But in the end that pays off and can have some very professional results! If you're smart about it and work with multiple materials, 3D printing can really speed things up if you use it to print detailed tedious parts and use smooth flat stock to make the rest. Working through CAD and 3D printing can be really helpful at times for mockups, it's easy and quick to print off smaller versions of models to just wrap your head around complex designs or print small sections to check fit or joints. This is something cosplayers need to do more often as 3D printing can be unforgiving with mistakes. Depending on the 'anatomy' of the print, you can't just cut a model shorter or heat it into shape to make it work like other materials.”
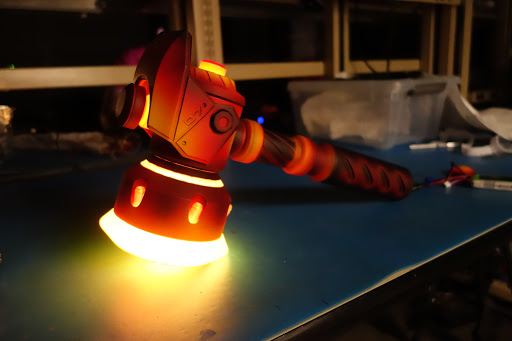
Torbjorn's Hammer in Molten Core Mode
3D printing has allowed Alina to produce amazing cosplay on a tight budget - something cosplayers are notorious for. She reports that without the access and low-cost availability of translucent ABS filament, her Torbjorn costume would not have been possible.
One of the best things about using 3D printing in making her amazing cosplays is the success of the costumes and props and the overwhelmingly positive feedback she has received - it keeps her coming back to do it again and again!
What cosplay is up next for Alina? If her FaceBook page is any indication, it looks like she will be going for the newest character to join the Overwatch line-up, a female engineer named Brigitte, who happens to be the daughter of Torbjorn!
For the future, Alina is working on doing some commission pieces, as well as starting a line of how-to videos on her production and finishing techniques for her wildly successful cosplay designs. We can’t wait to see what she dreams up and creates next, and we look forward to following up with her in the future - good luck Alina!
Want to be our next Hacker of the Month? Email chris.morgan@matterhackers.com, and tell us about your 3D printed creations - you could be featured in our next newsletter. Hacker of the Month wins 3 free spools of PRO Series PLA or ABS filament to further their pursuit of 3D printing greatness!
Hero image courtesy of John Jiao