
How To: 3D Print and Build a Custom Succulent Wall Hang
Add some greenery to your home or workplace by creating a customized 3D printed succulent wall hang. Follow the steps below!

I recently moved into a new apartment. Over the years I’ve collected plenty of wall decor, paintings, and posters - you know, the usual. I thought that I would have enough adornments to properly decorate the walls of my humble new abode. How wrong I was - you won’t believe the amount of wall space in what can best be described as a shoe box. After several unsuccessful trips to home decor stores, I turned to 3D printing to create a custom succulent wall hang to bring a little greenery into my home.
Check out some other weekend builds project ideas.
How to Make the Shape for Your 3D Printed Wall Hang
First, I needed to decide what kind of shape I wanted my wall hang to be. I picked the letter “R” for my first name, Rhonda - makes sense, right? Since Alec is pretty great with Solidworks, he helped me design an “R” in the Cooper Black font.
Now, I know that not everyone uses Solidworks or has access to talented 3D designers like Alec, so I’ve included some simple steps in Tinkercad, a free modeling software. Full disclosure, I am not a designer, and I have hardly ever used Tinkercad, so hopefully this gives you a better example of just how easy this is! To get a better grasp on how to use Tinkercad, check out the article How to use Tinkercad.
Step 1: Picking a Shape or Letter to 3D Print
Since Alec already created the “R” in Solidworks, I’m going to do a heart shape for this design. Select “Basic Shapes” in your dropdown shape menu in Tinkercad, and drag and drop the heart (or other shape/letter you’d like to use) onto your workplane.

Drag and drop the shape onto the workplane
Step 2: Scale the Shape or Letter
Scale the heart up by adjusting the sizes with the ruler function or by dragging the corners.
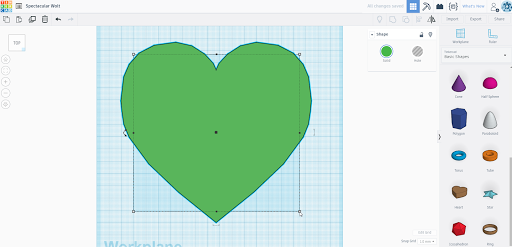
Drag the corners of the part to make your shape larger
Step 3: Duplicate the Shape
Next, we need to “hollow out” the heart. To do this, duplicate your shape by copying and pasting the heart. To do this, select your heart and press the copy image, and then the paste image.

Copy and Paste your object
Step 4: Scaling the Second Shape
Make your second heart slightly smaller and taller than the original heart by dragging the corners, and place it on the original heart like in step 2.
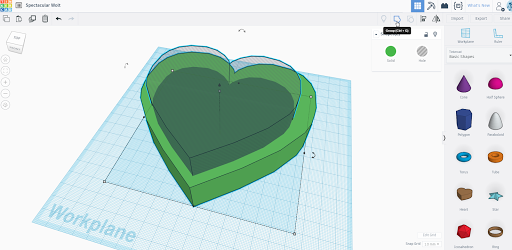
Step 5: Create a Rim/Edge
Adjust the second heart so that it sits just within the original heart - the top surface of the original heart should start looking like the rim/edge to the opening of the shape. You can change the color to see the second shape better by clicking on "Solid."

Make the smaller shape smaller and taller than the original shape
Step 5: Creating the "Hole"
Make the second heart into a hole by clicking on the heart and then the “hole” button. Note, not all letters and shapes will “inlay” as nicely as the heart does, so you might need to do multiple “hole” cuts to get your desired shape.

Change the second shape into a "hole"
Step 6: Creating a Base
Raise the heart “hole” up so that your original heart has a base. Do this by dragging the little cone-shaped arrow up.

Create a "base" by raising the second shape up
Step 7: Group the Shapes
Click and drag your mouse over both shapes (like you would highlight something) and click the “Group” button. This will “join” the two hears together, but since one is a hole, we’ve created some empty space.
Group the image to create the "hole"
Step 8: Create the Wall Mount Holes
Make 2 holes in the bottom of the design so it can be mounted to a wall. I did this by grabbing 2 cylinders and turning them into holes, dragging them down so they go all the way through the base, and grouping them together (steps 5-7).

Step 9: Export Your 3D Design for Printing
You’re done designing! Now you can export your file for a 3D Print.

3D Printing Your Custom Wall Hang
After slicing and scaling my letter “R” wall hang in MatterControl, I was ready to print. I used Metallic Bronze MatterHackers PRO Series PLA for my material because it has a nice sheen and matches some of the other accent colors that I have in my house. Learn how to print PLA filament like a pro here. The “R” was printed on the BCN3D Sigmax IDEX 3D printer. The Sigmax is a large 3D printer, so my letter is 273mm x 253mm (10.7” x 9.9”).
Building The 3D Printed Succulent Wall Hang
Since we’ve got our 3D printed letter/shape, we can no get into the build portion of the wall hang.
Materials
- Your 3D Printed Letter/Shape
- Hot Glue Gun or Superglue
- Wire Cutters
- Saw/Knife/Foam-cutting Device
- Green Floral Dry Foam
- Fake Succulent Plants
- Fake Filler Moss
- Pencil
- Scissors
Step 1: Cutting the Foam
I traced my 3D print using a pencil to get the general shape of the “R.” Instead of writing on the foam, I just jabbed it in there to make an indent. Yes, the reverse "R" looks weird!

Starting to get the outline of the foam for the letter
Step 2: Glue the Foam into the Letter
Once you have your foam in the correct size (I ended up breaking mine apart to make if fit better), glue it into place inside your shape.
Step 3: Create Wall Mount Holes in Foam
Since there is foam blocking the holes we’ll use to hang the letter, simply take the pencil and poke a small hole into the foam so there is room for a nail, screw, or whatever you want to use to hang it.
Step 4: Cutting Succulents
Use the wire cutters to cut the succulents so the stem is long enough to stick in the foam, but short enough so that they aren’t sticking out too far once inserted.
Using wire cutter to cut the succulents

Step 5: Placing the Succulents
I plotted which succulents I wanted where by making a little hole in the foam with the succulent’s stem. Then I glued the succulents into place once I was satisfied with my arrangement.

Step 6: Adding the Filler Moss
There will be some gaps in the succulents where you can see the foam. That’s where you will want to add your filler moss. I cut the moss to the shape that I need to fill, and then glue it in the place. In some instances, gluing is not necessary, as the succulents will keep the moss in place.
Cutting the filler moss to block the foam from sight

Step 7: Hang Your Custom 3D Printed Succulent Wall Hang
Hang your awesome new 3D printed Succulent Wall Decoration and let the compliments roll in!
Conclusion
Now that I have my new 3D printed succulent wall hang, the once barren walls of my apartment aren’t so barren anymore! I hope that this has inspired you to make a decoration of your own, or perhaps even for a friend!
If there is a 3D printing project you’d like to see or submit for a Weekend Build, let us know in the comments below, or shoot an email to support@matterhackers.com.