
How to Succeed when 3D Printing with PETG Filament
This in-depth guide provides everything you need to succeed when printing with PETG filament. Embrace the fantastic properties of durable and easy to print, PETG filament!

PETG has become a very popular 3D printing material thanks to it's ease of printing, mechanical strength, thermal resistance, and incredible color options thanks to natural PETG being so clear. There are a few things to know before getting started, like the need for an all-metal hotend and the necessity of well-tuned retraction, so we've put all our PETG expertise into this article so you can get out of the gates strong and start making amazing PETG 3D prints today. Let's get into it!
-
Table of Contents - Jump to PETG 3D Filament Help Topic You Need
- What is PETG Plastic?
- Hardware Requirements To 3D Print With PETG
- Hotend Requirements To 3D Print With PETG
- Temperature Required? - 250°C
- Do I Need An All-Metal Hotend? - For most brands.
- Is An Abrasive Resistant Nozzle Required? - Not usually.
- How Should I Set My Layer Cooling? - Maximum 50%.
- Bed Requirements To 3D Print With PETG
- Bed Temperature Required? - Minimum 65°C.
- What Bed Surface Works Best? - Many options, LayerLock Powdercoated PEI is ideal.
- Do I Need Bed Adhesives? - Not always, but Magigoo can help.
- Hotend Requirements To 3D Print With PETG
- Changing PETG Filament
- Getting the First Layer Right
- Difficult When Wet
- What to do When Things go Wrong - PETG Filament Troubleshooting
What is PETG Plastic?
PETG is an extremely common polymers used today that you likely encounter without even realizing it. Basically any clear plastic bottle is going to be made of PET (Polyethylene Terephthalate) or PETG (Polyethylene Terephthalate with a glycol modifier) and in fact many consumer 3D printers utilize PETG or some derivative to makeup their 3D printed structural components. When used as a 3D printing filament, PETG has found its home as the more accessible "durable 3D printing filament" due to its relatively stable 3D printing properties that make it easy to print and yet capable of being in low-heat or high-strength environments.
You’ll often see references to PETG in one of the following forms: PET, PETG, PETT, and many others. This can make it seem like these are many different filaments when in reality they are just slight variations in the formula to create a material that is more translucent, stronger, or more flexible. In terms of print settings, across all these variants they will be approximately the same, with some minor tweaks here and there to reduce stringing or improve layer adhesion.
If you're used to printing with PLA, then you might not have considered a unique attribute of PETG: that it's ductile. Where PLA may be able to withstand more force without breaking, when it hits the threshold where it'll break it is very sudden and without warning. In contrast, PETG will bend a little before it breaks, so you can see a failure before it happens. It's the different of printing a PETG shelf bracket that's starting to droop and a PLA shelf bracket that dumps your books onto your desk and monitors.
With PETG you can also take that ductility and use it in the design of some purposefully flexible geometry. Snap fit enclosures, where small tabs bend out of the way and snap into a channel once a lid is fully pressed in place, are a beautiful opportunity to utilize PETG. Or you can design a part that needs to rigidly hold something else without being too difficult to insert, like a bearing holder on a 3D printer part.
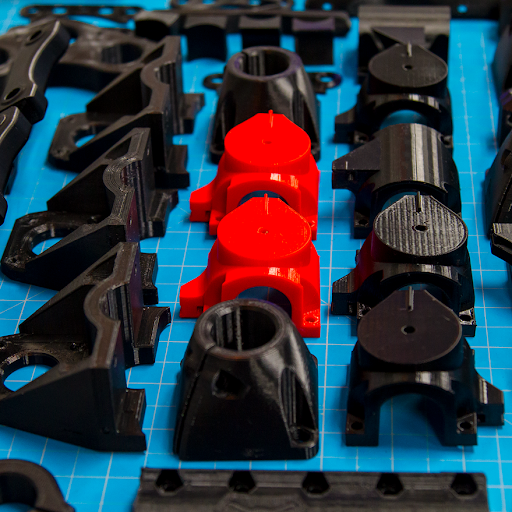
PETG 3D printing filament is a great material for functional prototypes and end-use parts.
Hardware Requirements
Hotends
There are many variations to the PETG formula, which makes specifying one temperature to print at a difficult claim. Some have additives that bring their printing temperature significantly lower while others bring the temperature significantly higher. Essentially, start with 245°C and play around with 5°C higher or lower to find the ideal print quality for you.
Some 3D printers utilize a PTFE (teflon) lined hotend as it is easier to manufacture than a hotend that is all-metal from the heatsink to the nozzle. PETG's printing temperature is right at the threshold of the temperature that PTFE begins to degrade, so some 3D printers might be able to get away with lower-temperature PETG filaments that have an ideal temperature at 240°C or less. For the most part, PETG does require an all-metal hotend to be able to tune your filament to its fullest, as in while you may have successful prints at 240°C, you don't achieve full strength until 255°C.
In general, PETG is non-abrasive, but once you start playing with additives it becomes a case-by-case basis. Sparkly filament isn't abrasive despite having non-PETG material in it, but it's common to add carbon-fiber to increase the stiffness and strength of the finished 3D prints, which is extremely abrasive. An easy way to avoid these concerns is to swap over to an Olsson Ruby nozzle or a Nozzle X when you want to use these materials.
Layer cooling is only occasionally necessary. This does depend on the 3D models actually being printed, as moderately sized models can be printed without cooling and come out beautifully, but tall and thin models with short layer times may need some gentle cooling to hold its shape. 50% is the maximum you will need for extreme overhangs or short layers, otherwise you are free to leave the fan off for the best layer adhesion possible.
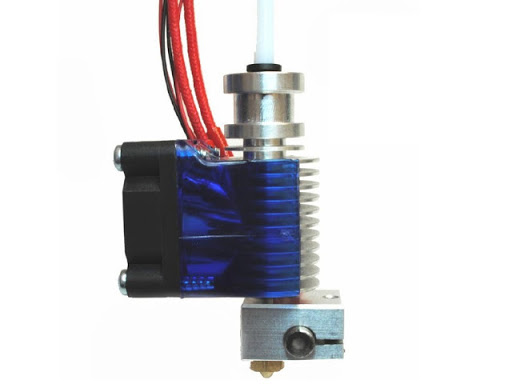
E3D v6 All-metal Hotend
Bed Requirements
For the best chance of success, you will want to make sure you have a heated bed set to 65°C. Some PETG is more warp-prone than others, so higher temperatures may be required to give them enough adhesion to the bed. If you're having difficulty, bump the temperature up by 5°C at a time until adhesion improves.
As for the bed surface itself, you have quite a few options to work with, keeping in mind that it's not an exhaustive list, just the big players. Let's take a look at each surface individually:
- LayerLock Powder-Coated PEI - A textured, flexible build surface that can add a unique look to your 3D prints. Make sure you already have a magnetic system in place for this to work properly and keep it clean with the highest percentage isopropyl alcohol you can find. You may need to "smoosh" the first layer a bit more than you're used to to get it to stick, but once it is cooled it usually pops off without touching it.
- LayerLock Garolite - While it is the ideal surface for 3D printing with nylon, LayerLock Garolite is still quite versatile and can be used to support PETG 3D printing. You will want to use any of the adhesives listed below to get additional bed adhesion to lock down your PETG 3D prints. A little roughing up with some high-grit sandpaper can also refresh your garolite and give it more bite for your 3D prints to hold onto.
- Glass - If you want a glossy smooth bottom to your 3D prints, this is the way to go. You will want to use an adhesive of some sort though (check the list below) as a release agent as some users have torn chunks of glass out of their bed as it adheres to their clean PETG print's first layer.
- BuildTak - An adhesive sheet you can apply directly to your 3D printer's bed or on top of a Flexplate. No adhesive solution necessary, simply wait for your bed to cool and use a BuildTak spatula or twist the Flexplate to remove your print. A word of caution though, as printing too close to the BuildTak can permanently bond the two together and tear chunks of it off your printer's bed.
- BuildTak PEI - An adhesive sheet you can apply directly to your 3D printer's bed or on top of a Flexplate. Basically magic. Sticks solid when hot and pops off with a gentle tap when cool. You may need to bump the temperature up slightly to get enough adhesion to stick (near 70°C should be plenty). A thin smear of an adhesive is highly recommended to prevent the PETG from permanently bonding to the PEI.
- GeckoTek - An adhesive sheet you can apply directly to your 3D printer's bed or on top of a Flexplate. Available in both a hot and cold variant to better suit the capabilities that your 3D printer has.
- Wham Bam PEX - An entire flexible bed system adhered to the 3D printer's bed. A strong magnet keeps the spring steel with an adhesive sheet of PEX applied to it secured to the printer's bed during the print, but can be easily removed and flexed to pop your print off.
There are always new and exciting methods for bed adhesion being developed, so it's important to have a good grasp on what each method is best used for. You can check out our 3D Printing Essentials article about bed surfaces to fully understand the pros and cons of every bed surface you might come across while 3D printing.
In addition to build surface upgrades, there are also a wide variety of 3D printer adhesives that you can apply to your 3D printer's bed to get a great first layer. These adhesives are specifically developed for the 3D printing industry, so you can trust they have been tested to be tried and true 3D printer adhesives. Here are the best 3D printer adhesives that you can use to get the best first layer for PETG filament:
- Stick Stick 3D printer adhesive
- Magigoo 3D printer adhesive
- 3DGloop! 3D printer adhesive
Most 3D printer bed adhesives have the same instructions for use: apply a thin layer to the build surface where your actively 3D printing. Then, wait for your part to cool before removing - waiting for your 3D printed part to cool makes it much easier to remove, and certain adhesives will sometimes even "pop" the part off the bed once cooled.
Changing Your PETG 3D Printing Filament
When switching between two PETG spools and colors:
- While the extruder is cold set the heat to 245°C and wait for it to heat up.
- When you reach 245°C, release tension on the extruder (by either squeezing the tension release, flipping a latch, or completely unscrewing the adjustable tensioner), and quickly, but consistently pull on the filament to remove it from the hotend without breaking.
- Continue releasing tension on the extruder and insert the new filament until it reaches the nozzle.
- Run the new color through the extruder until it runs clean and the new color is all that is coming out of the extruder. If you are switching from a dark color (such as black) to a light color (like white or natural) run a while longer to be sure you don't have any dark contamination. Without this step it's possible to be a couple layers in and have the last bit of filament finally purge out.
Getting the First Layer of Your PETG 3D Printed Part Right
The first layer is the most important part of any print - it sets the foundation that the entire print builds on. You can check out the in-depth article on how to get a perfect first layer 3D printing first layer, or for a brief summary of what to consider below are the few things you need to do to get the first layer to stick well.
- You need the print bed to be level.
- You need the nozzle to be the correct distance from the bed at the start of the 3D print.
- You need a good base material for your PETG to adhere to.
Below is a video from MatterHackers' 3D Printing Essentials series that will help guide you in the right direction for getting a stellar first layer. In this video, we'll walk you through the steps mentioned above in detail so you can succeed when 3D printing with PETG filament.
Difficult When Wet
There are 3D printing materials which are hygroscopic, which means it will actively absorb moisture from the air. This is a factor that you can't change in the material, so a hygroscopic material left out for long enough will reach saturation until it can no longer absorb water. Thankfully this is a fully reversible process without any material degradation. Best practices before 3D printing with any PETG filament is to thoroughly dry it out with a PrintDry PRO for several hours (or overnight if you have the time) and print with it immediately. Unless you live somewhere extremely humid without any temperature controls, your spool of PETG should be dry enough for use for several weeks before needing to be dried back out again.
Wet 3D printing filament doesn't just impact the appearance of your 3D print, but breaks down the molecular chains and creates a significantly weaker 3D print, which is why it's so important to make sure your filament is dry. Check out our in-depth article on how moisture affects your filament, and how you can successfully dry your 3D filament filament and water.
PETG 3D Printing filament is a durable and easy-to-print materials making it great for functional, end-use parts.
What to do When Things go Wrong When Using PETG 3D Printing Filament - PETG Filament Troubleshooting
There are a few key things to check when your prints aren't working. But before we look at solutions we need to have a brief description of your symptoms.
"I can't tell if my printing temperature is right "What to Look for if you are having trouble getting your PETG filament temperature right:
- If the temperature is too high
PETG tends to get stringier the higher you take the temperature. Small cobweb like strings will web between different parts of the 3D print until it eventually balls up and sticks to your nozzle, heater block, or wall of your progressing 3D print. As long as you are confident that your filament is dry and you are still encountering stringing, lower the temperature by 5°C and see if that improves the situation. If not, you may just need to adjust your retraction settings for this slightly more flowy PETG. - If the temperature is too cold
You will either see that the filament is not sticking to the previous layer or that less filament is being extruded than necessary. You will get a part that is not strong and can be pulled apart easily or visually has many small voids along its walls where filament couldn't be extruded well enough. In either case, you should increase the temperature by 5°C and try again until you get consistent extrusion and layers that fully adhere to each other.
"I can't get the first layer to stick."
- Make sure the nozzle is at the right height.
Check out the 3D printing Essentials: Bed Leveling for what to look for in an ideal first layer. PETG, contrary to almost every other material, actually prefers to be "laid down" onto the surface rather than smeared into it. Raise your nozzle from your bed ever so slightly so it's not as squished as usual. - Make sure the print bed is level.
Check out the 3D printing Essentials: Bed Leveling for best practices when leveling your bed. If part of the bed is too far from the nozzle and the other part of the bed is too close, filament can drag around and create compounding problems.
"The part has bad internal layers and top surfaces."
- Check the temperatures.
Make sure you’re printing at the right temperature and that your bed is the right temperature. Too cold on either of these and there won't be enough adhesion between the two surfaces. - Check the filament tension.
Too loose and the extruder gears won't have the bite they need to push the filament around, too tight and filament can be deformed and not extrude reliably. - Clean the filament drive gear (if it looks clogged).
If you had a print fail where the job continued but no filament was being extruded, then the drive gear likely chewed a spot in the filament and filled its teeth with filament, reducing its overall grip.
"The outside edges of my parts have lots of little bumps on them."
- Make sure your printer is getting enough data.
If printing from a computer, ensure that the computer is not too busy to feed the printer commands. If the printer is pausing it is usually due to the printer being too busy. - Print from SD card.
You can get around this by printing from an SD card. Sometimes this means you lose the ability to control the printer from your PC, but its a guaranteed way to remove your PC's hardware capabilities from the equation. - Source better PETG.
We have found that the quality of your print material can have a big impact on the quality of your part. Getting better PETG can help you get better parts. However, don't be too quick to assume the problem is in your PETG. With the right settings and patience hobbyists have succeeded in printing all sorts of materials many of which have very low viscosity and inconsistency. You should be able to get at least usable parts even with some lower quality filament. - Your retraction settings need tuning.
If your retractions settings aren't set right, your printer could be overextruding after each retraction leaving little bumps at the location where it started extruding again. Play with the "extra restart distance" and see if that helps. - Your filament is wet.
Many filaments can absorb water from the air and PETG is one of the most notorious. Because PETG is hygroscopic, you need to dry your spool before using it, which can easily be done using a PrintDry PRO to pull the moisture out of your filament. When not in use, you can also use silica gel packets to prevent your spool from reabsorbing water, but these packets won't pull moisture that is already present in the filament.
"Tall sections of my prints look melted or squished together."
- Print more than one part at a time.
By adding more parts to the build plate you are increasing the overall cross sectional area of each layer, giving more time for the separate objects to cool than if they were printed on their own. Since you can't use too much layer cooling without losing layer adhesion, adding more parts to the build plate is a suitable solution.
"My printer will not put out any material."
- Make sure your hot end is getting hot.
Check that the hot end is heating at all. If it is not you need to have your printer serviced. It is likely that you have a loose connection or your electronics have been fried (assuming the printer is still connected and responding to your host software :). - Clean the drive gear and adjust tension.
The first thing we are going to do is clean the filament touching drive gear and ensure that we have proper tension against the filament. Usually improper tension or a clogged drive gear will make the print look more like the picture we have for low temperature filament, but it sometimes does prevent extrusion all together. Clean the pinch wheel with a wire brush, and make sure your tension is good and solid (too much can also prevent extrusion and is more common with direct drives [the motor is directly connected to the drive gear] but less common with geared drives). - Remove the current filament.
It may be that you have a small particle in your extruder tip jamming the plastic. Use the change filament technique described above to pull out any particles that are in the extruder tip. - Check for and remove jams between the extruder and hot end.
This is the most extreme type of problem because now it is time to take things apart. Sometimes heat can creep up the filament in the extruder and cause a bulge that then cools and prevents any further extrusion. This is usually at the junction between the extruder and hot end. Take off the extruder and remove all the PETG you can (you may need the hot end hot (80c-100c) to get all the material out. If you can't get out all the filament by pulling it out you may need to try and drive it down through the hot end. We usually use a small allen wrench. If this fails you can try and drill out the extruder or hot end but you may need to replace parts. Be sure to take precautions against being shocked or burned. If you are not qualified to do this work find someone who is, rather than risk injury.
Thank you for reading How To Succeed When Printing In PETG.
Happy Printing! - MatterHackers
P.S. Check out our Filament Comparison Guide to get the scoop on all the latest and greatest filaments! Or browse the MatterHackers Store for all your filament needs.