MatterHackers Automatic Print Ejector - The Punching Machine


Achieve 3D printer autonomy by adding an Automatic Print Ejector to your machine. This mechanism will knock the printed part off the bed when it is finished printing. We like to call it the punching machine, you'll see why...
| List Price: | $0.00 |
|---|---|
| Price: | $0.00 |
| Price: | $... |
| Order Now: | Ships calculating... |
Developed by the MatterHackers Engineering Team - the Punching Machine gives your printer the ability to remove the printed part from the bed without any human interaction. See it in action below.
Here is a featured article on the background of this design and some more details on the assembly: The Punching Machine
Recommended Print settings:
- Layer Height: 0.2 mm Layers
- Perimeters: 2 Perimeters
- 30% Infill
Note: the boxing glove and wades_small_gear are licensed Creative Commonsare and reused and/or modified
Please share your adaptations to your printer! Send email including pictures, or better yet a video, to: support@matterhackers.com. We will update the webpage with your Print Ejector!
COMPONENT LIST (What you will need)
- Printed Parts (download them on this page)
- 1×NEMA 17 Stepper Motor
- 1×Polulu Stepper Motor Driver
- 1×OpenBeam 24 cm Extrusion
- 34×623ZZ Ball Bearings3mm ID, 9.5mm OD
- 14×M3 x 12 Bolts
- 2×M3 x 20 Bolts
- 18×M3 x 8 Bolts
- 30×M3 Nuts
- 20×M3 Washers

Code
The programming is also not complicated. I'm including the interesting parts here but the full thing is available on GitHub. The firmware is based on the OpenBeam branch of Marlin firmware. The changes should not be hard to patch into any other branch of Marlin, though.
I added a new G-Code command (G42) that activates the punching mechanism. It also accepts a feedrate (in Hz) so you can tell it how fast to punch. For example, "G42 F300". If you do not set a speed, it defaults to 50 steps/s. Here is the section from the G-Code parser in Marlin_main.cpp:
    case 42: // G42
      if(code_seen('F')) {
        punch(code_value());
      } else {
        punch(50);
    }
This is the actual punching code in pugilism.cpp.
void punch(float speed)
{
  int delayLength = 1000 / (speed*2);
  SERIAL_ECHOLN("WHAM!");
  // Enable driver
  digitalWrite(PUNCH_ENABLE_PIN, LOW);
  // Set direction
  digitalWrite(PUNCH_DIR_PIN, HIGH);
  // Punch
  // Idea: Ramp up speed
  for (int i=0; i<150; i++) {
    delay(delayLength);
    digitalWrite(PUNCH_STEP_PIN, HIGH);
    delay(delayLength);
    digitalWrite(PUNCH_STEP_PIN, LOW);
  }
  // Reverse direction
  digitalWrite(PUNCH_DIR_PIN, LOW);
  // Retract
  for (int i=0; i<150; i++) {
    delay(10);
    digitalWrite(PUNCH_STEP_PIN, HIGH);
    delay(10);
    digitalWrite(PUNCH_STEP_PIN, LOW);
  }
  // Disable driver
  digitalWrite(PUNCH_ENABLE_PIN, HIGH);
}
Basically it activates the driver, sends 150 pulses to the step pin, then reverses and disables the driver. 150 steps seems to be about the right distance since the stepper motor has 200 steps/revolution and I could tell from moving the linkage by hand that the gear rotates about 3/4 of a turn.
300 steps/s seems to be the ideal speed. It is quick and forceful, but not so fast that it overloads the stepper motor. Sometimes it skips steps while punching but this is fine because it resets its position when it retracts. I had an idea that you could get more power by accelerating instead of punching at a constant velocity. This wouldn't be hard to implement but I haven't done it yet.
Electronics
Wiring was pretty straightforward. I salvaged an old Pololu stepper driver from one of our spare RAMPS boards and used a ribbon cable with female headers to wire it up to the Brainwave. Here is the the wiring diagram from Pololu:
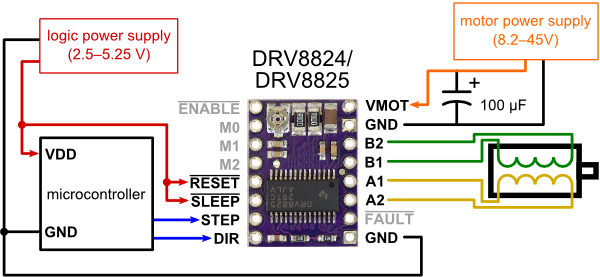
I used the 12V rail from the Brainwave for VMOT as opposed to the 24V rail from the Kossel's PSU. Not sure how much current the 12V line was intended for, but it seems to be doing all right. The STEP, DIR, and EN lines are hooked up to OC1B, OC1C, and OC1A, respectively. I didn't bother with microstepping because I wanted as much torque as possible. A pullup resistor on the EN line might be a good idea but I didn't include it. Here is the pin configuration added to the Brainwave Pro section of pins.h. I had to dig around in Arduino's pins_arduino.h to find the corresponding pin numbers.
#define PUNCH_STEP_PIN 26     // OC1B
#define PUNCH_DIR_PIN 27      // OC1C
#define PUNCH_ENABLE_PIN 25   // OC1A
The motor I found already had a connector on the end of it, but when I plugged it in it didn't want to work. I verified the motor connections using an old trick. If you jump two of the lines together and the motor becomes harder to turn, you know they are connected to the same coil. Rearranged the pins on the connector and everything was good.


MatterHackers Digital Designs are easy to access and ready to print within MatterControl.
Digital Design files can be accessed using MatterControl Software or MatterControl Sync. When logged in, Digital Designs can be found within the "Purchased" folder of your MatterControl Cloud Library.
| Price: | FREE |
|---|---|
| License: | loading |
| Instant Digital Delivery | |