
Essential 3D Printing Tools for SLA Resin Desktop Fabrication
Find all the essential tools you need to succeed with SLA resin 3D printing using this helpful guide.

Resin 3D printers are becoming part of every additive manufacturing workshop and prototyping facility faster than ever before. From manufacturer’s to members of the 3D printing community, it is made very clear to handle resin safely, but what’s not often talked about are the tools that are must-haves for any resin workspace. With FDM 3D printers, it’s fairly obvious the tools that you might need like glue sticks and spatulas, but it’s not quite as intuitive for SLA 3D printing. We’ve compiled a list of some of the most essential tools that you will need to be successful with your resin 3D printer, and created a tool kit that includes many of these vital tools as well.

Find essentials tools you'll need for a smooth resin 3D printing experience and more with MatterHackers Resin 3D Printing Tool Kit.
Table of Contents
Safety Gear
Safety is more important than ever when 3D printing with material like photopolymer resin. While filament in FDM 3D printing is harmless to the touch, many resins currently on the market are not safe to handle and inhale without protective equipment. Some brands like MH Build Photopolymer 3D Printing Resin are made out of a non-toxic formula that minimizes odor and is safe to handle—however, it is best practice to get into the habit of using the following safety accessories when producing parts with any resins.

Nitrile Gloves
A constant supply of nitrile gloves is crucial to have on hand. The types of resins used in resin 3D printers are not something you want to get on your skin. While some users will have a minor to no reaction, others could have a mild to severe allergic reaction. This makes it so important to keep your skin covered and to quickly—and carefully—clean any drips and spills you see.

Safety Goggles
Any time you are dealing with chemicals that are a potential irritant, it’s wise to use safety equipment to be better safe than sorry. A splash of resin in your eyes is definitely something to be avoided, and simple safety goggles is all you need to prevent harm. Even if you are careful and never spill any resin, there’s still the potential for fumes off-gassing from the resin to irritate your eyes. Safety glasses are miles better than nothing, but we recommend getting goggles as there leaves zero room for a splash to make contact with your eyes.

Face Mask/Respirator
Much like protecting your eyes from the resin and its fumes, it’s important to consider the rest of your face and the protective gear necessary. All it takes is one bad move and that necessitates an immediate dressing down and scrubbing your face clean of the splashed resin to prevent harm. When looking for a face mask, focus on finding one that protects against splashes first and odors second, as the odors, while stinky, aren’t as immediately damaging as a spill could be. The ideal choice would be something like a respirator that filters VOCs, as these are often made of silicone rubber that is non-reactive to chemicals and wouldn’t be affected by a splash.
Apron/Lab Coat
As hard as you might try, there will be a point where resin ends up somewhere you don’t want it to—either on your desktop, the floor, your nice shirt, or even on tools/items you could have sworn you were super careful with! An apron or lab coat is simple enough to put on before you work with resin to protect both your skin and your clothing. When you’re done cleaning your resin 3D prints, it’s easy enough to wipe down your apron, wash it, or hang it up again, ready for use after your next wave of finished resin 3D prints.
Print Removal
Sometimes prints like to stick a little too snugly to the build platform and/or vat. When you get better bed adhesion than you bargained for, a print removal tool is ideal to have on hand—especially since you don’t want to man-handle those green (uncured) prints which are still soft enough to distort if you use enough pressure/force. Check out the useful tools below in successfully removing prints from your build platform (as well as other additional useful uses).

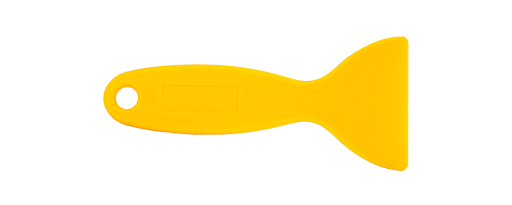
Plastic Putty Knife
With a beveled edge at the end, these plastic putty knives are a great versatile tool for removing the resin 3D prints on the build platform and in the vat. If you have any parts that stick to the bottom of your resin 3D printer’s vat, you won’t want to use a metal spatula/scraper to remove them, as you may damage the thin film used to release parts as they are printed. Instead, use a plastic putty knife to gently remove the failed 3D print without marring the surface. It’s also helpful to have one of these on hand to help mix up the resin if it’s been sitting in the vat for a while and the pigment has settled to the bottom.
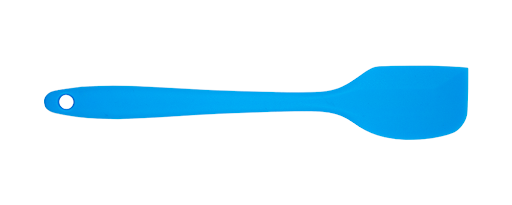
Silicone Spatula
Similar to the plastic putty knife, the silicone spatula works well to gently remove failed prints in the vat and mix the material in the vat without scratching up the FEP film. Note that a silicone spatula that has at least one 90º corner is ideal for removing prints. Added bonus—silicone is super easy to clean! If resin dries/cures on the spatula, simply flex it and it’ll come cleanly off. If on a more stiff part of the spatula such as the handle, simply chipping away at the cured resin works just as well.
Art Spatula/Palette Knife
Some resin 3D printed parts can have a really strong grip on the build plate as they need to survive against the forces of suction created when curing each layer. When you achieve that super strong bed adhesion, an art spatula is a handy tool that is small and thin enough to be able to wedge underneath the lip of a 3D print. Then you can slowly work your way around the perimeter of the part to gently pry it loose instead of aggressively stabbing at the part risking damage to the part or injury to yourself. Once you get the perimeter off the plate, the silicone spatula or plastic putty knife are great tools to finish the print removal job.

Art Spatula/Palette Knife
Post Processing and Clean Up
Finish your 3D printed SLA parts with the right tools and accessories to clean up your prints and keep your workspace tidy. Having these items on hand will save you a lot of time and effort down the line.

Flush Cutters
The supports that are automatically generated within 3D printer slicing programs can be small and spindly or thick and robust, so you need to have a tool that will have you well equipped for any scenario. Flush cutters are strong enough to snip through even the heaviest of supports with ease, and with their flat base you can get up close to the surface of the finished 3D print.

Soft Bristle Toothbrush
Cleaning off every drop of uncured resin is an important part of post-processing resin 3D prints; any resin left behind will affect the shape and texture of the print once you post-cure it with a UV light. In some cases, rinsing off the 3D print is enough to clean it off, but with models that have small details and tight spaces, it’s better to take a more active approach to clean the 3D print. A soft bristle toothbrush can help make quick work to scrub off any uncured resin and assist in working around the cleaning agent in the hard to rinse areas. It’s important to use a soft—NOT hard—bristle toothbrush as hard bristles can leave marks behind on your green parts.

Silicone Mat
A clean station is a safe workstation. Control the mess with a silicone mat dedicated to catching any drips and spills that occur before, during, and after your resin 3D printing sessions. A mat made of silicone is extra special because resin does not stick to silicone. Once you’re done working with resin for the day, simply leave your silicone mat out in the sun or some other form of intense UV light. Once the resin on the mat hardens and drys, simply flex the silicone mat until those hardened pieces pop off and voila! Your silicone mat is clean and you can safely dispose of that now cured resin with the normal trash. Cleaning messes has never been easier.

Solar Turntable
When curing parts during the post-process stage, it's important to make sure that every single surface of that resin-printed part gets cured in order to make them safe to handle to the touch and ensure they achieve maximum durability–enter the solar turntable. Some enjoy using nature's natural method–the sun–to cure their parts. Using a solar turntable not only turns your prints to ensure each side is being evenly cured but does it automatically thanks to its solar power aspect. It can also automatically function with a AA battery and under UV lights if desired.

Curing Light
Every post-processing station needs some method of curing your prints. Having a UV Curing Light is a great accessory for creating a DIY post-curing setup. If utilizing the sun isn't your preference, LED lamps are a fantastic alternative that gives you more control of where and when you want to convert those SLA parts into their final form. Pair this with the solar turntable and you've covered all the basic accessories needed to put together an effective post-curing station.

Isopropyl Alcohol
There are many different solutions that have been used to clean resin 3D prints, but isopropyl alcohol produces clean results while not foaming up if agitated. Other cleaning products like dish soap, while capable of cleaning resin off of the finished 3D prints, often foams or suds up as you scrub and shake up the finished part in a bath. Isopropyl alcohol doesn’t foam at all with the additional bonus of evaporating from the surface of the 3D print rapidly, preventing the need to wait long for the part to dry and move onto post-curing.

Isopropyl Alcohol
Paper Towels
Spills and drips happen—whether or not you expect them—which is why you will want disposable paper towels on hand to clean up any mess. Paper towels are effective at cleaning up messes. Just be sure to either dispose of them in a dedicated hazardous waste canister, or set the paper towels under intense UV light to quickly cure any of the resin on it, turning it solid and inert which makes it ready for disposal with normal trash.

Paper Towel
Separate Cleaning Containers for Isopropyl Alcohol and Water
To properly rinse your resin 3D prints, you will want to have two separate containers for cleaning your parts: one with isopropyl alcohol, the other with water. The first bath will remove most of the uncured resin off of the surface of the 3D prints, but once the alcohol evaporates, it can leave behind some resin from the new alcohol-resin mixture leaving the surface tacky. A second bath with clean water can help remove that thin coating of resin to leave the surface of your 3D prints smooth and tack-free. Note that you should NOT dispose of this isopropyl alcohol and water down the drain or into the environment after use. Leave them under intense UV light (such as the sun) to allow the liquid to evaporate and leave behind cured resin that is hardened and dry, signaling the material is inert and ready to be disposed with normal trash.
Resin Storage
Proper resin storage is integral to reducing waste. Check out the tools below that ensure storage is easy, clean, and effective.

Metal Mesh Strainer
When transferring resin around, you may have cured parts left in your vat that you can’t see through the thick and opaque resin. This mesh strainer should be used within the funnel to catch the cured resin as you are emptying out the vat, whether you are trying to change resins, store used resin in a container, or clean out the vat because you know there are solids mixed somewhere within it. By having solids within the vat, it’s possible for them to float between the build plate and vat causing the distance between them to be greater than the first layer and instantly fail your 3D print. Filtering out these particles will prevent that.

Silicone Funnel
FFF 3D printing has many different materials you can print with and resin based 3D printers are no different; there are flexible resins, resins that burn-out for investment casting, durable resins, and even fluorescing resins. To transition from one resin to another, you will need to transfer the contents of the 3D printers vat into a container separate from the original bottle to prevent contamination. A silicone funnel will make that process clean and easy. To clean the funnel once you are done, the best method is to set it in your post-cure UV bath to solidify any and all resin on it to render it inert and solid for easy disposal, rather than trying to wash and rinse it clean. Not only does this make cleaning super easy, but this silicone funnel, combined with the metal mesh strainer, also saves you from having to constantly purchase new disposable paper filters.

Resin Storage Container
Having a dedicated storage container for used or mixing resin is extremely beneficial for reducing resin waste and keeping your batch of unused resin fresh. While putting used resin with unused resin won’t ruin the entire batch, print quality results may be reduced. Leaving resin sitting in a vat for more than a day can affect the quality of the resin due to a number of factors such as the air quality of the room it’s sitting in, the room temperature, the level of humidity, amount of UV light coming into contact with the resin, etc. For mixing resin, a separate container is great for experimenting. If storing resin in a separate container, make sure to choose one that is light proof for proper protection from UV light.

Finding the tools you need to be successful with 3D printing is just as important as finding the right 3D printer for the job. Many of the tools listed here can be found via MatterHackers Resin 3D Printing Tool Kit. These are the accessories and tools that the MatterHackers Pros have found to be effective when we are 3D printing with resin 3D printers, but if there are any that help you in your process that we didn’t mention here, we would love to hear about them in the comments below.
Happy printing!

The path to successful SLA 3D printing is smoother using the essential tools found in MatterHackers Resin 3D Printing Tool Kit.